background image

8

Maintenance

MAINTENANCE

Before servicing or making adjustments to machine, stop engine on tow vehicle and remove key

from ignition. Securely prop Aer-8 on jack stands.

Use all procedures and parts prescribed by the manufacturer.

Before operating this machine, become familiar with all controls and functions of this unit and the tow vehicle.
Also complete all maintenance requirements and read all safety warnings. By knowing both machines thor-
oughly, how it operates and by doing the prescribed maintenance steps, you can expect relatively trouble-free
operation for years to come.

TOW VEHICLE

You will need a heavy duty vehicle with 4 wheel brakes and 3-point hitch. 3-point is standard on  Aer-8 Aerifier.

Transport Frame Assembly requires a clevis hitch and  a 

3

/

4

 diameter by 4" pin with some type of lock. Tow

vehicle must be capable of 825 lb tongue weight.

DAILY CHECKLIST

1. Check engine oil level in tow vehicle.  Add as needed. DO NOT OVERFILL.

2. Check aerifier for loose or missing nuts, bolts, screws, etc., and tighten or replace as needed..

3. Check that all tines are in good condition.

4. Grease bearings daily after each use.

If transport frame assembly in installed:

5. Check hydraulic hoses for any leaks or loose connections.

6. Check tire pressure. 20 psi (1.4 bar)

7. Check electrical system for loose connections or frayed wiring, including battery cables. Replace any

faulty equipment or tighten if loose.

OPERATION SAFETY

1. Before operation check to see that reel is rotating properly.

2. 3-point lift arms of tow vehicle must not be locked, but in floating position.

3. Always lift tines completely out of the soil before making sharp turns.

4. Do not aerate during extended periods of dry periods without irrigation.

5. When not in use, remove the jack pin and extend the legs to maximum extension, reinsert the jack pin

and secure with a clip. Always use jack stands for safe storage.

LUBRICATION

Use No. 2 General Purpose Lithium Base Grease and lubricate DAILY.  The  Aerifier  has 2 grease fittings, one
on each pillow block on each side of the reel. When inserting grease, be careful not  to ruin the seal, if this hap-
pens, replace the seal at once. Be sure to wipe grease fitting clean before injecting grease. Give only one or two
pumps of grease at each lubrication.

Summary of Contents for AER 8 Aerifier

Page 1: ...Product Support Hwy SS Poplar Ave Cameron WI 54822 1 800 891 9435 productsupport smithco com Parts Service 60 78 AER 8 Aerifier Serial AER60 005 AER78 005 July 2012 Operators...

Page 2: ...ER8 001 Hydraulic Transport Frame 12 AER8 003 Hydraulic Hose Kit 13 AER8 002 Electric Hydraulic Lift System 14 15 AER8 Charging Harness 16 3 Point Hitch 17 Turf Quake Tine 5 Spacing 18 19 Turf Quake T...

Page 3: ...ntain safety operat ing assembly and maintenance instructions Failure to do so could result in personal injury or equipment dam age Keep manuals in a safe place after operator and maintenance personne...

Page 4: ...of control or tipping of the vehicle A Use extra caution in backing up the vehicle Ensure area is clear B Do not stop or start suddenly on any slope C Reduce speed on slopes and in sharp turns Use ca...

Page 5: ...20 HP 15 kW Heavy Duty Vehicle with 4 wheel brakes Capable of 825 lb 374 kg tongue weight ACCESSORIES TINE REELASSEMBLIES FOR REPLACING ENTIRE TINE REELASSEMBLY 60 78 AER8 60R601 AER8 78R781 Turf Qua...

Page 6: ...ight is 200 lbs per ft of machine width 1 The Aer 8 must be able to float The tractor must be equipped with a float position on the lower link arms The float position will allow the tines to float upw...

Page 7: ...ook the rear cylinder if not already done There is a cylinder lockout attached to the rear pivot arm This is a security guard used when the cylinder needs to be extended for a long period of time such...

Page 8: ...u will have to supply your own quick couplers to attach hydraulic hoses to your tow vehicle 2 Hydraulic fittings and hoses should be attached to the cylinder If not connect one end of hoses to the cyl...

Page 9: ...the ground Lift Aer 8 out of the ground when making sharp turns 7 Compacted areas may have to be aerated more than once 8 When Aer 8 is not in use remove jack pins extend legs to maximum extension rep...

Page 10: ...e as needed 3 Check that all tines are in good condition 4 Grease bearings daily after each use If transport frame assembly in installed 5 Check hydraulic hoses for any leaks or loose connections 6 Ch...

Page 11: ...psi 1 4 bar Improper inflation will reduce tire life considerably SERVICEINTERVALS Before each Use Lubricate all bearings on reel Use No 2 General Purpose Lithium Base Grease Check tow vehicle fluid...

Page 12: ...d before using Fast Charge Charge battery at 15 amps for 10 minutes or 7 amps for 30 minutes Do not exceed the recommended charging rate If electrolyte starts boiling over decrease charging Always rem...

Page 13: ...level ground 6 Lower all 4 jack stands if Transport Assembly is not installed Secure pins 7 If transport Assembly is installed lower front jack stands and the trailer hitch on the tongue Secure pins...

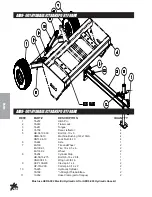
Page 14: ...10GA 4 HNTL 34 10 Lock Nut 3 4 10 4 6 74 244 Axle 1 7 60 130 Tire and Wheel 2 60 130 01 Tire 18 x 9 5 x 8 2 60 130 02 Wheel 2 8 74 254 Cylinder Stop 1 HB 38 16 275 Bolt 3 8 16 x 2 3 4 1 HNW 38 16 Win...

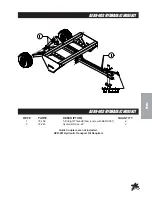
Page 15: ...LICHOSEKIT AER8 003HYDRAULICHOSEKIT REF PART DESCRIPTION QUANTITY 1 18 168 3 8 Straight Thread Elbow come withAER8 001 2 2 74 246 Hydraulic Hose 22 2 Quick Couplers are not included AER 001 Hydraulic...

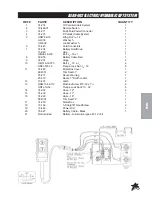
Page 16: ...14 Parts AER8 002ELECTRIC HYDRAULICLIFTSYSTEM...

Page 17: ...x 1 1 8 22 055 Battery Cable Red 1 9 74 231 Hinge 2 10 HB 516 18 075 Bolt 5 16 18 x 3 4 6 HNFL 516 18 Flange Lock Nut 5 16 18 6 11 74 248 Motor Box Cover 1 8947 31 Trim Seal 31 2 25 277 Decal Warning...

Page 18: ...16 Parts...

Page 19: ...REF PART DESCRIPTION QUANTITY 1 74 279 3 Point Hitch Frame 1 2 HB 34 10 300 Bolt 3 4 10 x 3 6 HMB 34 10 Machine Bushing 3 4 x 10GA 6 HNTL 34 10 Lock Nut 3 4 10 6 3 74 282 Mount Brackets 2 4 HB 38 16...

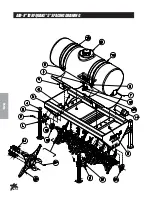
Page 20: ...18 Parts AER 8 TURFQUAKE 5 SPACINGDRAWING...

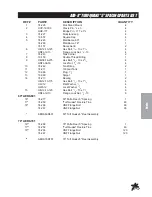
Page 21: ...8 16 Lock Nut 3 8 16 4 10 74 242 Tank Strap 2 11 74 211 100 Gal Tank 1 12 10 389 Plug 11 4 1 13 16 960 Spigot 1 14 74 213 Bearing 2 HB 12 13 175 Hex Bolt 1 2 13 x 13 4 4 HW 12 Flat Washer 1 2 4 HWL 12...

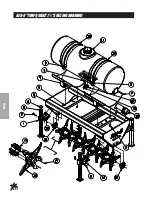
Page 22: ...20 Parts AER 8 TURFQUAKE 7 SPACINGDRAWING...

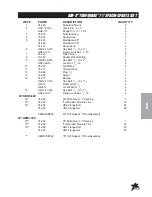
Page 23: ...16 Lock Nut 3 8 16 4 10 74 242 Tank Strap 2 11 74 211 100 Gal Tank 1 12 10 389 Plug 11 4 1 13 16 960 Spigot 1 14 74 213 Bearing 2 HB 12 13 175 Hex Bolt 1 2 13 x 13 4 4 HW 12 Flat Washer 1 2 4 HWL 12 L...

Page 24: ...22 Parts AER 8 ALLSTAR 5 SPACINGDRAWING...

Page 25: ...NTL 38 16 Lock Nut 3 8 16 4 10 74 242 Tank Strap 2 11 74 211 100 Gal Tank 1 12 10 389 Plug 11 4 1 13 16 960 Spigot 1 14 74 213 Bearing 2 HB 12 13 175 Hex Bolt 1 2 13 x 13 4 4 HW 12 Flat Washer 1 2 4 H...

Page 26: ...24 Parts AER 8 ALLSTAR 7 SPACINGDRAWING...

Page 27: ...TL 38 16 Lock Nut 3 8 16 4 10 74 242 Tank Strap 2 11 74 211 100 Gal Tank 1 12 10 389 Plug 11 4 1 13 16 960 Spigot 1 14 74 213 Bearing 2 HB 12 13 175 Hex Bolt 1 2 13 x 13 4 4 HW 12 Flat Washer 1 2 4 HW...

Page 28: ...26 Parts AER 8 AERFINE 3 SPACINGDRAWING...

Page 29: ...960 Spigot 1 14 74 213 Bearing 2 HB 12 13 175 Hex Bolt 1 2 13 x 13 4 4 HW 12 Flat Washer 1 2 4 HWL 12 Lock Washer 1 2 4 15 HB 12 13 125 Hex Bolt 1 2 13 x 11 4 8 HNFL 12 13 Flange Lock Nut 1 2 13 8 22...

Page 30: ...28 Parts AER 8 AERFINE 5 SPACINGDRAWING...

Page 31: ...13 x 13 4 4 HW 12 Flat Washer 1 2 4 HWL 12 Lock Washer 1 2 4 15 HB 12 13 125 Hex Bolt 1 2 13 x 11 4 8 HNFL 12 13 Flange Lock Nut 1 2 13 8 60 AER8 606 16 74 239 60 Core Fine Shaft 1 17 74 251 Core Tine...

Page 32: ...30 Parts AER 8CORINGTINESDRAWING...

Page 33: ...175 Hex Bolt 1 2 13 x 13 4 4 HW 12 Flat Washer 1 2 4 HWL 12 Lock Washer 1 2 4 15 74 215 Shaft Flange 2 16 HB 12 13 125 Hex Bolt 1 2 13 x 11 4 8 HNFL 12 13 Flange Lock Nut 1 2 13 8 60 AER8 607 17 74 23...

Page 34: ...32 Parts REARROLLERDRAWING...

Page 35: ...HW 58 Washer 5 8 2 7 74 213 Bearing 2 13 HB 38 16 125 Bolt 3 8 16 x 11 4 4 HNTL 38 16 Lock Nut 3 8 16 4 14 74 250 LH Roller Bracket 1 HG 14 28 180 Grease Fitting 1 15 74 278 Spacer 2 60 AER8 610 8 74...

Page 36: ...ctor 4 corners of main frame 74 157 Decal Aer 8 Main Frame Sides 74 210 Decal Hang Tag Aer 8 002 76 305 Decal Rotating Parts Reel Housing QUICKREFERENCE BATTERY NOT SUPPLIED AUTOMOTIVE TYPE 24F 12 VOL...

Page 37: ...you need help locating an Authorized Smithco Distributor or if you have questions regarding your warranty rights or responsibilities you may contact us at Smithco Product Support Department 200 W Pop...

Page 38: ...ty gives you specific legal rights and you may also have other rights which vary from state to state THERE ARE NO OTHER EXPRESS WARRANTIES OTHER THAN THOSE SET FORTH ABOVE ALL IMPLIED WARRANTIES OF ME...

Reviews: