background image

8

Introduction

SAFE PRACTICES

1. It is your responsibility to read this manual and all publications associated with this machine (engine,

accessories and attachments).

2. Never allow anyone to operate or service the machine or its attachments without proper training and

instructions. Never allow minors to operate any equipment.

3. Learn the proper use of the machine, the location and purpose of all the controls and gauges before you

operate the equipment. Working with unfamiliar equipment can lead to accidents.

4. Wear all Personal Protective Equipment (PPE) on your head, eyes, ears, hands and feet. Operate the

machine only in daylight or in good artificial light.

5. Inspect the area where the equipment will be used. Pick up all debris you can find before operating.

Beware of overhead obstructions and underground obstacles. Stay alert for hidden hazards.

6. Never operate equipment that is not in perfect working order or without decals, guards, shields, or other

protective devices in place.

7. Never disconnect or bypass any switch.

8. Carbon monoxide in the exhaust fumes can be fatal when inhaled, never operate a machine without

proper ventilation.

9. Fuel is highly flammable, handle with care.

10. Keep engine clean. Allow the engine to cool before storing and always remove the ignition key.

11. After engine has started machine must not move. If movement is evident, the neutral mechanism is not

adjusted correctly. Shut engine off and readjust so the machine does not move when in neutral position.

13. Never use your hands to search for oil leaks. Hydraulic fluid under pressure can penetrate the skin and

cause serious injury.

14. This machine demands your attention. To prevent loss of control or tipping of the vehicle:

A. Use extra caution in backing up the vehicle. Ensure area is clear.

B. Do not stop or start suddenly on any slope.

C. Reduce speed on slopes and in sharp turns. Use caution when changing directions on slopes.

D. Stay alert for holes in the terrain and other hidden hazards.

15. Before leaving operator’s position for any reason:

A. Disengage all drives.

B. Lower all attachments to the ground.

C. Set park brake.

D. Shut engine off and remove the ignition key.

16. Keep hands, feet and clothing away from moving parts. Wait for all movement to stop before you clean,

adjust or service the machine.

17. Keep the area of operation clear of all bystanders.

18. Never carry passengers.

19. Stop engine before making repairs/adjustments or checking/adding oil to the crankcase.

20. Use parts and materials supplied by 

Smithco

Smithco

Smithco

Smithco

Smithco

 only. Do not modify any function or part.

hese machines are intended for professional maintenance on golf courses, sports turf, and any other
area maintained turf and related trails, paths and lots. No guaranty as to the suitability for any task is
expressed or implied.

Summary of Contents for SUPER RAKE 13-550-D

Page 1: ...del 43 100 A Super Star X treme Gas Model 43 000 A Diesel Model 43 001 A Super Rake Gas Model 13 550 D and 13 551 D Diesel Model 17 001 E June 2006 Product Support Hwy SS Poplar Ave Cameron WI 54822 1...

Page 2: ...s and Diesel Specifications 11 Setup 12 Controls Instruments Gas Super Rake 14 Controls Instruments Diesel Super Rake 15 Controls Instruments Super Star 16 Controls Instruments Diesel Super Star 17 Co...

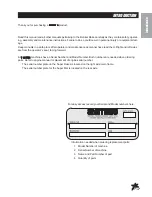
Page 3: ...o do so could result in personal injury or equipment dam age Keep manuals in a safe place after operator and maintenance personnel have read them Right and left sides are from the operator s seat faci...

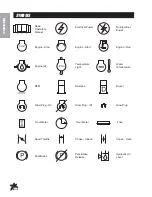
Page 4: ...vel Choke Open Choke Closed Hand Throttle Hour Meter Hour Meter Fuse Glow Plug Glow Plug Off Glow Plug On RPM Gasoline Diesel Water Temperature Temperature Light Engine Oil Engine Stop Engine Start En...

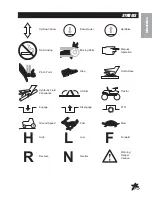
Page 5: ...Parts Manual Operation Pinch Point Step Hot Surface Hydraulic Fluid Penetration Lift Arm Tractor Engage Disengage PTO Ground Speed Fast Slow H High L Low F Forward R Reverse N Neutral Warning Danger C...

Page 6: ...y messages The appropriate signal word for each has been selected using the following guidelines DANGER Red Indicates an imminently hazardous situation that if not avoided will result in death or seri...

Page 7: ...SIGN LOCATION SUPER STAR REMEMBER If Safety Signs have been damaged removed become illegible or parts replaced without decals new decals must be applied New decals are available from your authorized d...

Page 8: ...SIGN LOCATION SUPER RAKE REMEMBER If Safety Signs have been damaged removed become illegible or parts replaced without decals new decals must be applied New decals are available from your authorized d...

Page 9: ...Y SIGN LOCATION X TREME REMEMBER If Safety Signs have been damaged removed become illegible or parts replaced without decals new decals must be applied New decals are available from your authorized di...

Page 10: ...started machine must not move If movement is evident the neutral mechanism is not adjusted correctly Shut engine off and readjust so the machine does not move when in neutral position 13 Never use yo...

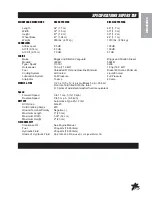
Page 11: ...l 40 Octane Minimum Cooling System Air Cooled Liquid Cooled Lubrication System Full Pressure Full Pressure Alternator 16 amp 40 amp WHEELS TIRE 3 23 x 10 5 x 12 4 ply multitrack 5 psi 35 bar Front tir...

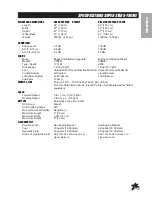
Page 12: ...to 10 m p h 0 16 kph 0 to 10 m p h 0 16 kph Reverse Speed 0 to 4 m p h 0 6 kph 0 to 4 m p h 0 6 kph TIRES WHEELS All Tires 3 21 x 11 00 x 8 NHS 3 21 x 11 00 x 8 NHS 5 psi 35 bar 5 psi 35 bar BATTERY...

Page 13: ...ir Cooled Liquid Cooled Lubrication System Full Pressure Full Pressure Alternator 16 amp WHEELS TIRE Three 22 X 11 10 0 Knobby Tires 5 psi 35 bar Front tire fluid filled to 80 lbs total 45 5 pints of...

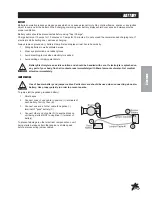
Page 14: ...tach the battery hold downs Then attach red positive cable A to positive terminal Slide rubber boot over the positive terminal to prevent shorts Attach black negative cable B to the negative terminal...

Page 15: ...13 Introduction NOTES...

Page 16: ...OARD Foot Pedal controls forward and reverse motion Pushing down on the front of pedal I will give you a forward motion and pushing down on rear pedal will give you a reverse motion When pedal is rele...

Page 17: ...on front pedal J will give you a forward motion and pushing down on rear pedal K will give you a reverse motion When pedal is released the hydrostatic transmission centers and stops the vehicle with a...

Page 18: ...chments To raise push forward to lower pull back Release the lever when attachment is in proper position and lever will return to neutral LIFT ASSEMBLY LEVER This lever J raises and lowers all attachm...

Page 19: ...lower pull back Release the lever when attachment is in proper position and lever will return to neutral LIFT ASSEMBLY LEVER This lever J raises and lowers all attachments under the center of the ma...

Page 20: ...ition and lever will return to neutral LIFT ASSEMBLY LEVER This lever J raises and lowers all attachments under the center of the ma chine To raise push forward to lower pull back Release the lever wh...

Page 21: ...VER This lever H raises and lowers all rear attachments To raise push forward to lower pull back Release the lever when attachment is in proper position and lever will return to neutral LIFT ASSEMBLY...

Page 22: ...will return to run position B 4 Allow engine to idle and warm up a few minutes before selecting a direction of travel 5 To shut off engine on all gas machines turn key to the stop position On Diesel...

Page 23: ...essure should be 5 psi 0 35 bar maximum 4 Inspect electrical system for loose connections or frayed wiring including battery cables Replace any faulty equipment or tighten if loose 5 Check hardware fo...

Page 24: ...r end turn machine and drive down one side of trap and come back up other side Grass or other material may build up on rake tines as machine passes enter exit point in Figure 1 Lift rake briefly while...

Page 25: ...te is added 4 Avoid spilling or dripping electrolyte Battery Electrolyte is an acidic solution and should be handled with care If electrolyte is splashed on any part of your body flush all contact are...

Page 26: ...Directives EN292 1 EN292 2 EN294 EN349 92 59 89 392 Title and or number and date of issue of the other Directives if applicable For the relevant implementation of the safety and health requirements m...

Page 27: ...t covered under this warranty nor is any loss of income and or other loss resulting from the failure of the product to function due to a warranty defect The following items are not covered under the S...

Page 28: ......
Reviews: