background image

Your settings

Your settings

Menu items and submenu items

Presettings

Your settings

Login/Logout


F

 2-10)

Access rights

I

A convenient way to save the settings of access rights on a data carrier is to use the 

Transmit access

rights

 function in the 

Login/Logout

 menu.

Login duty for all users

off

Login only via ISIS card (apart from users of higher ac-

cess levels)

off

Display acknowledgement after login with ISIS card

[1...10 sec] (0 = off)

0

Maximum login time [1...120 min] (0 = off)

0

Auto-logout after 1...120 min of non-activity (0 = off):

0

Clear screen and REVIEW memory after logout

on

Operating options 

(

F

 2-26)

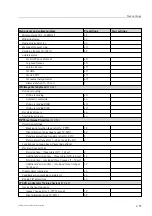
Key settings

Priority keys

hold key

hold key

P1

BW-SEN off

P2

BW-HIGH  

off

P3

MARK

Function keys 

hold key

hold key

F1

MARK

F2

AUTO off

F3

STORE

F4

IMS MENU

F5

MAIN MENU

F6

EXIT

F7

X-PLORE off

F8

X-ACT MENU

F9

OTS

F10

OPTI-ZOOM off

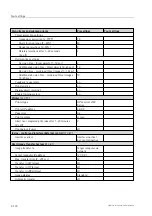
Image keys

hold key

hold key

B1

MAT+-NEG off

B2

off

B3

OS

off

B4

BW

off

B5

MAT+-SEN off

B6

MAT+-HIGH off

Language

English

Image settings

95587413 01/01/09 © Smiths Heimann

2-97

Summary of Contents for HI-SCAN 100100T

Page 1: ...uction transmission or use of this document or its contents is not permitted without express written authority Offenders will be liable for damages All rights including rights created by patent grant or registration of a utility model or design are reserved Modifications reserved 95584681 01 01 09 Smiths Heimann SMITHS HEIMANN www smithsdetection com ...

Page 2: ...95584681 01 01 09 Smiths Heimann ...

Page 3: ...uide for users with supervisor access level Section 2 For users with operator access level you can order the following abridged user s guide The guide only contains the 1st section Order no User s guide for users with operator access level 95584682 95584681 01 01 09 Smiths Heimann III ...

Page 4: ...Contents IV 95584681 01 01 09 Smiths Heimann ...

Page 5: ...95584770 01 03 2003 Smiths Heimann 1 ...

Page 6: ......

Page 7: ...gency stop buttons 1 14 The radiation indicators 1 15 The counters 1 16 Further control elements 1 16 The separate emergency stop button for integrated units 1 16 The contact mat and the attendance detector 1 16 The hand held bag code scanner 1 17 The keyboard of the HI SCAN X ray unit 1 17 The screen indication field 1 23 The indication field on the second screen 1 27 How to start and terminate y...

Page 8: ...4 Particularities of units integrated into a baggage handling line 1 56 Particularities of units integrated into an iLane system 1 56 How to use the automatic detection functions 1 57 The X ACT system 1 57 Radioactivity detector 1 58 The functions HI SPOT and High Density Alert HDA 1 59 How to display X ray images 1 60 The default image display 1 60 How to select other image display modes 1 60 The...

Page 9: ...cannot be switched on or switches off by itself 1 93 How to reset the emergency stop buttons 1 94 The X ray unit switches off because of a power failure 1 94 No test image wait indicator does not light up or flashes 1 95 No or insufficient test image wait indicator lights up briefly after switching on 1 95 Error messages 1 95 Error messages with error code 1 95 Messages without error code 1 103 Th...

Page 10: ......

Page 11: ... 7760 HI SCAN 8585 HI SCAN 85120 HI SCAN 9075 HI SCAN 100100T HI SCAN 100100T 2is HI SCAN 100100V HI SCAN 100100V 2is HI SCAN 100170 HI SCAN 11080 HI SCAN 12080 HI SCAN 13090 HI SCAN 130100 HI SCAN 130100T HI SCAN 130130T 2is HI SCAN 135135 HI SCAN 145180 HI SCAN 150150 140kV HI SCAN 150150 300kV HI SCAN 180180 300kV HI SCAN 180180 2is 300kV Units with automatic conveyor control integrated into a ...

Page 12: ...t information and facilitate the use of the HI SCAN X ray unit G This symbol refers to further documentation I The Technical specifications of the X ray unit are contained in the corresponding Technical Manual The X ray inspection unit meets EC standards The EC declaration of conformity or the manufactu rer s declaration will be forwarded to you on request Use as agreed The HI SCAN X ray inspectio...

Page 13: ...n lead to slight or minor injuries S Attention Indicates a possibly detrimental situation for the unit Non compliance can lead to damages on the HI SCAN X ray inspection unit and to data loss and malfunctions Warning signs installed on the X ray inspection unit Sign Meaning Hazard Observe the instructions in the documentation Dangerous voltage Doors or hatches marked by this symbol may only be ope...

Page 14: ... SCAN X ray unit has been installed a technical inspection acceptance test regarding X ray protection must be carried out if necessary Should the X ray unit be moved to another installation site these regulations also possibly apply The inspection and approval of the X ray unit with regard to radiation protection must be repeated at certain time intervals if required The detection characteristics ...

Page 15: ...the safety instructions and legal and official provisions Roller and modular plastic belt conveyors may only be loaded and unloaded by trained staff who are familiar with the accident prevention regulations 50 A Warning Be absolutely sure that the local mains voltage corresponds to the value indicated on the X ray unit type plate and the fusing of the provided mains outlet meets at least the value...

Page 16: ...he HI SCAN X ray unit is supervised as long as it is switched on 120 R Warning The HI SCAN X ray unit exclusively serves the purpose of X raying movable items You must not in spect human beings or live animals 130 A Warning Do not sit on the operator rest of the X ray unit Keep your feet in contact with the ground 140 A Warning To be able to adhere to the following instructions it is indispensable...

Page 17: ... through smoke or unusual heat build up switch off the unit at once and disconnect it from the mains by unplugging the mains plug If the unit is equipped with a UPS unit Uninterruptible Power Supply unit switch it off as well F 1 31 How to switch on or ensure it is switched off Make sure the unit remains turned off e g by removing the mains cable F 1 28 How to connect the X ray unit to the mains o...

Page 18: ...ttention Short or flat items have to be put into plastic containers see below to be sure they will be detected and scanned even if placed in an unfavorable position Alternatively the X ray unit can be operated in Continuous scanning mode 250 S Attention Keep in mind that the material and structure of the plastic containers mentioned above may affect the X ray unit s material detection characterist...

Page 19: ...eck the lead curtains for tears and missing seg ments Check the conveyors of your X ray unit for damages and dirt as well as for items caught in the conveyors If the X ray inspection unit is equipped with roller or modular plastic belt conveyors check if objects have fallen between the rollers or into they chain drive and check if rollers plastic belt or chains have been dam aged 95587412 01 01 09...

Page 20: ... work Stop the conveyors if you have not enough time to carefully evalu ate an image 380 A Warning Make sure only scanned and checked baggage or freight items will be forwarded or returned to the passengers 390 A Warning Be always aware of the fact that the HI SCAN X ray unit generally does not automatically detect dan gerous items 400 A Warning Regard objects which cannot be identified as suspect...

Page 21: ...0 A Warning When rechecking suspect objects proceed according to the provisions and safety instructions given to you 440 A Warning If you wear coloured or tinted seeing aids bear in mind that you might see the colours in X ray im ages differently and thus interpret the image wrongly 450 95587412 01 01 09 Smiths Heimann 1 11 ...

Page 22: ...on top of the X ray inspection unit option operating console or located on an oper ating desk Further controls and indicators are located on the X ray unit housing How to adjust the operating unit How to unfold the keyboard Insert the appropriate key into the lock of the keyboard support and turn it to the right Pull out the black button to the left on the keyboard support and pan the keyboard int...

Page 23: ...extinguished after you have switched off by means of the key switch Then turn the switch from position I to po sition 0 S Attention If the X ray inspection unit is equipped with the option power fail buffer audible warning signals will be sounded when the unit is separated from the mains These signals will not stop until you reconnect the unit to the mains see below or switch off the incorporated ...

Page 24: ...mergency stop buttons serve to quickly switch off conveyors and X ray generators of the HI SCAN X ray unit or the complete unit in case of emergency 95587412 01 01 09 Smiths Heimann 1 14 I If the X ray inspection unit is integrated into a baggage handling line the line is switched off as well To restart the unit follow the corres ponding instructions F 1 33 ...

Page 25: ...l The X ray unit may be equipped with a blink ing function of the indicators In this case the indicators blink at a second s time 95587412 01 01 09 Smiths Heimann I In case of power failure or if an emer gency stop button has been actuated the radiation indicators may light up shortly several times This is however meaningless 1 15 ...

Page 26: ...ed units On a unit integrated into a baggage handling line the emergency stop button located beside the keyboard serves to quickly switch off convey ors baggage handling line and X ray generators in case of emergency On newer units the monitors and the electronics of the X ray inspection unit stay on I To restart the unit follow the corresponding instructions F 1 33 The contact mat and the attenda...

Page 27: ... ray image of such baggage or freight item will hence be automatically stored F 1 82 X ray images memorized that way may be searched for in the image directories later on by scanning the bag code again to recall or manage them F 1 84 Warning Do not look into the laser beam of the bar code scanner and do not point the beam at other persons 490 The keyboard of the HI SCAN X ray unit 95587412 01 01 0...

Page 28: ...active image display mode F 1 64 67 and 70 image display mode with higher penetration HIGH F 1 65 3 Indicator section K The power on indicator shows that the X ray unit is switched on L The wait indicator shows that the X ray unit is not yet ready for operation J The radiation indicators warn of X rays in the inspection tunnel 95587412 01 01 09 Smiths Heimann 1 18 I As an optional equipment a turn...

Page 29: ...Central Image Data Archive CIDA I Units with newer software can be adjusted in such a way that the electronic baggage marking takes already place simultaneously with the 1st key de pression however only in case that no fictitious object was inserted by the TIP system switching on and off the image markings set by the user F 1 50 and the inser tion of markings of the automatic detection functions X...

Page 30: ...on F 1 71 and switchover of mode for alphanumerical entries 5 Emergency stop button to quickly switch off conveyors and X ray generators of the HI SCAN X ray unit or the complete unit in case of emergency possibly not existing at X ray inspection units integrated into baggage handling lines These are partly equipped with a separate emergency stop key located next to the keyboard F 1 16 95587412 01...

Page 31: ...e System F 1 82 stop the image scroll during a training session of the Operator Training System OTS XTrain F 1 77 leave the REVIEW function F 1 48 49 77 and 89 selection of the preceding X ray images REVIEW function F 1 48 49 77 and 89 8 Priority keys combinations of above mentioned image display functions and further individual functions can be assigned to three priority keys by users with higher...

Page 32: ...r on older keyboards lights up permanently as long as an ISIS card is correctly inserted in the keyboard s card reader 0 see below If the indicator flashes after inserting a card or if it does not light up at all the card has either been wrongly inserted or it is not read able 0 Card reader for logging in and out at the X ray unit via ISIS cards Intelligent Screener Identifica tion System 95587412...

Page 33: ... in the X ray image 1 50 HI CAT1 8 HI CAT image 1 8 1 69 HI MAT HI MATPLUS color image1 1 61 HIDE INFORMATION Hide written information in X ray images 1 89 HIGH current image with higher penetration 1 65 HIGH HI MATPLUS color image1 with higher penetration 1 65 HIGH NEG current image with higher penetration in negative image display 1 65 66 HIGH NEG HI MATPLUS color image1 with higher penetration ...

Page 34: ...mage1 with Superenhancement 1 67 STORE store current image 1 82 TRANSFER IMAGE transfer current image by means of the Xport system 1 51 X ACT MENU call up X ACT menu 1 57 X PLORE X PLORE image 1 67 X PL SEN X PLORE image with Superenhancement 1 67 1 on the black white monitor you see the corresponding display for the black white image 2 name or user identification code of the user logged in to the...

Page 35: ...play of conveying directions In this direction scanning procedures can be carried out in the one way mode F 1 47 Press the corresponding key m or n shortly to start the conveyors To stop the con veyors press 1 In this direction scanning procedures can be carried out in the one way mode F 1 47 The corresponding key m or n must be kept depressed during the inspection I If the color of an arrow chang...

Page 36: ...reverse mode F 1 52 The inspection in both directions is possible with the function Reverse scanning F 1 53 In this direction objects can only be reversed Press the corresponding key m or n shortly to start the conveyors only on units equipped with newer software To stop the con veyors press 1 In this direction objects can only be re versed The corresponding key m or n must be kept depressed durin...

Page 37: ...on code of the user logged in to the HI SCAN X ray unit F 1 34 6 display of date and time 8 miniature display of the complete X ray image with the second view of the baggage or freight item Im age sections which are magnified on the screen will be provided with a frame in the miniature display 95587412 01 01 09 Smiths Heimann 1 27 ...

Page 38: ...et by the technician carrying out the installation Adhere to the following instructions if you do the connection yourself If the X ray unit has already been connected and you want to disconnect it make sure in advance that the unit has been shut down completely i e no indicator lights up on the keyboard any more 95587412 01 01 09 Smiths Heimann S Attention An X ray inspection unit which is not pro...

Page 39: ...he value indicated on the X ray unit type plate and the fusing of the provided mains outlet meets at least the current value indicated on the type plate Be also sure that the provided mains outlet is equipped with a protective earth conductor A connec tion without PE conductor is not allowed If you connect the unit to the on board supply system of a vehicle airplane or ship or to another spe cial ...

Page 40: ...to another installation site only if it is installed on a mobile base de livered by Smiths Heimann 620 S Attention When changing the installation site it is imperative that the legal and official regulations are com plied with F 1 3 630 Adhere to the instructions of the preceding paragraph then withdraw the mains cable from the socket and from the unit Use the enclosed wrench to turn all adjusting...

Page 41: ...If required place the unit on an appropriate base 660 Establish the mains connection as described in the preceding paragraph How to switch on S Attention Do not switch on the HI SCAN unit if it has not been operated for a period of 6 months The X ray generators must first be regenerated by a competent service technician The non respect of this rule may lead to the destruction of the X ray generato...

Page 42: ... ray unit is carrying out a self test first After a short moment the display illustrated appears In the upper screen area a test image appears in the lower screen area the indication field F 1 23 is displayed In dual view units a second test image appears on the second screen with a second indication field F 1 27 95587412 01 01 09 Smiths Heimann I The UPS unit can be switched off in the same way i...

Page 43: ...onveyors conveyor line and X ray generators are switched off immediately when an emergency stop but ton is pressed the X ray unit is then shut down and switched off as well After you have eliminated the safety risk reset the emergency stop button by turning or pulling F 1 94 and restart the unit as described above 95587412 01 01 09 Smiths Heimann 1 33 I If the screen saver is activated and the X r...

Page 44: ...isk reset the emergency stop button by turning or pulling F 1 94 In older units the power supply for the conveyors and X ray generators will be thus restored automatic ally In newer units however you have to briefly turn the key switch on the keyboard of the X ray unit to the right to position II clearing the emergency stop state and restoring the power supply for conveyors an X ray generators Del...

Page 45: ...xt to the card reader on older keyboards lights up perman ently as long as the card is correctly inserted On units equipped with newer software the acknowledg ment illustrated beside is displayed if provided like that by higher access level users After a short delay the message will automatically disappear you may also delete it with r 95587412 01 01 09 Smiths Heimann I If the indicator flashes af...

Page 46: ...om a higher access level user Use o to select the entry mode before entering a charac ter pressing to the left 0 9 entry of digits pressing to the right a z entry of letters and special char acters Now enter your user ID via the keyboard When entering letters and special characters you have to keep on pressing the keys labeled 1 abc 0 _ as often and quickly until the desired character has been obt...

Page 47: ...w the key before you manually clear baggage or freight items that have got stuck or before you correct other malfunctions in the inspec tion tunnel or on the conveyors If the unit does not have a key switch wait until all indicators on the keyboard have extinguished and separate the unit from the mains by pulling the mains plug 720 Automatic clearing The window illustrated will appear at first 955...

Page 48: ...d Stop conveyor using the navigator to allow unloading bag gage or freight items As soon as you have conveyed all items out of the tunnel in the manner described above leave the window with s S Attention If the tunnel is not completely cleared error messages regarding the light barriers and incom plete or missing X ray images will result during following inspections 760 95587412 01 01 09 Smiths He...

Page 49: ...o the arrow symbols in the screen indica tion field F 1 25 In the latter case the unit can also be set so as to stop the conveyors only after up to 3 seconds after the key is released An immediate conveyor stop is possible with 1 770 If you are going to unload a freight item stop the conveyors with 1 When you have unloaded all freight items in the manner described press shortly the key m or n poin...

Page 50: ...indicators are deac tivated again As soon as you release the navigator the other indicators and the audible alarm will be deactiv ated as well How to log out To protect the operators from overtiredness newer soft ware allows to request the operator to log out after a pre defined time Higher authorization users can activate this function and set the time interval Acknowledge the message and then lo...

Page 51: ...ut and activate it If you have logged in with your ISIS card the message illus trated appears reminding you of withdrawing your card Afterwards the user ID entry window for the next user is displayed How to switch off Leave all menus Ensure that no baggage item is left on the conveyors If necessary have the conveyors move left or right until the inspection tunnel is empty Check if the recheck of t...

Page 52: ...etely from the electrical mains supply you have to wait until the power on indicator has extinguished before withdrawing the mains plug or deactivating the mains supply The non compliance with this instruction may lead to the destruction of the X ray unit If the X ray inspection unit is equipped with the option power fail buffer audible warning signals will be sounded when you unplug it These sign...

Page 53: ...the mains by pulling the mains plug 790 How to place baggage and freight items S Attention When switching on the unit first clear the inspection tunnel F 1 37 before you place objects on the conveyors 795 The baggage or freight items must always be placed in front of the lead curtain Larger baggage or freight items must only be placed on the conveyors when they are stopped Place baggage or freight...

Page 54: ...ic return mode is used place a new object for further scanning on the conveyor only if the previous object has run out again at the input and you have removed it from the conveyor belt If you do not comply with this objects can drop down from the conveyor belt and thus be destroyed and also injure you or other persons 860 95587412 01 01 09 Smiths Heimann 1 44 I When continuously scanning items whi...

Page 55: ... stops The spacing between the forklift truck s fork arms must be adjusted to match the position of the re cesses 3t heavy duty roller conveyors however can be loaded from all sides Objets to be scanned must be placed on standard or 3t heavy duty roller conveyors in a way that they do not dip into the gaps between the rollers A wooden board should be put on the roller conveyor if neces sary 955874...

Page 56: ...he para graphs dealing with the options F 1 52 before you carry out a scan 900 Depending on the setting the X ray unit works in the one way or automatic return mode You recognize the conventional one way mode by one of the adjacent arrows in the indication field on the screen F 1 25 In the one way mode the objects to be scanned are placed on the conveyor at the tunnel entrance they are then con ve...

Page 57: ...eyors function with 1 I If the conveyors were stopped though the inspection of a baggage or freight item had not yet been finished the conveyors will possibly reverse a short distance automatically This way cuts in the X ray image are avoided cutless image processing You can now view the X ray image in different image display modes F 1 60 and evaluate it You can also memorize the X ray image F 1 8...

Page 58: ...omatically This way cuts in the X ray image are avoided cutless image processing 95587412 01 01 09 Smiths Heimann A R Warning Stop the conveyors immediately with 1 if somebody puts a hand behind the lead cur tains Also avoid that baggage or freight items fall down In case of such risk stop the conveyors immediately 950 1 48 I In order to identify unknown objects it might be necessary to scan the b...

Page 59: ...veyor and thus also the object back to the entrance with r 95587412 01 01 09 Smiths Heimann 1 49 S Attention If the conveyors was stopped during the scanning of an item and if no brief reverse movement was initiated when stopping an automatic reverse movement can be initiated when continuing the scanning this way no cuts will be caused in the X ray image cutless image processing In this case pay a...

Page 60: ...check 95587412 01 01 09 Smiths Heimann 1 50 I If a TIP system is activated you have to delete a possibly fictitious object inser ted by the TIP system with H before you mark a suspicious object F 1 73 I If a TIP system is activated a corresponding feedback from the TIP system will be usually triggered upon pressing H for the first time and any fictional threat object possibly inserted will be dele...

Page 61: ...ral Image Data Archive CIDA via a data network the suspect baggage or freight item will not only be marked with H for being audibly identified see above but at the same time the corresponding X ray image will be transferred to the image data archive Particularities of units equipped with the Xport image transfer system If the Xport image transfer system is set to automatic transfer all X ray image...

Page 62: ...hat the conveyors are not automatically stopped enlarge the distances between the baggage or freight items accordingly Particularities of units equipped with Full reverse mode If the X ray unit is equipped with Full reverse mode you can change the scanning direction I If the function Reverse scanning see below is activated and if both direction arrows in the screen indication field appear in black...

Page 63: ...re running For reasons of safety you have to keep m or n depressed As soon as you release the key the conveyors and the image scroll will stop and the emission of X rays is deactivated Particularities of units equipped with Second parallel conveyor control The conveyors of the X ray unit cannot only be controlled via the keyboard but also via a supplementary remote con trol box or via remote contr...

Page 64: ... HI SCAN X ray unit can be equipped with a contact mat or an optical attendance detector Before starting the conveyor and until stopping the conveyors with 1 you have to step on the mat or you have to stay in front of the attendance detector which is mounted below the keyboard Particularities of units equipped with safety switches conveyor end and or oversize detectors Light barriers installed as ...

Page 65: ...terwards with m or n normal stop mode In both cases you can also start the conveyors in the opposite direction without removing the baggage or freight item in advance Together with the conveyors stop corresponding messages may additionally appear If the conveyors are in pause mode the message will be deleted automatically when you remove items Otherwise you have to delete the message with r before...

Page 66: ...onveyor in reverse mode is not possible since the iLane conveyor system can only be operated in forward direction If baggage items pile up on the conveyor line following the unit the conveyor of the X ray unit is automatically stopped Once the baggage items are removed the belt restarts automatically If an object was completely scanned it is marked by a blue yellow frame As long as this frame is d...

Page 67: ...owledge and delete the message with r The X ACT system With the X ACT system your attention will automatically be drawn to suspect and higher absorbing objects in the X ray image by corresponding markings Depending on the setting of the detection class certain explosives and or certain drugs are recognized Objects which may be explosives are provided with a red frame in the X ray image objects whi...

Page 68: ...low black frame Radiation warning see below Low intensity radiation Red black frame Radiation alarm see below Radiation of higher intensity Symbol γ radiation Symbol Neutron radiation Symbol γ and neutron radiation Radiation warning Due to the high sensitivity of the integrated radioactivity detector even very low intensity radiation sources will be detected To be sure that the detected radiation ...

Page 69: ... a detection with the naked eye is not possible 1120 The functions HI SPOT and High Density Alert HDA Using the functions HI SPOT and High Density Alert your attention will automatically be drawn to higher absorbing objects in the X ray image by corresponding markings if the objects have a certain minimum size and absorption degree Function HI SPOT highlights the image sections contain ing higher ...

Page 70: ...e higher access level users before The keys to select the different image display modes must either be permanently depressed non locking key or you have to press the key only briefly locking key to switch on and off an image display mode This is configured by the higher level users Furthermore higher access level users can determine not to use certain image display modes as long as the conveyors a...

Page 71: ...HI MATPLUS color image indicates the material composition of the objects contained in the scanned item by coloring with three different basic colors and varying shades The materials an object is composed of are assigned to three groups according to the effective atomic weight of the chemical elements contained the three groups are represented in orange green and blue This assignment is effected on...

Page 72: ... over 56 which oc cur in an extremely thin layer e g lead or gold foils will be displayed in green or orange depending on the foil thickness Already starting at a layer thickness of a few millimeters these elements will be displayed in dark grey to black due to the high absorption If different materials are overlying the colouring shifts towards the material absorbing most of the radiation An over...

Page 73: ...cond func tion can only be called up via a priority key assigned to function O or O Organic Only image O Organic OnlyPLUS image O If you apply the other two special functions Organic Stripping OS and Organic StrippingPLUS OS you can limit the display to non organic materials made of denser materials Organic objects will be merely displayed in grey shades Depending on the unit s configuration you c...

Page 74: ...trast enhancement is achieved since no brightness levels are required for non interesting absorption ranges now By pressing v to the right repeatedly you can shift the absorption range towards objects of high absorp tion degrees e g metallic objects HI MATPLUS color image VARI MAT Black white image VARI BW Organic only image VARI O Organic Stripping image VARI OS 95587412 01 01 09 Smiths Heimann 1...

Page 75: ...higher penetration is generated This way you can detect objects hidden behind other high absorbing ob jects Details of high absorbing objects become more clearly visible Even thicker layers of light organic ma terial explosives drugs are definitely emphasized At the same time low absorbing objects are filtered out HI MATPLUS color image MAT HIGH Black white image BW HIGH Depending on the unit s co...

Page 76: ...ia a priority key assigned to the functions MAT LOW for the HI MATPLUS im age BW LOW for the black and white image or LOW The function last mentioned takes effect on the current image display HI MATPLUS image or black and white image The negative image display NEG In the negative image high absorbing objects appear bright low absorbing objects appear black This way smaller or thinner objects of hi...

Page 77: ...age you should therefore prefer to regard those parts of the X ray image which do not show overlying objects X PLORE image Z 8 The image displays with Superenhancement SEN For the above mentioned image display modes black white HI MATPLUS Organic Only PLUS Organic Strip ping PLUS and X PLORE you can obtain an optimum contrast over the whole X ray image when using Super enhancement Low absorbing ob...

Page 78: ...isplay HI MATPLUS image or black and white image For the Organic Only PLUS and Organic Stripping PLUS images the Superenhancement function can only be selected via the priority key assigned to the functions O SEN and OS SEN HI MATPLUS color image MAT SEN Black white image BW SEN Organic Only image O SEN Organic Stripping image OS SEN Organic OnlyPLUS image O SEN Organic StrippingPLUS image OS SEN ...

Page 79: ...ly different colors All color images have one thing in common there is no direct relation between ab sorption and grey levels brightness and between color and material kind as it is the case in the HI MATPLUS color image In this case the contrast of the X ray image surpasses the normal B W and HI MATPLUS image displays since the hu man eye can much better distinguish different colors than brightne...

Page 80: ...he function VARI CAT For HI CAT images you can steplessly select different assignments between absorption and colors or grey levels The detectability of small details is thus selectively increased finest object structures become clearly visible For the HI CAT black and white images the direct relation between absorption and grey levels is canceled Very similar absorption degrees are displayed in g...

Page 81: ...mes to the left you return to the non magnified display On newer units you can continuously raise and reduce the magnification factor if this was not deactivated by a user with higher access level Just keep the key o depressed until the desired magnification is reached On the miniature display in the indication field you can always re cognize the section currently magnified 95587412 01 01 09 Smith...

Page 82: ...s of the baggage or freight item the object finder makes it easier for you to locate the object in the second view Activate the finder with the priority button that is as signed the OBJECT FINDER function A thin vertical light blue line appears on both monitors Now use v to steer this line on the discovered ob ject in the first view At the same time the line moves on the second monitor on the obje...

Page 83: ...nveyors are stopped automatically and one of the following messages is displayed on the screen A Warning Units with newer software may be set in a way that the conveyors will only be stopped and a mes sage will only appear if the suspect object has been projected by means of the TIP system i e if it is not a real object If no message appears when actuating H and if the conveyors do not stop you ha...

Page 84: ... was projected by the TIP system and is now provided with a black yellow frame Afterwards it will be deleted Delete the message with r Message 3 No threat object was projected on the image by the TIP system As a result no frame is inserted Delete the message with r Nevertheless as you have recognized a suspect ob ject press again H and send the baggage item to the recheck then 95587412 01 01 09 Sm...

Page 85: ...s Delete the message with r Now check if any further suspect object can be found in the X ray image If so press H and send the bag gage item to the recheck then Message 5 The complete X ray image was projected by the TIP system and is now provided with a black yellow frame Afterwards it will be deleted Delete the message with r 95587412 01 01 09 Smiths Heimann 1 75 I The real X ray images together...

Page 86: ...e object or image is deleted and one of the following messages appears on the screen the messages can alternatively appear with blue background colour in units with newer software Message 6 The projection of a fictional threat object on the image of a real baggage item has been aborted by the TIP system Delete the message with r Now check if any further suspect object can be found in the X ray ima...

Page 87: ...u need to evaluate the image and to make a decision is limited to a few seconds range 1 to 10 s If you need more time stop the image scroll Usu ally the time is automatically extended then range 0 to 45 s Restart the image scroll with m or n If you want to review preceding images you can recall them with the REVIEW function Select the inter esting image with 3 and 2 To switch back to the last imag...

Page 88: ... black yellow frame and will be deleted afterwards Delete the message with r Message 2 A complete X ray image was projected between two basic images It is now provided with a black yellow frame and will be deleted afterwards Delete the message with r 95587412 01 01 09 Smiths Heimann I Threat objects which have been recognized will be stored automatically under category TRAINING RECOGN OBJECTS by t...

Page 89: ...essage 4 A fictional threat object was projected on the basic image of a baggage item It is now provided with a black yellow frame and will be deleted afterwards Delete the message with r 95587412 01 01 09 Smiths Heimann I Threat objects which have been missed will be stored automatically under category TRAINING MISSED OBJECTS by the IMS Image Store Sys tem together with the basic images into whic...

Page 90: ...y been projected or the threat image is provided with a black yellow frame and deleted afterwards Simultaneously one of the following messages appears on the screen the messages can alternatively appear with blue background colour in units with newer software Message 6 The projection of a threat object on the basic image of a baggage item has been aborted Delete the message with r Message 7 The pr...

Page 91: ...ed with black yellow frames and deleted afterwards 95587412 01 01 09 Smiths Heimann 1 81 I In this case as well recognized and missed threat objects are automatically stored under categories TRAINING RE COGN OBJECTS and TRAINING MISSED OBJECTS by the IMS Image Store System together with the basic images into which they were pro jected You can recall these images us ing the IMS Image Store System F...

Page 92: ...mages The current image i e the image of the object scanned last is stored in the category Clipboard when you press S I If a priority key is assigned to the function FRAME OBJECT F 1 50 you can provide suspicious objects with a red yellow frame before you store or transfer it S Attention Do not store the image until it has been displayed completely on the monitor This means that the empty section ...

Page 93: ...the scanner at the bar code and press the button integrated in the handle until a short audible signal is sounded and the green LED lights up Afterwards have the baggage or freight item enter the tunnel If the bag code cannot be read from the baggage or freight item s tag you can also enter it manually Actuate the priority key as signed to the function ENTER BAG ID The window illustrated is displa...

Page 94: ... units equipped with more recent software in the left side of the menu you can either switch to the left with the navigator on the symbol or to one of the displayed categories This way you change from the current category into the parent one To open a category move with the navigator to it and either switch with the navigator to the left or to the right If a category contains subcategories this is...

Page 95: ...ailable Category Content Clipboard with subcategories X ray images stored individually with S Possibly this category is subdivided into subcategories that will be generated automatically from the calendar years the months and the days on which the im ages have been stored TIP RECOGN OBJECTS X ray images of real baggage or freight items with threat objects pro jected by the HI TIPPLUS aTIP system w...

Page 96: ...ted image as well as some additional information There are File name Under this name the image is stored on the hard disk of the integrated elec tronics New images are first named according to the date and time of the stor age and the serial number of the X ray unit Higher access level users can change the name Date time Point of time of the image memorization User Name or ID of the user who store...

Page 97: ...ton integrated in the scanner handle until a short audible signal is sounded and the green LED lights up If the bag code cannot be read from the baggage or freight item s tag error signal from bag code scanner you can enter it manu ally instead Actuate key 9 yz The window illustrated beside is displayed The entry of letters and digits via keyboard is carried out as described for the user ID code F...

Page 98: ...sh to recall images set the Recall options first Press key 3 ghi The window illustrated appears Use the navigator to move to the desired option and activate deactivate it with the navigator or change the value There are the following options Random order the recall of the marked images for example for training purposes is carried out at random order Reverse order the image stored last is displayed...

Page 99: ... time If you want to review preceding images you can recall them with the REVIEW function once more Select the interesting image with 3 and 2 To switch back to the last image press 1 or reach the last im age automatically with restarting the IMS recall with m or n If no image changing is being carried out you can terminate the recall with 1 and return to the normal operation of the HI SCAN X ray u...

Page 100: ...ng before starting the printout they will be stopped I If a priority key is assigned to the function FRAME OBJECT F 1 50 you can provide suspicious objects with a red yellow frame before you print it The baggage counters The HI SCAN X ray unit is equipped with a total baggage counter which cannot be reset and a temporary counter which can be reset for scanned baggage or freight items Use the navig...

Page 101: ... item Operating options in the Main menu and activate the item The menu illustrated beside is dis played Move to item Audible baggage marking alarm and vary the dur ation using the navigator If you select the setting 0 the audible signal remains deactivated Afterwards leave the menu with r so that the new value is stored The silent alarm With this option you can secretly send a silent alarm to the...

Page 102: ...f the unit Use the navigator to move to item Diagnosis in the Main menu and activate this item The menu illustrated is displayed Move to item Configuration display and activate this item The configuration display appears In several fields you can read important data referring to the HI SCAN X ray unit 95587412 01 01 09 Smiths Heimann 1 92 A Warning The removal of screwed plates or panels may only ...

Page 103: ...failed Restore mains supply or have it restored An emergency stop button has engaged Reset all emergency stop buttons as described in the following paragraph see below The connector of the keyboard has been unplugged Check the keyboard plug connection as far as it is accessible The UPS unit of the power fail buffer is switched off Switch on the UPS unit if it is accessible F 1 31 How to switch on ...

Page 104: ...y inspection unit is equipped with the option power fail buffer periodical warning signals will be sounded The latter will not stop until the X ray inspec tion unit has switched off itself after a buffer time to be set between 1 and 20 minutes or as soon as the power supply has been restored If the monitor of ther X ray inspection unit is also sup plied via the power fail buffer you receive a corr...

Page 105: ... plugged in Check plug as far as it is accessible Error messages Most of the messages can be deleted with r before following the instructions to correct the error All error messages are collected in the Error report F 1 93 so that you can have a look at the messages again after deletion Error messages with error code Error messages Cause Correction Error code 0009 X ray system defective or operati...

Page 106: ...ms and check the light barriers for dirt and sticking baggage labels etc viewed in the conveyor direction of movement standard forward light barrier 1 is located at the tunnel entry light barrier 3 at the tunnel exit Systems with transmitter and receiver modules on both conveyor sides Use slightly damp cotton swabs put them through the openings in the tunnel interior walls see illustration and cle...

Page 107: ...erature is too high or too low See to a lower or higher ambient temperature to be estab lished Error code 0027 X ray system A B cannot be activated operating conditions are possibly out of range On units equipped with a heating or cooling sys tem for the X ray generators the correct operat ing conditions will be automatically established after a short time Error code 0028 X ray system A B cannot b...

Page 108: ...ggage or freight items pile up inside the inspection tunnel or at the end of the conveyors Error code 0119 Image errors have occured If necessary scan the last item again This error may be caused by external effects If required contact your service office or Smiths Heimann Error codes 0200 and 0201 IMS memory full Online Recording stopped Possibly delete unnecessary image files Ask a higher level ...

Page 109: ...pter plug in the connecting cable of the hand held scanner has come loose If so switch off the unit and wait until all indicators on the keyboard have extinguished Then restore the connection to the hand held scanner and switch the unit on again Error code 1107 see error code 1104 Error code 1302 Dongle read error Switch off unit and wait until power on indicator is off Then switch unit on again S...

Page 110: ... stored in the Print jobs category of the IMS system F 1 82 You can initiate the printout from here once more as soon as the network or the printer are ready again Error code 2107 Printing not possible printer error Check the printer and the network connection Non printed images saved in category Print jobs Check the printer and correct its troubles see op erating instructions of the printer If re...

Page 111: ...e or unit disconnected from mains See paragraph Power failure F 1 94 Error code 2202 Batteries of UPS unit exhausted Even if you do not use the X ray inspection unit it should always be connected to the mains to en sure that the buffer batteries are charged If this is not possible you have to switch off the incor porated UPS unit if accessible F 1 31 How to switch on or you have to have it switche...

Page 112: ...by a user with higher ac cess level Error code 3104 The Xport system transfers images already automat ically For the Xport system transfers all images already automatically the individual image transfer is de activated Error code 3105 USB memory does not respond see error code 3102 Error code 3500 System has not been correctly shut down the last time Stick to the right order when switching off the...

Page 113: ...e unit from the mains can be the cause of the error See also the instructions of error code 3500 Error code 4001 Radioactivity detector is not activated Ask a higher access user to activate the radio activity detector Messages without error code Messages in alphabetical order Cause Correction Date for next preventive maintenance reached Inform the personnel responsible for the main tenance of the ...

Page 114: ... X ray unit is set to the automatic return mode In this operating mode the length of the objects to be inspected is limited Have the unit set to the conventional operating mode one way mode by a user with higher access level if neces sary Scanning failed Object is returned If necessary in terrupt with STOP key If the conveyor is stopped several times in the automatic return mode the inspection is ...

Page 115: ...and so activating X rays and initiating an image scroll The X ray unit shows other image interferences Cause Correction Sources of interference like machines which are not radio screened or walkie talkies interfere with the X ray unit Switch off machines which are not radio screened keep a minimum distance of 1 meter to the X ray unit and the monitor Conveyors reverse when stopping or starting the...

Page 116: ...r failure F 1 94 Periodical sounds or permanent sound without simultaneous power failure The power fail buffer of the X ray unit signalizes an internal error S Attention The X ray unit will switch off itself very soon 1250 If the X ray unit has not been connected to the mains for some time the batteries of the power fail buffer have been possibly discharged Con nect the unit to the mains for at le...

Page 117: ...95584770 01 03 2003 Smiths Heimann 2 ...

Page 118: ......

Page 119: ...ess to access rights automatic detection 2 16 Access to user data 2 16 Access to the IMS system without TIP OTS libraries 2 16 Extended management of access rights 2 17 Activating deactivating an access level 2 18 Granting of access rights 2 18 Particularities regarding the TIP OTS and IMS systems 2 19 Particularities regarding the user data management and ISIS card programming 2 20 How to transmi...

Page 120: ... the extended IMS functions 2 46 Recall and print images 2 46 Delete move and copy images 2 48 Convert images 2 48 Rename images 2 49 How to configure the HI TIPPLUS and the aTIP system 2 50 The TIP menu 2 51 How to activate the TIP system 2 51 How to organize HI TIPPLUS categories 2 52 Add new categories 2 53 Edit category 2 54 Delete category 2 54 How to import a threat image library 2 54 How to...

Page 121: ...ts 2 75 The meaning of the report fields 2 76 The screener daily log report report 1 2 77 The individual screener performance report report 2 2 77 The screener performance comparison report report 3 2 78 The threat detection by category report report 4 2 78 The report and download access report report 5 2 79 How to download TIP OTS XTrain reports 2 79 Download to ZIP disk CD or USB memory 2 79 Dow...

Page 122: ......

Page 123: ...n regarding your safety Contrary to the lower access level users you have access to fur ther settings and functions You can take down notes of your set tings F 2 97 I To enter digits and texts use the keys 1 abc 0 _ as mentioned in section 1 paragraph How to log in If menus and messages appear partly or entirely in a lan guage different from the language in this manual on the screen you can adjust...

Page 124: ...ou will not have access to certain functions and menus until the user with superior access rights in each case has granted you the appropriate access right For users with access levels Local su pervisor 1 2 or 3 this is the Supervisor for the Supervisor the access rights are defined by the service personnel in case of units with newer software 95587413 01 01 09 Smiths Heimann S Attention Modify th...

Page 125: ...t image libraries of the TIP and OTS XTrain systems The online recording of all X ray images for archiving purposes is made possible by means of the Removable Image Data Archive RIDA Via the external CD drive you can replace or upgrade the threat image libraries of the TIP and OTS XTrain systems and read in X ray images How to get access to the drives and the USB connection plugs The drives the US...

Page 126: ...6030di On newer units of this type the USB connection is located on the unit s housing How to exchange the removable drives If you want to change a removable drive ZIP CD DVD or RIDA by another one or install a drive for the first time switch off the X ray unit and wait until all indicators on the keyboard have extinguished 95587413 01 01 09 Smiths Heimann S Attention Never actuate the yellow Rese...

Page 127: ... the X ray unit afterwards Peculiarities of older RIDA removable drives Insert the appropriate key into the lock on the right side of the drive and slightly press it in then turn it to the right into a vertical position You can now withdraw the hard disk with its handle and insert the new one Finally press in the key slightly again and turn it to the left into the horizontal position Withdraw the ...

Page 128: ... to or from a ZIP disk or to recall images directly from a disk insert the latter into the drive before calling up the IMS menu F 2 44 When recalling images stored on the ZIP disk you can remove the disk only after calling up the IMS menu again and leaving it with s The internal CD DVD drives For the transmission of data and the copying of images of the X ray unit to a CD you need writable CD Rs o...

Page 129: ...enu again and leaving it with s After starting a copy or transmission process to a CD R or CD RW first the illustrated CD menu opens You have the following setting possibilities Delete CD DVD before writing If you have inserted a rewrit able CD RW you can delete all data which is already on the CD by selecting the first menu option Close CD DVD after writing If you want to ensure that after writin...

Page 130: ... On the left plug X56 of the USB interface you can con nect conventional USB memories like USB sticks or USB hard disks of the standards USB 1 1 and USB 2 0 For USB 2 0 units the higher transfer rate of this standard is supported For unit type HI SCAN 6030di the plug on the unit s housing corresponds to the left plug X56 95587413 01 01 09 Smiths Heimann S Attention If a bootable operating system i...

Page 131: ...writing or reading process normally a corresponding indicator is illuminated on the USB memory 1370 For the download of the TIP and OTS XTrain reports F 2 79 the user data and access rigths F 2 10 the diagnosis report F 2 89 and the error report F 2 92 you can insert the USB memory even shortly before starting the data transmission If you wish to copy images to or from a USB memory or to recall im...

Page 132: ... or not using appropriate user identification codes and passwords or ISIS cards Intelligent Screener Identification System S Attention If the HI TIPPLUS system F 2 50 is used and user TIP statistics are kept the login procedure must imperatively be activated For the aTIP system the login procedure is indispensable since the pro jections are already user related 1400 95587413 01 01 09 Smiths Heiman...

Page 133: ...will be defined Please note that the time setting is only active for the operator access level To rule out the possibility of an unauthorized access to an unattended X ray unit choose an adequate period under Auto logout at non activity Upon expiration of the set period the user logged in last will be logged out automatically in case of non activity of the unit To deactivate this function set the ...

Page 134: ...onsist of 4 to 8 digits or letters into the two fields for Password Select the Access level of the new user in the corres ponding menu item If you want to program an ISIS card for the newly added user at once activate the last menu item Pro gram ISIS card subsequently When exiting the menu with r the data is memor ized and the program changes to ISIS card program ming F 2 22 if activated in the la...

Page 135: ...or deleted you have to exit the User data with r afterwards in units equipped with older software versions only in order to have all entries become effective In units with newer software versions modifications will become effective immediately after having been entered 1440 95587413 01 01 09 Smiths Heimann S Attention Remember your own modified data well If you have forgotten your user ID or passw...

Page 136: ...evels by means of the navigator There are Loc Supervisor 1 2 or 3 The menu opposite is dis played Now you can define the features to which settings or modifica tions can be made by the users of the selected access level I On units equipped with older software you can only enable or disable the access to the TIP and OTS system and to the automatic detection function If the access to a certain featu...

Page 137: ...configure the system except for the right to make modifications in the libraries View library right to have a look at the library of the respective system via the IMS sys tem but no right to make modifications View and modify library right to make modifications to the system s library i e import delete shift copy and rename image files categories and sessions activate and deactivate threat images ...

Page 138: ...nfigure the login procedure and manage his own data and the data of users with operator rights He cannot access the Access rights menu This menu can only be accessed by you The local supervisor cannot manage the data of users with equal or superior rights Access to the IMS system without TIP OTS libraries In case of disabled access the local supervisor has the same rights as a user with operator a...

Page 139: ...ctivate it The menu illustrated beside is displayed Select one out of three access levels by means of the navigat or There are Loc Supervisor 1 2 or 3 The menu opposite is displayed The menu structure corresponds to that of the Main menu In the subordinate menus you can define the access rights for the corresponding menu item listed under the main menu 95587413 01 01 09 Smiths Heimann I As user wi...

Page 140: ...c Supervisor 1 2 or 3 shall be activated on the X ray unit for this set the parameter to on If the parameter is set to off users of this ac cess level will not be allowed to log in at the X ray unit even if in the following access rights are granted to this level Granting of access rights The menu and menu items of the access rights menus follow the same pattern as the Main menu items 95587413 01 ...

Page 141: ...enu or menu item and read the current setting however they cannot change those settings full access Users of the corresponding access level can open the menu or menu item and are al lowed to change the setting or execute the menu function Particularities regarding the TIP OTS and IMS systems In the access rights menu of the IMS system you can determine to which categories users shall have access F...

Page 142: ... you want to exclude the access to the configuration of the TIP OTS system completely the ac cess for the TIP OTS libraries has to be disabled as well Particularities regarding the user data management and ISIS card programming If you want to switch directly from the user data management menu and submenus to the ISIS card pro gramming menu and back you have to establish full access for both menus ...

Page 143: ... After having left the menu remove the disk or CD and insert it into the drive of the other X ray unit or re move the USB memory and connect it to the USB plug of the second X ray unit Here call up the same menu s and activate the cor responding menu item Upload data from ZIP disk Up load data from CD DVD or Upload data from USB memory After your acknowledgement the data is copied to the hard disk...

Page 144: ...ew user or Edit user data F 2 12 and 13 after having entered the user data and acknowledge with r First you are requested to insert the card to be programmed Remove your own card if inserted and insert the card to be programmed If the card is new the message illustrated beside is first displayed Acknowledge the message with r If there is data already stored on the inserted card you have to decide ...

Page 145: ...t the next user F 2 12 and 13 If you finally quit the User data menu with s you will be requested to re insert your own card if you had logged in with your card at the beginning of your activity The extended ISIS functions Select menu item ISIS card programming in the Main menu At first you are requested to insert the card to be programmed Remove your own card if inserted and insert the card to be...

Page 146: ... card you can only edit the data In this case change to window Edit user data directly with key 1 abc F 2 13 If you quit the User data with s the window Edit user data or the window Add new user with r the selected or edited data is taken over into the ISIS card programming menu If the indicated user data is correct press key r The data is written on the card Afterwards you are requested to remove...

Page 147: ...who is not listed in the user data of the X ray unit you can include this user in such user list Insert the card so as to be pro grammed The window illustrated is displayed showing the data of the user If you want to include this user in the user list acknowledge with r 95587413 01 01 09 Smiths Heimann 2 25 ...

Page 148: ...menu item Operating op tions in the Main menu and activate this menu item The menu opposite is displayed How to set the keys on the keyboard Use the navigator to go to menu item Key settings and activate this menu item The menu opposite is displayed 95587413 01 01 09 Smiths Heimann 2 26 ...

Page 149: ...or whether the function is to be switched on and off by briefly pressing the priority key hold key off Afterwards exit the menu with r The function keys For some of the function keys you can define whether the corres ponding function key is to be held to activate a function hold key on or whether the function is to be switched on and off by briefly press ing the key hold key off 95587413 01 01 09 ...

Page 150: ...image keys you can define whether the corresponding im age key is to be held to activate an image display mode hold key on or whether the image display mode is to be switched on and off by briefly pressing the key hold key off Activate menu item Image keys The menu illustrated is displayed Activate or deactivate the buttons Afterwards exit the menu with r 95587413 01 01 09 Smiths Heimann 2 28 ...

Page 151: ... left all menus How to set date time and time zone I If the X ray unit is connected to a central computer airport server Matrix Server etc via network the date time and time zone set on that computer will be cyclically overtaken i e modifications you make will be overwritten after a short delay Use the navigator to go to menu item Date time time zone and activate this menu item The menu opposite i...

Page 152: ...e menu Here you can select your time zone and activate or deactivate the changeover to summer or winter time Then leave the menu with r The message The unit will be restarted to take over the new setting is displayed After confirming with r a restart of the unit will be carried out You can view and edit the single data of the selected time zone by selecting the Edit time zone menu by means of the ...

Page 153: ...ate time menu item The menu shown is displayed Set the date in the first field the time in the following Exit the menu with r How to select the image settings In this menu you can define the default image display the Zoom settings and the screen saver Use the navigator to go to menu item Image settings and activate this menu item The menu illustrated is displayed 95587413 01 01 09 Smiths Heimann S...

Page 154: ...aggage inspections Image displays of options the unit is not equipped with must not be selected 1490 The zoom settings In the Image settings menu you can set the Maximum zoom factor and in addition enable disable the Con tinuous zoom and the Zoom interpolation on newer units Select the corresponding item and set the desired value or enable disable the corresponding function Exit the menu with r Th...

Page 155: ...al view units In dual view units two views of the baggage or freight items are displayed on the two monitors One monitor shows the scanning view from the top or from the bottom the second one shows the scanning view from the side If you want to change the assignment between the views and monitors select in the View monitor as signment menu item the opposite setting 95587413 01 01 09 Smiths Heimann...

Page 156: ...e power fail buffer If the X ray inspection unit is equipped with a power fail buffer you can determine how long the X ray unit is kept ready to operate in case of power failure If within this buffer time the power supply is restored you can continue to carry out scannings at once In this case the unit needs not be switched on again Images of already scanned objects will not be lost If the power f...

Page 157: ...ing another image display and return to the default image display F 2 32 before starting the conveyors Use menu item Forbidden image display modes during conveyor run to define the image displays at the selection of which the conveyors are stopped automatically At the same time you define that the corresponding image dis play mode is left automatically when re starting the con veyors 95587413 01 0...

Page 158: ...t depressed locking off during the conveyor run The settings Forward Reverse key locking off can be chosen to avoid unattended operation of the conveyors and if the unit is not equipped with a contact mat or an attendance detector With setting a time between 1 and 3 seconds you can still allow the operators to shortly release the keys without stopping the conveyors at once immediate conveyor stop ...

Page 159: ...ion Reverse scanning cannot be used The function Continuous scanning I The function Continuous scanning is only required if you want to screen very flat objects which can not for certain reasons be put into plastic containers or similar Disadvantages of this function are the X ray generators being activated permanently as long as the conveyors are running and the con veyor keys being held permanen...

Page 160: ...will not fall down when starting the conveyors again If the conveyors were stopped because objects had piled up the objects can possibly get more damaged during the immediate reverse run Start reverse run delayed If the conveyors were stopped because objects had piled up the objects will not get more damaged because no immediate reverse run will take place Objects which have been put on the edge o...

Page 161: ... can obtain information thereupon from your sales partner IIf the selection menu for the detection class can be called up via a pro grammed function key then the detection class can also be modified by users with inferior authorization level High Density Alert activating deactivating the function High Density Alert 95587413 01 01 09 Smiths Heimann I If the HI SCAN X ray unit is not equipped with o...

Page 162: ...oactiv ity detector The following menu items are valid for all functions previously mentioned Combine frames the lower the minimum ab sorption and the minimum size values have been selec ted the more objects are provided with a frame Here you can define to which extent several frames are to be combined to one bigger frame 95587413 01 01 09 Smiths Heimann I An automatic detection will only be ex ec...

Page 163: ...all sound You can also set the Alarm duration Exit the menus with r 95587413 01 01 09 Smiths Heimann I If you have set automatic return as op erating mode on newer units F 2 36 then the conveyor stop on detection of objects is not necessary The conveyor is automatically stopped in this operating mode in any case after an object is re turned However note that the alarm message and the conveyor stop...

Page 164: ...nit hard disk for an unlimited time you can define a maximum time for the recheck and analyst operators to carry out the recheck or image evaluation If this time is exceeded the images will be deleted unless you have selected the memory option in case of timeout which is described in the following If the X ray unit is equipped with the IMS Image Store System you can define the conditions under whi...

Page 165: ... transmitted last object The complete image of the last object that has been fully scanned is trans mitted even if the beginning of such object is not visible on the screen any more This setting is only recommen ded if the operators of the X ray unit have been coached for not marking suspect baggage or freight items until the latter have been completely scanned This setting should also be selected...

Page 166: ...n be such as to permit only those bag images to be stored that contain suspect objects detected by the automatic de tection functions F 2 39 Depending on the capacity of the incorporated hard disk several thousands of images can be stored If a removable image data archive RIDA is installed then you can automatically store the images of all the bags in spected The memory capacity is by many times o...

Page 167: ... matic detection functions F 2 39 In the second menu item you define whether the Online recording is to automatically overwrite the oldest im ages in case the IMS system has got no more free memory capacity Use the last but one and the last menu item to activate deactivate the Online recording on the Removable image data archive RIDA and or on the Central image data archive CIDA 95587413 01 01 09 ...

Page 168: ...e access to further categories Recall and print images Refer to the first section to learn how to mark recall and print images You can select the following categor ies Category Contents Online Recording with subcat egories images of Online recording and images stored individually by reading in bag IDs bag code scanner on units equipped with newer software this category is divided into subcategorie...

Page 169: ...movable disk of the Online recording RIDA the category is divided into subcategories which are automatic ally created by the year month and day on which images have been stored ReCheck Analyst Recheck ex ternal image evaluation with subcategories Reject Accept and Timeout images transferred to recheck or external image evaluation stations which are stored in three different subcategories on the X ...

Page 170: ...d by conventional image processing programs The conversion is available if you as described above convert im ages from any of the existing IMS categories to an USB memory The category selection USB memory being confirmed with r the menu illustrated beside opens You can choose the image format into which the im ages shall be converted You can also select several formats at a time Your selection bei...

Page 171: ...key 1 abc Actuate key 6 pqr A window with the current file name appears Use the navigator to delete the file name Afterwards you enter a new one Accepted are digits letters and the underscore _ Confirm the new name and exit the window with r 95587413 01 01 09 Smiths Heimann 2 49 ...

Page 172: ... TIP projections F 2 51 from which categories and at which percentage in proportion to the other categories combined threat im ages and single threat objects are projected during the normal operational flow selecting percentage F 2 53 only applies to the HI TIPPLUS system I You can also add edit and delete categories F 2 52 and import complete threat image libraries from CDs DVDs ZIP disks or USB ...

Page 173: ...ts feedback when marking real objects F 2 59 whether messages for aborted projections shall be displayed in yellow or blue Message color of aborted projections F 2 60 In addition to that enter the location of the X ray unit F 2 57 This information is required for the different TIP reports The TIP menu Use the navigator to go to menu item TIP Threat Image Projection in the Main menu and activate th...

Page 174: ...images and threat ob jects are projected during the operational flow S Attention As an addition to the percentage rate setting a sufficient number of images of every active category must be selected and activated accordingly in the IMS Image Store System F 2 55 If the Selecting percentage 0 is set for all categories there will not take place any projections 1620 95587413 01 01 09 Smiths Heimann S ...

Page 175: ...reat images In units with newer software it is also possible to replace or upgrade the complete threat image lib rary by a library stored on data carriers CD DVD ZIP disk or USB memory F 2 54 Add new categories Actuate key 1 abc The menu op posite is displayed In field Category name you enter the name of the new category digits letters and the underscore _ are accepted in field Selecting percent a...

Page 176: ...rs to see to which TIP system the library belongs and if it is a complete library or an upgrade Also check if the library is intended for the unit type Then insert the first disk the first DVD or the first CD or connect the first USB memory Go to the menu item Import threat image library or Import adaptive threat image library with the navigator and activate this menu item The window illustrated i...

Page 177: ...in terminate the import by pressing key s The import being finished the category organizing menu is automatically displayed Here you can make the settings for the imported categories F 2 52 How to activate images only applies to the HI TIPPLUS system Contrary to the lower access level users you can define for every single image of all HI TIPPLUS categories and sub categories whether such image is ...

Page 178: ...n range is 20 at a bag ratio of 1 projection per 100 bags the pro jection may be made already after the 80th bag or only after the 120th bag In the third menu item Random projections random ratio you set the percentage of the number of pro jections set above to be made at random These random projections may be made either within or out of the diversification range You thus allow to have projection...

Page 179: ...navigator to go to menu item Location menu and activate this menu item The menu opposite is dis played In the first field Location you enter the name of the air port or building where the HI SCAN X ray unit is in stalled in the second field Subsite you indicate the X ray unit installation site inside the building You can enter a maximum of 8 characters per field S Attention It is indispensable to ...

Page 180: ...he either actuates H or stops the conveyors In the last menu item Additional decision time combined images you set the time a operator is given addi tionally to come to a decision after having stopped the conveyors How to work on reports Menu item Reports and data download is referred to below F 2 75 For a reasonable use of the reports the feature Login duty for all users or Login only via ISIS ca...

Page 181: ... the re inspection and the X ray image is possibly sent to the recheck station Another setting is possible by means of which the operator re ceives a feedback and the image is simultaneously sent Do the appropriate setting in the TIP menu Go to the menu item Feedback when marking real objects The following settings can be made off The operator does not receive a feedback when actuating H The scann...

Page 182: ...ection of the color in which aborted projections are indicated You can choose the colors yellow or blue in the TIP menu under the menu item Message color of aborted projections 95587413 01 01 09 Smiths Heimann I If the X ray unit is also provided with the OTS system this setting applies also for aborted projections of the OTS sys tem F 2 72 2 60 ...

Page 183: ...he other categories combined threat im ages and single threat objects are projected among and into the basic images during the training select ing percentage F 2 67 I You can also add edit and delete categories F 2 66 and import complete libraries from CDs DVDs ZIP disks or USB memories in units equipped with a newer software F 2 64 which combined threat images and single threat objects from a cat...

Page 184: ...feedback to operators F 2 71 if reports are being kept or not run statistics s F 2 71 whether the projected objects shall be displayed with markings of automatic detection functions display object markings F 2 71 whether messages for aborted projections shall be displayed in yellow or blue Message color of aborted projections F 2 72 The OTS XTrain menu Use the navigator to go to menu item OTS XTra...

Page 185: ...n must be activated F 2 68 1680 I You can generate further sessions yourself by creating a new session see below recording images of baggage items with a storing function of the IMS image store system Online recording or individual storing see 1st section and shifting the images with unsuspicious contents as basic images from the Clipboard or Online Re cording category into the previously created ...

Page 186: ...ession with the navigator Actuate key 3 ghi How to import an OTS library Depending on the data material available you have to decide whether you want to replace or upgrade the ex isting library Therefore check the data carriers to see if it is a complete library or an upgrade Also check if the library is intended for the unit type Then insert the first disk the first DVD or the first CD or connect...

Page 187: ... does not matter When all data carriers have been read in terminate the import by pressing key s The import being finished the category organizing menu is automatically displayed Here you can make the settings for the imported categories F 2 66 If you leave it the menu for managing the training sessions is displayed subsequently for the same reason F 2 63 How to set the image change frequency Use ...

Page 188: ... and at which percentage in propor tion to the other categories threat images and threat ob jects are projected during the operational flow S Attention As an addition to the percentage rate setting a sufficient number of images of every active category must be selected and activated accordingly in the IMS Image Store System for the OTS XTrain projec tion F 2 68 If the Selecting percentage 0 is set...

Page 189: ...images In units with newer software it is also possible to replace or upgrade the complete threat image lib rary by a library stored on data carriers CD DVD ZIP disk or USB memory F 2 64 Add new categories Actuate key 1 abc The menu il lustrated is displayed In field Category name you enter the name of the new category accepted are digits letters and the under score _ in field Selecting per centag...

Page 190: ...elete category Select the category with the navigator Actuate key 3 ghi How to activate images Contrary to the lower access level users you can define for every single image of all OTS Xtrain sessions and threat categories and subcategories whether such image is to be recalled projected or not during the operation This setting is made in the IMS menu F 2 44 95587413 01 01 09 Smiths Heimann I Activ...

Page 191: ...in sessions or threat projections Then actuate key 7 stu to enable or disable the images The names of the images activated for OTS XTrain are displayed in the normal font type images disabled are displayed in narrow font type How to define the threat projection settings Use the navigator to go to menu item Threat projection settings Threat projec tion frequency and activate the menu item The menu ...

Page 192: ...te the next projection by simply counting the basic images The higher the percentage values the less defined the projections take place 1710 Both detected and non detected threat objects and im ages are marked by a yellow black frame In the last menu item Delete projections after you determine how long framed objects remain visible on the screen before they are automatically deleted How to set the...

Page 193: ...backs Use menu item Feedback to operators to activate deactivate feedbacks to the operators How to display the object markings All images of threat objects were recorded with HI SCAN X ray units If at the moment of storing automatic detection functions like X ACT High Density Alert or HI SPOT were active at these units the projected threat objects would be marked accordingly with colored frames or...

Page 194: ... of the color in which aborted projections are indicated You can choose the colors yellow or blue in the OTS menu under the menu item Message color of aborted projections 95587413 01 01 09 Smiths Heimann I If the X ray unit is also provided with the TIP system this setting applies also for aborted projections of the TIP system F 2 60 2 72 ...

Page 195: ...brary Observe the following instructions when creating libraries designed to being imported S Attention The X ray unit software distinguishes between lower case and upper case names of directories and files Therefore it is essential that you set the computer on which you create the library to the display of upper and lower case letters 1750 CDs or DVDs must be created using a file system according...

Page 196: ...the exact spelling When importing a complete threat image library all data carriers will be regarded as upgrades after de letion of the existing library F 2 54 Hence the order of the data carriers does not matter The categories should only contain threat images in the HIF format Heimann Image Format Though files of different formats are harmless they needlessly occupy memory capacity since they ar...

Page 197: ...ted is displayed In the first field Operation you can choose one out of 5 reports to view The reports are described in the fol lowing In the second field from and third field to you define the period of time of the report and in the last field User you name the user whose report is to be displayed only active for report 2 After selection actuate key 1 abc to have the report displayed You can leaf ...

Page 198: ... Possible values are between 0 and 1 The higher the value the higher the probability Pfa probability that the operator marks bags basic images without any threat projec tion occurred Probability of False Alarms Possible values are between 0 and 1 The higher the value the higher the probability is d derived operator performance factor Possible values are between 4 7 and 4 7 The higher the value the...

Page 199: ... H though there was no projection Request selected report or data download The screener daily log report report 1 This report presents an overview of which operators worked each day along with the X ray unit The list is chronological The individual screener performance report report 2 This report which refers to the individual user indicates the daily performance of an individual operator 95587413...

Page 200: ...ort you can compare the performances of all operators within the period of one month The threat detection by category report report 4 This report indicates which one of the fictitious threat images and objects were detected by the individual operators and which were missed 95587413 01 01 09 Smiths Heimann 2 78 ...

Page 201: ...t Image Projection or OTS XTrain Operator Training System see above using the navigator The menu illustrated is displayed Select item Data download to ZIP disk Data download to CD DVD or Data download to USB memory in the first field In the second and third field you define the month and the year After selection actuate 1 abc to start the download Wait for the message TIP OTS reports successfully ...

Page 202: ...transferred via network without Heimann Management Console you first have to create the reports locally on the X ray unit On units with newer software versions proceed as described above for the transmission to ZIP disk CD or USB memory however select the menu item Generate reports locally On units with older software carry out the data trans mission to the ZIP disk as described above Then enable ...

Page 203: ...o a target computer use the second menu item to enter the IP address of the Target computer to which the X ray images are to be sent via data network Get this data from the net work administrator Normally the transmission of an X ray image takes only a few seconds During this time no X ray inspec tions are possible If owing to troubles on the network or target computer the transfer time defined vi...

Page 204: ...set the default image display F 2 32 With the menu item Automatic transfer you activate the automatic transfer of all generated X ray images If you deactivate the automatic transfer the generated X ray images can be individually transferred by the op erator as an alternative For this purpose it is however necessary that you assign one of the priority keys to the Transfer image function F 2 26 If t...

Page 205: ...he InLine interface the external con trol prior to selecting the calibration function F 2 87 If the calibration menu is visible even without de activating the external control the deactivation is not necessary A Warning Since the control signals of the baggage handling line or the safety switches are ignored when the external control is deactivated the feed or discharge conveyors and the conveyor ...

Page 206: ...of the lead curtain at the input side on the con veyor as illustrated The pointed end of the body is always to be directed towards the inspection tunnel All unit types without side cabinet carrying the illustrated labels above the tunnel entrances The right or left side of the body must be in line with the edge of the conveyor belt above which the label is situated Depending on the unit s layout t...

Page 207: ...be the left or right side Accordingly the body will be in line with the right or left edge of the conveyor belt On dual view units if the main monitor shows the baggage and freight items in the scanning view from the top F 2 33 The calibration body is placed on the conveyor belt s side close to which the lateral cabinet A is attached The lateral cabinet is located either on the left or the right s...

Page 208: ...put on the screen S Attention If the calibration was not successful an appropriate error message will be displayed F 2 92 If further calibration tests do not lead to success the X ACT system should be deactivated until the X ray unit has been repaired because the X ACT system may not work correctly and the objects searched for are not detected automatically any more 1780 Carry out complete calibra...

Page 209: ...run in opposite directions when the external control is deactivated this can lead to a high risk of crushing between the convey or belts See to it that nobody comes near the conveyors and reactivate the external control as soon as possible In case of deactivated conveyor end or oversize detectors baggage or freight items can fall off the conveyors or get stuck at the tunnel entrances or exits 1790...

Page 210: ... the menu item External access The menu illustrated is displayed Enable the access via the menu function Enable access The status display changes into Access enabled I If you leave the menu with s the access will be blocked again This way access to the X ray unit is only possible as long as the menu shows the status message Access enabled With menu function Disable access appearing then you can di...

Page 211: ...via a connected network F 2 88 Use the navigator to go to the menu item Diagnosis in the Main menu and activate it The menu illustrated is displayed Move to menu item Diagnosis report and activate it The X ray unit executes a couple of tests now After wards the Diagnosis report is displayed on the screen 95587413 01 01 09 Smiths Heimann S Attention During the generation of the diagnosis report the...

Page 212: ...address that you receive from your data network administrator Select the paper size your printer is set to see operating instructions of the printer with menu item Pa per size In field Print contents you can select whether the screen contents or the image of the object scanned last is to be printed out screen the printout comprises the object scanned last i e the current object and the objects pre...

Page 213: ...priate message and the X ray image is stored under cat egory Print jobs from where it can be printed out once more If you want to prevent users of the operator access level from printing out images you can exclude this right via menu item Printing by all users If you want to delete print jobs in progress e g due to an overload of the printer or the data network ac tivate the last menu item Cancel ...

Page 214: ...reat image categories For one or several categories set a selecting per centage of altogether 100 F 2 52 or 2 66 A removable drive does not work Cause Correction The drive is not inserted correctly Check if the release trigger of the drive has locked and if the LED on the drive lights up shortly when switching on the unit F 2 4 A USB memory does not work Cause Correction The USB memory is not inse...

Page 215: ...s Error code 0703 and 0705 ZIP disk not writeable Copying image files aborted Formatted ZIP disks must be used to do the HI TIP OTS XTrain and user data download The disk may be full Error code 0706 Data carrier not readable Check whether the CD DVD or ZIP disk has been correctly inserted or the USB memory correctly connected Error code 0707 Data carrier not readable or IMS memory full Copying abo...

Page 216: ...riting process Error code 0725 Reading USB memory failed The memory is not connected correctly or defect ive Error code 0726 Writing to USB memory failed The memory is not connected correctly or defect ive Error code 0727 see error code 0725 Error code 0728 see error code 0726 Error code 1205 Current time zone setting is invalid Check setting Renew the time zone setting Error code 1400 Network not...

Page 217: ...rating troubles Error messages Correction Error code 2305 Invalid data on the card The data on the card is wrong or not complete You may delete the card and program it again 95587413 01 01 09 Smiths Heimann 2 95 ...

Page 218: ...95587413 01 01 09 Smiths Heimann 2 96 ...

Page 219: ...n with ISIS card 1 10 sec 0 off 0 Maximum login time 1 120 min 0 off 0 Auto logout after 1 120 min of non activity 0 off 0 Clear screen and REVIEW memory after logout on Operating options F 2 26 Key settings Priority keys hold key hold key P1 BW SEN off P2 BW HIGH off P3 MARK Function keys hold key hold key F1 MARK F2 AUTO off F3 STORE F4 IMS MENU F5 MAIN MENU F6 EXIT F7 X PLORE off F8 X ACT MENU ...

Page 220: ...uperenhance ment and Zoom on Zoom on Operating mode One way Scanning direction standard forward Reverse scanning off Reverse key locking off Forward key locking on Releasing conveyor keys is ignored for 0 3 seconds 0 Continuous scanning off For cutless images conveyor reverses at Start Recheck external image evaluation F 2 42 Store images if unsuspicious off Store images if suspicious off Store im...

Page 221: ...n TIP Threat Image Projection F 2 50 Projection settings Bags per projection bag ratio 2 9999 10 Diversification range bag range 0 50 50 Random projections random ratio 0 50 5 Delete projections after 1 20 seconds 0 off 2 Location menu see above Operating options Decision time settings Decision time threat objects 1 10 sec 3 Additional decision time threat objects 0 45 sec 10 Decision time combine...

Page 222: ...istics on Display object markings on Enable training system on Printer F 2 90 Printer type HP Laserjet 2100 Series Printer IP address 0 0 0 0 Paper size A4 Print contents screen Abort non completed print jobs after 1 30 minutes 0 off 0 Printing by all users off InLine control and interface External control F 2 87 Interface variant Interface inactive Ext control inactive Xport Image Transfer System...

Reviews: