Quick-Start Guide for Smithy Metal-Working Machine
Moving Your Smithy from the Pallet
Dec 2008
10
M
Moovviinngg YYoouurr SSm
miitthhyy w
wiitthhoouutt M
Meecchhaanniiccaall PPoow
weerr,, continued
Step 7
Important Note
Important Note
Step 8
Step 9
Step 10
Step 11
Remove the Carriage Assembly
Smithy does not recommend that you remove the carriage assembly unless it
is absolutely necessary. It is very easy for several small parts to fall into the
apron assembly and cause problems later.
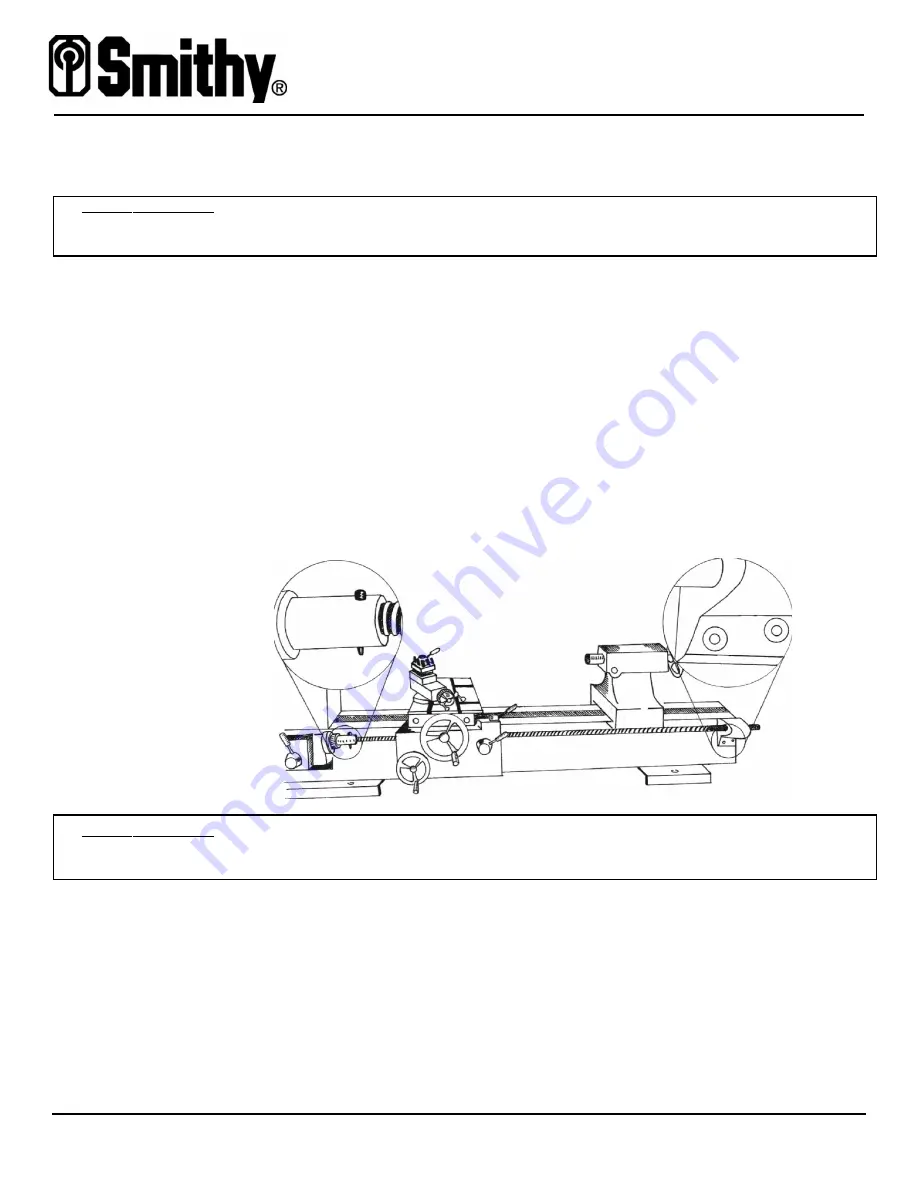
If the carriage assembly must be removed, start with the coupler sleeve that con-
nects the leadscrew to the driveshaft on the left-hand side of the leadscrew (see
blow-up at left in drawing below). It is pinned to the leadscrew by a tapered pin.
Locate the smaller end of the pin and drive the pin out.
On the right trestle, remove the hex-socket capscrews (see blow-up at right in draw-
ing below).
Note:
Depending on the model, the cap screw for removing the testle
could be located on either the operator’s side (as shown below) or at the end of the
bed. Tap lightly on the right trestle to loosen it from the lathe bed. Do not remove
the locating pins. You will need them in place to realign the carriage. Engage the
half-nut, run the carriage to the right and off the rack, and slide the carriage off the
bed. **
As you are removing the carriage, the gib and locking pin could fall out. Be careful
not to lose them.
The drawing above is shown with the tailstock in place. However, the tailstock
will need to be removed before the carriage can be removed. See Step 6
above.
With a person at each lifting handle, use proper lifting techniques to move the
machine to the location of the permanent work bench. Proper lifting technique
includes squatting down so that you use your leg muscles to lift rather than bending
over at the waist and risking a back injury.
Lift the machine high enough to clear the top of the work bench.
Move the machine over the work bench and gently set it down in position.
After following the instructions on page 11 to secure the machine to the bench,
reassemble any parts that were removed.
** On models: GN-1324, GN-1340, GN-1324-I, GN-1340-I, MI-1220 LTD & MI-1231 LTD


