background image

Installing the system

Connect NVR and cameras with corresponding power adapters.NOTICE,
NVR Power Adapter: 12V/ 2A
Camera Power Adapter: 12V/ 1A

DO NOT USE WRONG ADAPTER FOR SYSTEM WORKING

Connect provided mouse to NVR box. 
Attach provided antennas to cameras. 

NOTE:

If antenna already has been screwed into the camera, please DO NOT unscrew it. 
Otherwise camera will be broken. Systems have two different antennas. One can be 
removed and the other cannot be, which is all-in-one.)

NOTICE,
Fasten antennas tightly for better signal transfer.

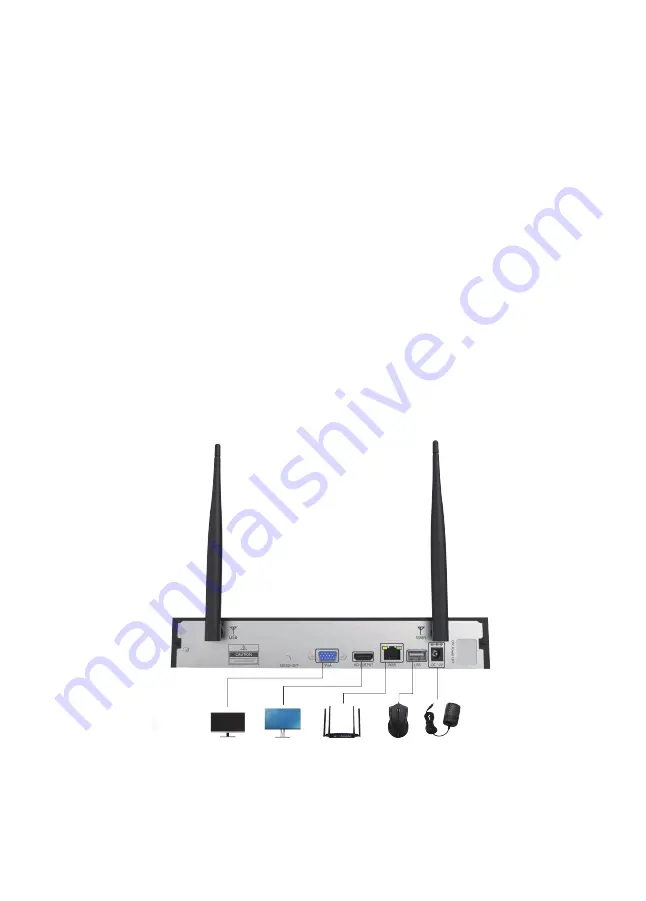
Connect NVR to PC Monitor or TV by VGA/ HDMI cable, please kindly noted that the 
system doesn’t support on laptop and All- in-One PC for initial Setup.
Connect NVR to the router by provided Ethernet cable, the router must be
WAN(wide area work).

The NVR and cameras that came with your order have been paired and tested at 
the factory to operate immediately when powered up.  Pairing would only be neces-
sary if you add additional cameras to your system. (More on the pairing process 
later)

04

VGA Port

(PC Monitor)

HDMI Port

(TV Monitor)

Ethernet Port

(Router)

USB Port

(Mouse)

Power Supply

Summary of Contents for 2PCS

Page 1: ...Wireless Network Video Recorder System User Manual 2PCS 4PCS 6PCS 8PCS 720P 960P 1080P 2CH 4CH 6CH 8CH NVR Kits V 9 201905...

Page 2: ...ents Camera System Installation Password Management and Internet Connection Remote Viewing on a Smart Phone Viewing on PC by Eseecloud Software Record Video Playback Video Frequently Asked Questions 0...

Page 3: ...eskysales003 Skype ID for UK SMONETSERVICE Wechat for US CA B997520270 Website WWW SMONETCCTV COM Thank you for choosing Smonet product Here is the list for product and relevant accessories S N 1 2 3...

Page 4: ...om the cameras Installing a Hard Drive Skip this section if a hard drive was pre installed Hard Drive Specifications 4TB maximum internal SATA Interface 3 5 2 5 inches Please power off the NVR before...

Page 5: ...hich is all in one NOTICE Fasten antennas tightly for better signal transfer Connect NVR to PC Monitor or TV by VGA HDMI cable please kindly noted that the system doesn t support on laptop and All in...

Page 6: ...the NVR Password Management and Internet Connection 2 Log in Right click your mouse to open the main menu on the home screen Click System Setup and the password page will appear NOTE The Default User...

Page 7: ...avigate to System setup Network setup make sure DHCP is checked At the bottom of the window you should see Network Status as Healthy Network Click Show QR Code you should see Cloud ID 06 Click network...

Page 8: ...PC or Smart Phone More on this in the next Section of this manual If the system does not come Online please do the following 1 Make sure the light at the network port of the NVR is flashing which indi...

Page 9: ...ier in section 2 of this manual Use NVR login Username password on your monitor screen here Pic3 If you have multiple Smartphones you must register multiple accounts You cannot have one account across...

Page 10: ...Enter the cloud ID 9 or 10 numbers You can find it at the bottom right side of your home monitor screen Username is NVR system user name on your home monitor screen If you don t change it in your set...

Page 11: ...At right bar you ll see your Device name double click on it select Connect Videos you ll be able to view live videos 10...

Page 12: ...lled in the NVR by the user Recording There are two types of recording Scheduled Recording and Motion Activated Recording TYPE 1 Scheduled Recording Right click the mouse on the home screen and naviga...

Page 13: ...iscussed ads part of Type 2 Motion Recording in the next section Step3 The period can be set to an individual day of the week 7 day available from Monday to Sunday Step4 Specific time intervals can be...

Page 14: ...ed E mail Notice you need to bind your email to the system if you want to receive email alert More information about how to bind email can be checked in FAQ Step5 Arming time Factory Default Setting i...

Page 15: ...setting Step8 You can simply click Copy to copy the motion detection setting to other channels and adjust area setting for each cameras one by one To use the playback feature you must first set up th...

Page 16: ...vigate to System setup General setup HDD Setup select Format and click Format click OK From this screen you can also turn off the overwrite function and check your hard drive Status At right bar pleas...

Page 17: ...t Q3 How can I troubleshoot camera issues A First check to see if the power adapter is working by testing with another power adapter lf the power adapter is functioning move the camera close to NVR bo...

Page 18: ...k OK Please make sure you haven not blocked message notifications from the IP PRO app in your phone settings Q5 How can I receive e mail notifications for motion detection A First ensure you follow th...

Page 19: ...yboard next to the forward slash as shown in this figure Complete the fields on the screen as follows take hotmail account as an example SMTP Provider select it per your email type Sender Sender e mai...

Page 20: ...OK Whether or not your test was successful be sure to click Ok to save your settings To test your alarm walk past your camera You will receive an Email notification within 2 to 3 minutes as shown in...

Page 21: ...Video detection again Click the Copy to button to other Channels Click OK Email alarm will be deactivated Q7 How do I use a USB to Back up my data A You need to make sure you have recorded video in y...

Page 22: ...he camera Step1 Remove the Ethernet cable connecting the NVR to your router and connect it to the new camera Power up the camera Step2 right click the mouse and select the Video Manage menu item Step3...

Page 23: ...d by antennas Make sure all cameras antenna fixed tightly Adjust the direction of antennas as shown in the figure below Best wireless signal Worst wireless signal Putting NVR box higher to be the same...

Page 24: ...hly illuminated Try lower the sensitivity settings on the cameras to minimized false recordings You could also try mounting the cameras under a building overhang that will block rain from passing too...

Page 25: ...use from the home screen of your monitor and navigate to System setup General setup HDD setup Verify if there is HDD information select hard drive information click Format OK If there is no hard drive...

Page 26: ...t the NVR to another monitor with higher resolution When the videos appear you may need to adjust the NVR to a lower resolution level such as 1024 768 to allow the videos to properly display on the sc...

Page 27: ......

Reviews: