background image

HEX390 Installation & Commissioning Instructions September 2016

3

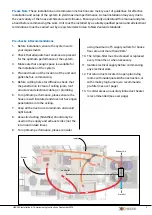
Please Note: 

These installation and commission instructions are merely a set of guidelines for effective 

installation and setup of the system to yield maximum performance. Actual installation may vary due to 
the vast variety of the house architecture and climates. Ensure you fully understand this manual and plan 

ahead before commencing the work. Unit must be installed by a suitably qualified person and all electrical 

terminations must be carried out by a registered electrician to New Zealand standards. 

using maximum of 5 supply outlets for house 

floor area not more than 280m

2

10. 

The G3 pre-filter must be cleaned or replaced 

every 9 months or when necessary. 

11. 

Isolate electrical supply before commencing 
any electrical work.

12. 

For return ducts located in open plan living 
rooms with inadequate kitchen extraction, or 
with smokey log burners, we recommend a 

pre-filter (see over page)

13. 

In colder areas an auxiliary inline duct heater 
is recommended (see over page)

Pre-checks & Recommendations

1. 

Before installation, ensure the system suits 
your requirements

2. 

Check that adequate heat sources are present 
for the optimum performance of the system.

3. 

Make sure that enough space is available for 
the installation of the system. 

4. 

Plan and mark out the location of the unit and 
grilles before commencing 

5. 

Before cutting holes for diffusers, check that 
the penetration is clear of ceiling joists, roof 
structure and electrical cabling or plumbing.

6. 

For optimum performance, please ensure the 
house is well insulated and does not have open 
penetrations into the ceiling.

7. 

Keep all the duct runs to minimum and avoid 
tight bends. 

8. 

Acoustic ducting (Silentflex) should only be 

used on the supply and exhaust sides (not the 
return and intake lines).

9. 

For optimum performance, please consider 

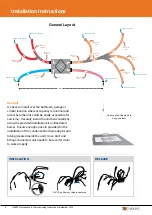
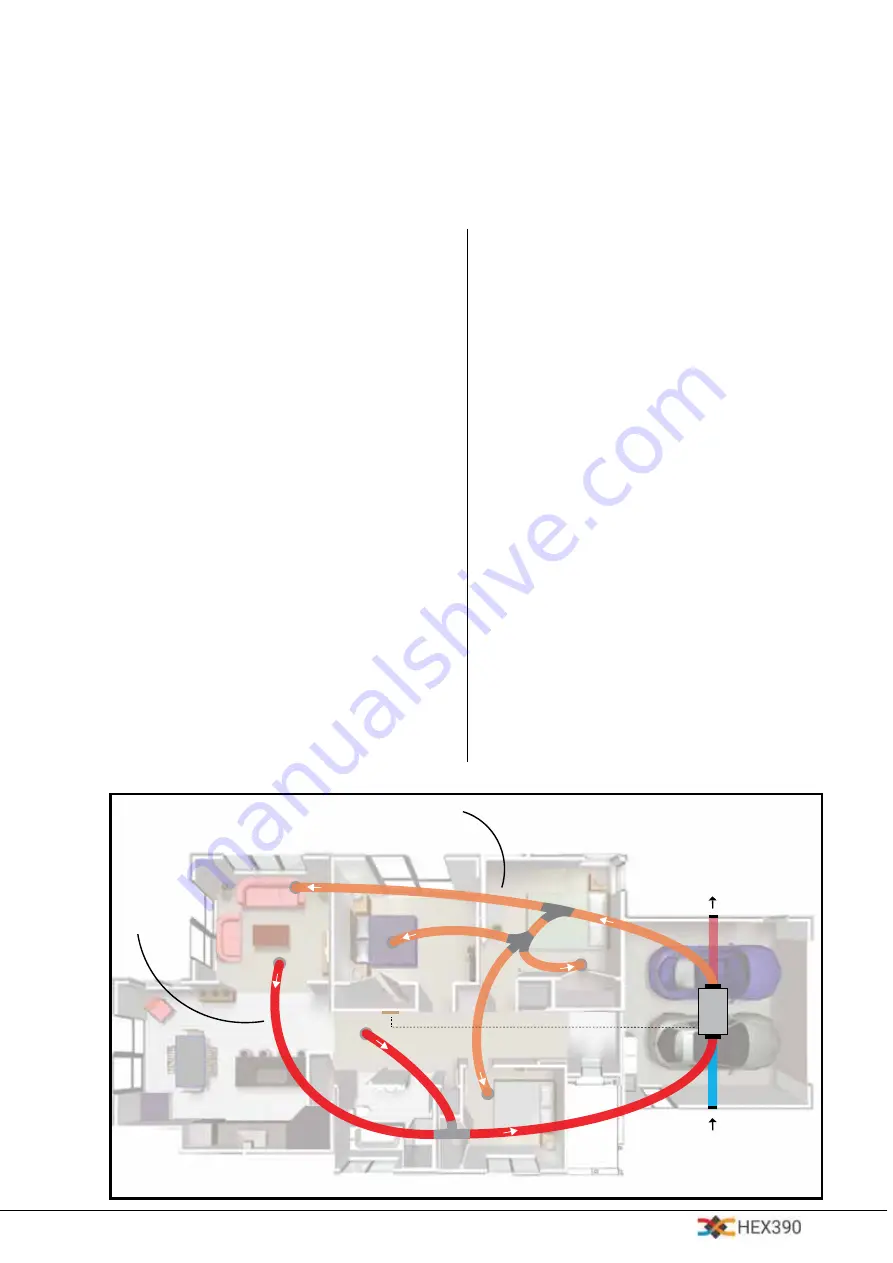
supply

controller

Extract

Fresh Air

Exhaust Air

HEX390

Summary of Contents for HEX390 Series

Page 1: ...er 2016 1 HEX390 Domestic Ventilation System with Heat Exchanger Balanced Pressure Ventilation Installation Commissioning Instructions for Digital or Manual controller HEX390 Supply Air Return Air Exhaust Air Outside Air HEX390 Heat Exchange unit v3 1 762 ...

Page 2: ...______________________________________________________________ HEX390 Warranty 5 years manufacturing warranty from date of first retail purchase This HEX product when delivered to you in new condition from a HEX authorized dealer and used in normal conditions will be free from any defects in manufacturing materials and workmanship for the periods set out above Warranty Period Any faulty goods will...

Page 3: ... with inadequate kitchen extraction or with smokey log burners we recommend a pre filter see over page 13 In colder areas an auxiliary inline duct heater is recommended see over page Pre checks Recommendations 1 Before installation ensure the system suits your requirements 2 Check that adequate heat sources are present for the optimum performance of the system 3 Make sure that enough space is avai...

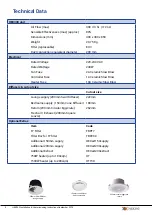
Page 4: ...Fuse 10A Ceramic Slow Blow Diffusers cut out size Cut out size Lounge supply 200mm Swirl Diffuser 222mm Bedrooms supply 150mm Cone Diffuser 180mm Return 200mm Circular Egg Crate 262mm Fresh air Exhaust 200mm Square Louvre Optional Extras Item Code F7 Filter FBPF7 Filter Box for F7 filter FBP200 Additional 150mm supply HEXext150supply Additional 200mm supply HEXext200supply Additional Extract HEXex...

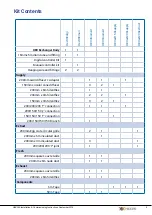
Page 5: ...1 1 150mm circular cone diffuser 3 2 1 200mm x 6m Silentflex 1 1 200mm x 3m Silentflex 2 2 1 150mm x 3m Silentflex 3 2 1 200 200 200 Y connection 1 1 1 200 150 150 y connection 1 150 150 150 Y connection 1 200 150 150 150 Branch 1 Extract 200mm Egg crate circular grille 2 1 1 200mm x 6m insulated duct 1 200mm x 3m insulated duct 3 1 200 200 200 Y joint 1 1 Fresh 200mm square Louvre Grille 1 1 200m...

Page 6: ...silent 150mm x 3m silent 150mm x 3m silent 200mm x 3m silent 200mm x 3m insulated Drain 200mm x 6m nude 6m 200mm x 6m silent 200mm louvre sq grille 200mm louvre sq grille 150mm Cone Diffuser 200mm Swirl Diffuser 150mm Cone Diffuser 150mm Cone Diffuser 200mm Circular Eggcrate General Layout Up to 6 times faster to install than traditional methods Keyless no tool required for adjustment Ergonomic bu...

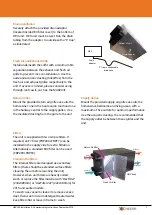
Page 7: ...es Use the Insulated ducting from the grille to the unit Exhaust Air Return Air filter HEX body Supply Air Return Air Outside Air Fresh Air filter Filters The unit is supplied with two G3 pre filters If required an F7 filter FBP200 FBPF7 can be installed in the supply side for extra filtration Alternatively a standard EU2 filter can be used FBP200 FBPF2 Supply Grilles Mount the provided supply air...

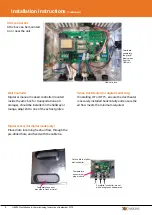
Page 8: ...adjacent to one of the extract grilles Temperature sensor mounted in fresh air inlet Temperature sensor wire plugs in here Cat5 cable to digital wall controller For digital controller mount with pack glands downwards In line Duct Heater for digital model only If installing HT or HT15 ensure the duct heater is securely installed horizontally and ensure the air flow meets the minimum required Digita...

Page 9: ...set to 30 the unit will turn off if the incoming fresh air is above 30ºC Return Air filter Fresh Air filter Optional Internal On Off Thermostat Electrical Supply 230VAC by installer Electrical supply must be installed by a registered electrician as per the schematics on pages 10 11 Heater Connection Return Air Shielded don t cut Cables The 5 core cable fan loom goes to the attic box for both manua...

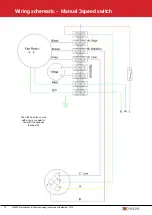
Page 10: ...HEX390 Installation Commissioning Instructions September 2016 10 Wiring schematic Manual 3speed switch The attic box also comes with a two core wire for use with the optional thermostat ...

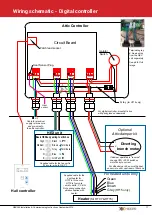
Page 11: ...ic damper kit 1 2 3 P N P1 N P3 N NC C 240VAC MOTOR HEAT Vent Circuit Board Patch lead socket Isolator Switch NO Heat Sensor Plug Grey HT15D Only Green Blue Brown Grey Mode Fan Diverting Branch Motor Heater 1 2 3 N P P N If damper operates in reverse change CW CCW switch on motor body to correct Diverting branch motor Hall controller For heated units only Heat sensor For attic damper kit ensure th...

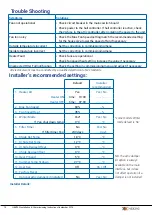
Page 12: ...s not affect operation if a damper is not installed Symptoms Solutions Fans not operational Check circuit breaker in the mains switch board Check power to the hall controller If hall controller is active check the 2A fuse in the attic controller after isolating the power to the unit Fan too noisy Check the Max Fan Speed setting match the recommended setting for the house size lower the speed of fa...

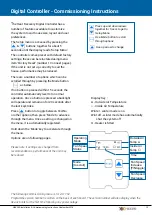
Page 13: ...Press button to toggle between Yes No or other options then press Mode to advance through the menu Once a setting is changed on the menu it is automatically registered Hold down the Mode key to accelerate through the menu Options are on following pages Please note if settings are changed from recommendations performance of the unit may be reduced Display Key Δ Outside Air Temperature Inside Air Te...

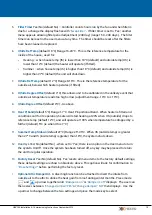
Page 14: ... a max of 100 House size Max Setting Upto 120m2 50 120m2 180 m2 70 180 m2 250 m2 100 280 Two or more units recommended 3 Fan Speed Heat default 45 Range is 30 to 60 adjustable in 1 increments using up down arrows Fan Speed Heat sets a minimum speed for the fan to ensure enough airflow for the heater to operate There are many duct fan combinations some more restrictive to airflow than others Theref...

Page 15: ... Degree Offset default 0 C As above 10 Heat P band default 5 C Range 1 7 C Heat Proportional Band When heater is fitted and conditions call for its operation heater will start heating at 20 when OS outside drops to reference temp default 12 C and will operate at 100 when temperature has dropped by a further default 5 C ie when OS is 7 C 11 Summer Temp S down default 27 C Range 25 35 C When OS outs...

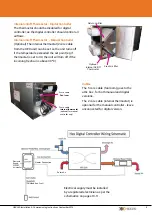
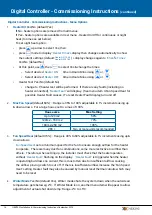
Page 16: ...e cleaned replaced Clock function has battery back up in the event of a power failure Time can be set adjusted by pressing mode and buttons together until Entering Menus then Set Clock appears Time can then be adjusted using up down buttons once correct time is set press mode to save new setting Optional Attic Damper Kit A diverting branch can be attached to divert the intake from the outside air ...

Reviews: