background image

15 


KEY # 

PART # 

DESCRIPTION 

QTY 


KEY # 

PART # 

DESCRIPTION 

QTY 

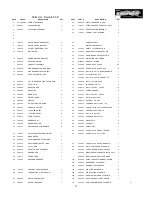
UP 3K ASSB  UPRIGHT ASSEMBLY  


53 

08-0004 

CIRCUIT BREAKER 15 AMP 

20-0001 

DECK ASSEMBLY  


54 

13-0017 

TELCO HARNESS FOR HEART RATE 

20-0003 

ELEVATION ASSEMBLY  


55 

11-0002 

REAR ELEVATION BUSHING 


56 

11-0003 

UPRIGHT PIVOT BUSHING 


19-0014 

MOTOR MOUNTING BRACKET 


59 


CONSOLE DECAL  

19-0015 

MOTOR COVER BRACKET 


60 


MOTOR COVER DECAL  

19-0029 

OPTICAL WHEEL BRACKET 


62 

14-0024 

SAFETY LATCH DECAL N/S 

10 

19-0019 

BELT GUIDE 


63 

14-0025 

WARNING FOLDING DECAL N/S 


64 

14-0026 

WARNING CONSOLE DECAL N/S 

12 

19-0032 

SPRING ANCHOR BRACKET 


65 

02-0078 

MOTOR TENSION SPRING 

13 

06-0018 

BASE PAN MOTOR 


66 

02-0002A  DECK LIFT SPRING 


24-0151 

CONSOLE ASSEMBLY  


67 

02-0004 

SCREW, 8X 5/8 PHIL PH 

40 

16 

05-0019 

SIDE BOARD EXTRUSION RIGHT 


68 

02-0005 

SCREW, 8X 5/8 PHIL PH HILO 

16 

05-0020 

SIDE BOARD EXTRUSION LEFT 


69 

02-0006 

BOLT, 5/16 X 5 - 1/2 SHOULDER BOLT 

17 

06-0027 

PIVOT SUPPORT COVER 


70 

02-0007 

5/16-18 NYLOCK NUT 


71 

02-0008 

BOLT, 5/16-18 X 3/4 GRADE 2 ZP 

21 

06-0053 

3-PC LCD CENTER PLASTIC CONSOLE 


72 

02-0009 

NUT, 5/16-18 WHIZLOC 

22 

06-0071 

FAN 5" 5/8” ID 


76 

02-0013 

LOCK WASHER, 1/4 

23 

06-0020 

BASE PAN END 


77 

02-0014 

BOLT, 1/4-20 X 2 - 1/2 HEX 

10 

24 

06-0004 

BASE PLUG 


78 

02-0015 

SPRING WASHER 

25 

06-0005 

DOME PLUG 


79 

02-0016 

BOLT, 3/8-16 X 2 - 1/2 HEX 

26 

06-0007 

MOTOR COVER   


80 

02-0017 

NUT, 3/8-16 NYLOCK 

27 

06-0008 

END CAP 


81 

02-0018 

PUSH NUT, 3/8 HAT 

28 

06-0009 

S.E.S. EXTENSION GLIDE 


82 

02-0019 

CARRIAGE BOLT 10-24 X 1-1/2 

29 

06-0019 

BASE PAN CENTER 


83 

02-0020 

SCREW, 1/4-20 X 2-1/2 SOCKET HEAD 

30 

06-0011 

2" ROLLER WHEEL 


84 

02-0021 

WASHER, 9/32 X 5/8 X 1/8 

31 

06-0012 

3” ROLLER WHEEL 


85 

02-0022 

NUT, 10-24 NYLOCK 

32 

06-0013 

UPRIGHT SPACE 


87 

02-0024 

CARRIAGE BOLT 5/16 X 1 

33 

10-0004 

RUBBER FOOT 


88 

02-0025 

WHEEL AXLE 

34 

10-0002 

BOARD ISOLATOR 


89 

02-0026 

PUSH NUT    

10 

35 

10-0013 

GRIP MOLDED WITH REMOTE 


91 

02-0028 

SAFETY KEY 


93 

02-0030 

SCREW, 8-32 X 5/8 HEX TRILOBE 

37 

12-0022 

ACTUATOR (ELEVATION MOTOR) 


94 

02-0031 

SCREW, 3/8-16 X 1 3/4 HEX 

38 

12-0018 

DRIVE MOTOR  


39 

03-0006 

WALKING BOARD EXTRA LONG 


40 

04-0012 

WALKING BELT EXTRA LONG 


97 

02-0034 

SCREW, 8-32 X 5/8 PPH N/SHOWN 

41 

04-0004 

POLY V BELT 


98 

02-0035 

NUT, 8-32 NYLOCK NOT SHOWN 

42 

09-0012 

FRONT ROLLER ASSEMBLY 


99 

02-0036 

SCREW, GREEN HEAD 8 X 5/8 PPH 

43 

09-0013 

REAR ROLLER 


08-0094 

MEM, LCD PROGRAM WITH INCLINE 815 

44 

13-0011 

POWER CORD 


08-0089 

MEM, LCD POWER 815 AND 835HR 

45 

13-0003 

ENCODER HARNESS 


103 

02-0040 

GUIDE TUBE RETAINER NOT SHOWN 


104 

14-0027 

EMERGENCY STOP DECAL 


105 

06-0014 

BUSHING, STRAIN RELIEF 

48 

13-0016 

CONTROL PANEL HARNESS 


107 

06-0016 

WIRE TIES NOT SHOWN 

10 

49 

13-0007 

JUMPER WIRE 6" NOT SHOWN 


108 

06-0021 

WIRE CLAMP NOT SHOWN 


109 

06-0022 

RESET GUIDE TUBE NOT SHOWN 

51 

08-0050 

MOTOR CONTROLLER 


110 

06-0024 

HEX WRENCH CLIP NOT SHOWN 

52 

08-0047 

OPTICAL ENCODER 


111 

10-0007 

6" CROSS HANDLEBAR FOAM GRIP 

Parts List - Smooth 5.3P 


Summary of Contents for 5.3P

Page 1: ...dmillbynet com advancedfitness com The Fitness Superstore SALES 888 9TREADS 888 987 3237 SERVICE 888 340 0482 SMOOTH is a registered trademark of Internetfitness com Mt Laurel NJ O W Smooth 5 3P Tread...

Page 2: ...m Up Exercises 5 Assembly Instructions 6 Power Requirements 7 Console Functions and Descriptions 8 Program and Operating Instructions 9 10 Program Descriptions and Profiles 11 Belt Adjustments and Ten...

Page 3: ...in regards to plugging in your treadmill Keep the power cord away from the incline wheels and do not run the power cord underneath your treadmill Do not operate the treadmill with a damaged or frayed...

Page 4: ...increments as this treadmill is capable of high speeds If you are taking medication consult your physician to see if the medication will affect your exercise heart rate If you have heart problems you...

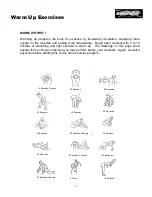
Page 5: ...tretching and light exercise to warm up The drawings on this page show several forms of basic stretching you may perform before your workouts Again consult a physician before starting this or any othe...

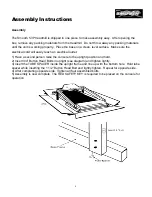
Page 6: ...an electrical outlet 1 Have a second person raise the console to the upright position and hold 2 Insert 3 4 Button Head Bolts in upright see diagram and tighten lightly 3 Insert the TUBE SPACER inside...

Page 7: ...r treadmill Surge protectors can be purchased at most hardware stores The manufacturer recommends a single outlet surge protector with a UL 1449 rating as a Transient Voltage Surge Suppressor TVSS wit...

Page 8: ...peed selected In program mode the change in speed with the Speed Bar will only work in the current interval Once the program switches to another interval the speed will revert to the programmed speed...

Page 9: ...s START STOP button Belt will gradually slow to zero To pause your workout press PAUSE To re start after pausing Press the PAUSE button WARNING The treadmill belt will resume at the speed the treadmil...

Page 10: ...to select your workout time then press the ENTER PROGRAM button The SPEED TIME window will now be flashing Using the same or arrows select the speed for your workout then press ENTER PROGRAM Now the I...

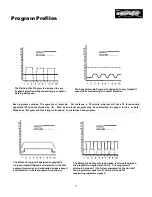
Page 11: ...nd gradually decrease speed and elevation in the last segment cool down The Speed Intervals Program is designed to vary treadmill speed while maintaining a constant elevation The Rolling Hills Program...

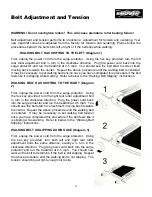
Page 12: ...Walking Belt Slipping instructions WALKING BELT HAS SHIFTING TO THE RIGHT Diagram 2 First unplug the power cord from the surge protector Using the hex key provided turn the right rear roller adjustmen...

Page 13: ...be lubricated usually within the first year or 500 hours of use If you have questions call us at 888 340 0482 Every 30 days or 30 hours of operation lift the sides of the walking belt and feel the to...

Page 14: ...n 2 Check the house electrical breaker box and the circuit breaker for the room the treadmill is located in If it has tripped reset or have an electrician replace the breaker in home If treadmill stil...

Page 15: ...3 8 16 NYLOCK 2 27 06 0008 END CAP 1 81 02 0018 PUSH NUT 3 8 HAT 4 28 06 0009 S E S EXTENSION GLIDE 4 82 02 0019 CARRIAGE BOLT 10 24 X 1 1 2 4 29 06 0019 BASE PAN CENTER 1 83 02 0020 SCREW 1 4 20 X 2...

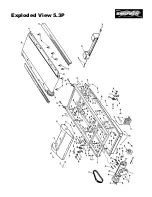
Page 16: ...16 Exploded View 5 3P...
Page 17: ...dent misuse or abuse b by the use of parts not manufactured or sold by Smooth c by modification of the Product or normal wear and tear d operation on incorrect power supplies or e as a result of servi...

Reviews: