background image

www.smoothfitness.com


31 


Summary of Contents for CE-2.5 Elliptical

Page 1: ...USER S MANUAL SMOOTH CE 2 5 ELLIPTICAL USER WEIGHT LIMITATION 300lbs 136kgs SERIAL NUMBER found on frame Ver 20121016...

Page 2: ...d all the necessary tools you may require to assemble the unit properly Having all of the necessary equipment at hand will save time and make the assembly quick and hassle free Clear your work area Ma...

Page 3: ...www smoothfitness com 3 SUPPLIED COMPONENTS This list identifies the major components you will use to assemble this product...

Page 4: ...Fixed Handlebar Swing Arm Handlebar R Swing Arm Handlebar L Upright Tube Front Cover Upright Tube Rear Cover Power pack Console Base Swing Arm Cover Front Console Base Cover L Front Pedal Tube Cover...

Page 5: ...cap 5 16 2 Step 3 18 Allen head bolt M8 1 25 15 6 115 Screw M4 16mm 4 Step 4 29 Screw 3 5 12mm 8 30 Screw M5 0 8 12 2 12 Nylock nut M10 1 5 2 17 Washer 10 22 3T 2 44 Knob 2 2 Step 5 18 Allen head bol...

Page 6: ...ep 7 E 4 30 Screw M5 0 8 12 2 Step 8 18 Allen head bolt M8 1 25 15 4 65 Washer 5 16 16 1 0 4 A Washer M8 4 29 Screw M3 5 12 8 Step 9 29 Screw M3 5 12 4 104 Screw M4 12 4 18 Allen head bolt M8 1 25 15...

Page 7: ...ck nut M8 1 25 12 CE25 20 21 Plastic cap 5 16 4 CE25 21 22 Allen head bolt M8 50 2 CE25 22 23 Rear square foot cap 2 CE25 23 24 Front square foot cap 2 CE25 24 25 Left roller holder 1 CE25 25 26 Right...

Page 8: ...0 10 CE25 65 66 Pulley 2 CE25 66 67 Base frame 1 CE25 67 68 Upright tube 1 CE25 68 69 Swivel tube LH 1 CE25 69 70 Swivel tube RH 1 CE25 70 71 Fix handle bar 1 CE25 71 72 Handle bar LH 1 CE25 72 73 Ha...

Page 9: ...E25 100 101 Pedal tube cover top R 1 CE25 101 102 Pedal tube cover bottom R 1 CE25 102 103 disc rim 2 CE25 103 104 Screw M4 12 4 CE25 104 105 bottle holder 1 CE25 105 106 power adapter 1 CE25 106 107...

Page 10: ...the machine A Attach the front support to the base frame with the wheels facing outward B Align the 2 bolt holes in the front support with the bolt holes in the main frame C Secure the front support t...

Page 11: ...m block under the machine A Attach the rear support to the base frame B Align the 2 bolt holes in the rear support with the bolt holes in the main frame C Secure the rear support to the main frame by...

Page 12: ...onto the round base frame tube C Check to make sure the upright tube is facing the correct direction See Fig 3 A D Secure the upright tube to the base frame by using 6 x 18 Allen head bolts E Hand ti...

Page 13: ...nk arm See Fig C E Secure the pedal tube to the base frame crank arm by using 1 x 17 washer and 1 x 12 M10 lock nut Completely tighten with a wrench F Attach and secure the Rear pedal tube covers 101...

Page 14: ...e console base and secure the covers together by using 4 x 29 screws and 4 x 30 screws See Fig 5B Do not completely tighten these screws until step 6 D Feed the Heart rate wire of the hand grips throu...

Page 15: ...e 113A and 113B covers See Fig 6A B Take the fan wire and route it with the other wires from the handrail assembly C Secure the fan cover 114 by using 4 x 116 screws D Attach the Handlebar cover 88 an...

Page 16: ...bar contact heart rate B Place the computer 43 on to the console base 112 See Fig 7A C Put the excess wires in to the back of the computer and in to the console base covers Be sure not to punch the wi...

Page 17: ...er swing arms 69 70 B Secure the upper and lower swing arms together by using 4 x 18 Allen bolts 4 x A spring washer and 4 x 65 washers C Tighten all bolts now D Place the Place the front and rear swi...

Page 18: ...ver and the rear cover with the bottle holder attached around the upright tube and secure by using 4 x 29 screws See Fig 9A C Locate the left and right pedals Place them on the pedal tubes with the si...

Page 19: ...0 Attach the Power Supply A Before plugging in the power supply verify the voltage specifications on the lable B Plug the adaptor jack in to the inlet on the bottom rear of the elliptical C Plug the p...

Page 20: ...Smooth Breeze Fan Cooling Fan is included with the unit to increase the Air Circulation during your exercise To operate press the Fan key to turn on To turn the fan off press the Fan key again to stop...

Page 21: ...primarily lower body muscle groups These muscle groups are shown in gray color on the chart below MUSCLE GROUPS A Shoulder muscles Calf muscles G B Pectoral muscles Trapezius muscles H C Bicep muscle...

Page 22: ...er Thigh Stretch Sit with the soles of your feet together with your knees pointing outward Pull your feet as close into your groin as possible Gently push your knees towards the floor Hold for 15 coun...

Page 23: ...mory SEX MALE FEMALE Yes AGE 10 100 Yes WEIGHT METRIC 20 330 Lb 10 150 KG Yes HEIGHT 36 84 INCH 90 210 CM Yes TIME 0 00 99 59 0 00 99 00 0 00 No DISTANCE 0 0 99 99 0 00 99 50 0 00 No CALORIES 0 999 0...

Page 24: ...gin a manual workout directly Note using quick start will use the default settings as the user profile Use the plus and minus keys to select User profile data program selections heart rate values and...

Page 25: ...setting values for user HEIGHT WEIGHT AGE and GENDER Press the RESISTANCE UP DOWN buttons to choose the User ID from U1 to U2 and press the ENTER button to select the user ID shown GENDER entry After...

Page 26: ...procedure the symbol W t will flash in the upper right corner the computer will display the default 150 lbs or previous setting and begin blinking Press the RESISTANCE UP DOWN button to adjust the use...

Page 27: ...he initial value has ended the program PRESET PRORGAMS After selecting the category program Press the keys to select P1 P12 The program profile will be displayed on the display as you scroll through t...

Page 28: ...rt rate ranges are based on the 220 age max HR Once the manual program is entered press to choose the target heart rate range Press enter to confirm Once the range has been set you can enter the time...

Page 29: ...ble check that the breaker has not tripped The correct power cord is being used Only use the power cord provided with the equipment The power cord is not pinched or damaged and is properly plugged int...

Page 30: ...This Warranty To obtain service on a Smooth Fitness product call Smooth Fitness In the instance that service is not available in an area Smooth Fitness at its discretion can either 1 find a service t...

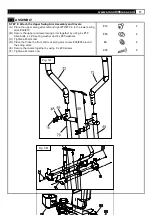
Page 31: ...www smoothfitness com 31...

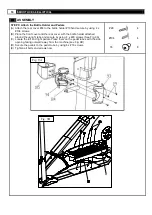
Page 32: ...32 SMOOTH CE3 6 ELLIPTICAL...
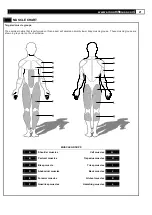
Page 33: ...www smoothfitness com 33 Smooth Fitness 780 5 th Ave King of Prussia PA 19406 Toll Free Customer Service 1 888 800 1167 Website www smoothfitness com...

Reviews: