background image


SMOOTH 9.15HR POWER FOLDING TREADMILL 


Visit us at: 

www.smoothfitness.com


3

POWER REQUIREMENTS 


Power Requirements

 
IMPROPER CONNECTION OF THE EQUIPMENT GROUNDING CONNECTOR CAN RESULT IN A RISK OF AN 
ELECTRIC SHOCK.  CHECK WITH A QUALIFIED ELECTRICIAN OR SERVICE MAN IF YOU ARE IN DOUBT AS TO 
WHETHER THE PRODUCT IS PROPERLY GROUNDED.  DO NOT MODIFY THE PLUG PROVIDED WITH THE 
PRODUCT, IF IT WILL NOT FIT THE OUTLET; HAVE A PROPER OUTLET INSTALLED BY A QUALIFIED ELECTRICIAN. 
 
This treadmill can be seriously damaged by sudden voltage changes in your home’s electrical power.  Voltage spikes, surges 
and noise interference can result from weather conditions or from other appliances being turned on or off.  To reduce the 
possibility of treadmill damage, always use a surge protector (not included) with your treadmill. 
 
Surge protectors can be purchased at most hardware stores.  The manufacturer recommends a single outlet surge protector 
with a UL 1449 rating as a Transient Voltage Surge Suppressor (TVSS) with a UL suppressed voltage rating of 400V or less 
and an electrical rating 120VAC, 15 amps. 
 
This treadmill must be grounded to reduce the risk of electrical shock.  Grounding provides a path of least resistance for 
electric current, should the treadmill malfunction.  This treadmill comes with an electrical cord having an equipment-grounding 
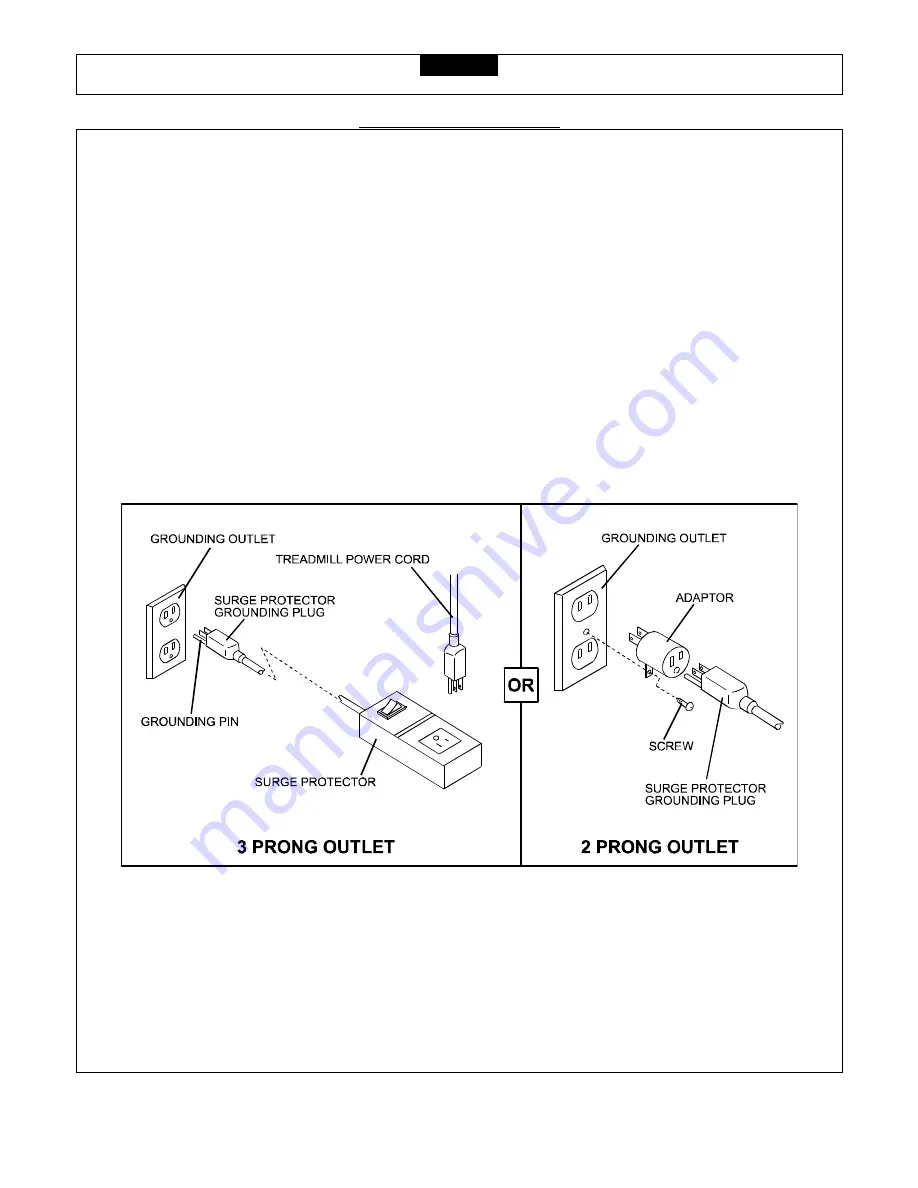
conductor and a grounding plug.  Always plug the power cord into a surge protector, and plug the surge protector into an 
appropriate outlet that is properly installed and grounded in accordance with all local codes and ordinances. 
 
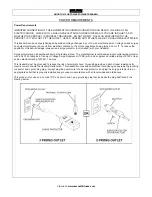
This product is for use on a nominal 110-volt circuit, and has a grounding plug that looks like the plug illustrated in the 
drawing below. 


Summary of Contents for Smooth 9.15HR

Page 1: ...USER S MANUAL SMOOTH 9 15HR POWER FOLDING TREADMILL MODEL NUMBER 9 15HR USER WEIGHT LIMITATION 300lbs TOLL FREE CUSTOMER SERVICE NUMBER 1 888 800 1167 SERIAL NUMBER found on frame...

Page 2: ...children under the age of 12 and pets away from the treadmill at all times The treadmill should not be used by persons weighing more than 300lbs Never allow more than one person on the treadmill at a...

Page 3: ...use a surge protector not included with your treadmill Surge protectors can be purchased at most hardware stores The manufacturer recommends a single outlet surge protector with a UL 1449 rating as a...

Page 4: ...ill save time and make the assembly quick and hassle free Clear your work area Make sure that you have cleared away a large enough space to properly assemble the unit Make sure the space is free from...

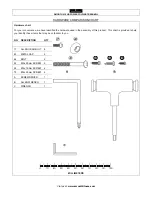
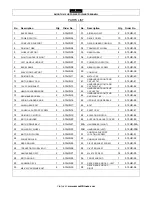
Page 5: ...e have identified the hardware used in the assembly of this product This chart is provided to help you identify those items that may be unfamiliar to you NO DESCRIPTION QTY 17 ALLEN HEAD BOLT 8 40 MET...

Page 6: ...NSORS 2 9 15HR 14 43 HANDLEBAR FRONT END CAP LEFT 2 1 9 15HR 43 15 DECK BASE SCREW 2 9 15HR 15 44 HANDLEBAR FRONT END CAP RIGHT 2 1 9 15HR 44 16 SPRING LOADED KNOB 1 9 15HR 16 45 UPRIGHT CROSS BRACE 1...

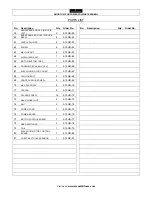
Page 7: ...9 15HR 64 65 MOTOR BOTTOM TRAY 1 9 15HR 65 66 RUNNING DECK BELLY PAN 1 9 15HR 66 67 ELEVATION MOTOR COVER 1 9 15HR 67 68 TENSION BOLT 2 9 15HR 68 69 FRONT SHROUD SCREW 2 9 15HR 69 70 M4 X 20 SCREW 4 9...

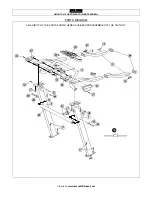
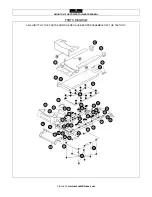
Page 8: ...SMOOTH 9 15HR POWER FOLDING TREADMILL Visit us at www smoothfitness com 8 PARTS DIAGRAM A MAJORITY OF THE PARTS SHOWN HERE HAVE BEEN PREASSEMBLED AT THE FACTORY...

Page 9: ...SMOOTH 9 15HR POWER FOLDING TREADMILL Visit us at www smoothfitness com 9 PARTS DIAGRAM A MAJORITY OF THE PARTS SHOWN HERE HAVE BEEN PREASSEMBLED AT THE FACTORY...

Page 10: ...SMOOTH 9 15HR POWER FOLDING TREADMILL Visit us at www smoothfitness com 10 PARTS DIAGRAM A MAJORITY OF THE PARTS SHOWN HERE HAVE BEEN PREASSEMBLED AT THE FACTORY...

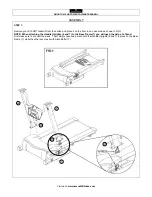
Page 11: ...and place it on the floor in an open area as shown in FIG 1 NOTE When attaching the Handle Uprights 6 and 7 to the Base Frame 1 you will need the help of a friend First make sure to connect the wires...

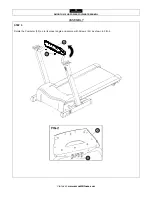
Page 12: ...H 9 15HR POWER FOLDING TREADMILL Visit us at www smoothfitness com 12 ASSEMBLY STEP 2 Remove the Screw 51 then rotate the Computer Support 3 up to the correct position as shown and secure with the Scr...

Page 13: ...SMOOTH 9 15HR POWER FOLDING TREADMILL Visit us at www smoothfitness com 13 ASSEMBLY STEP 3 Rotate the Computer 39 up to its proper angle and secure with Screws 52 as shown in FIG 2...

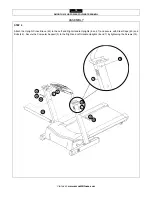
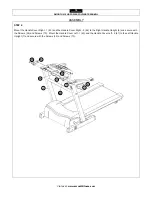
Page 14: ...hfitness com 14 ASSEMBLY STEP 4 Attach the Upright Cross Brace 45 to the Left and Right Handle Uprights 6 and 7 and secure with Steel Caps 40 and Bolts 46 Secure the Computer Support 3 to the Right an...

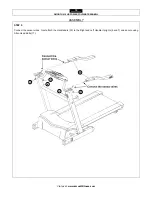
Page 15: ...POWER FOLDING TREADMILL Visit us at www smoothfitness com 15 ASSEMBLY STEP 5 Connect the sensor wires Next attach the Handlebars 50 to the Right and Left Handle Uprights 6 and 7 and secure using Allen...

Page 16: ...STEP 6 Mount the Handle Cover Right 1 42 and the Handle Cover Right 2 44 to the Right Handle Upright 6 and secure with the Screws 55 and Screws 70 Mount the Handle Cover Left 1 43 and the Handle Cover...

Page 17: ...nable it to fold The 9 15HR won t fold unless the deck is in its lowest position The treadmill must be plugged in for this to work 3 Turn the SPRING KNOB CLOCKWISE until it is fully engaged A CLICK ca...

Page 18: ...light up 1 Push the POWER FOLD SWITCH DOWN The deck will now start to DESCEND Keep holding the switch until the deck has fully descended 2 Turn the SPRING KNOB COUNTER CLOCKWISE until it DISENGAGES I...

Page 19: ...l on its side To adjust the level first fold up the treadmill as per the instructions on the FOLDING INSTRUCTIONS page of this manual If your treadmill will not fold please see the TROUBLE SHOOTING pa...

Page 20: ...f left idle for 5 minutes without any input in POWER ON status Press any button to return to POWER ON status when the computer is in the SLEEP MODE ENGLISH METRIC CONVERSION To switch the computer dis...

Page 21: ...from 2MPH 3 2KMPH and the incline starts from level 0 Press the SPEED UP DOWN buttons to adjust the speed Press the INCLINE UP DOWN buttons to adjust the incline level During exercise press STOP to pa...

Page 22: ...INCLINE follow the preset program You can still press the SPEED UP DOWN and INCLINE UP DOWN to change the program Any change only effects the current workout period The computer does not record any c...

Page 23: ...e actual heart rate is maintained between the standard heart rate and maximum heart rate the incline level will not change When the actual heart rate is over the maximum heart rate the incline level w...

Page 24: ...f moving back towards the center Repeat the above procedure until the walking belt is centered It may be necessary to set walking belt tension once you have completed this procedure if the belt feels...

Page 25: ...Your treadmill should not have to be lubricated usually within the first year or 500 hours of use Call your local Smooth dealer for service or questions regarding EVO products Every 3 months or 30 ho...

Page 26: ...ve the following information ready Model name or number from the cover of the manual Serial number located on the frame of the unit and The part description and the order number Limitations on Warrant...

Page 27: ...tially you may be able to exercise only for a few minutes in your target zone However your aerobic fitness will improve over the next six to eight weeks Don t be discouraged if it takes longer It s im...

Page 28: ...ned by your age and physical condition To determine your target zone consult the chart we have provided FIND YOUR TARGET HEART RATE 200 180 160 140 120 100 HEART RATE in beats per minute 80 20 25 30 3...

Page 29: ...med on this product will develop primarily lower body muscle groups These muscle groups are shown in gray color on the chart below Shoulder muscles A B Pectoral muscles Bicep muscle C D Abdominal musc...

Page 30: ...ivering more oxygen to your muscles At the end of your workout repeat these exercises to reduce sore muscle problems We suggest the warm up and cool down exercises on the following pages Toe Touch Slo...

Page 31: ...into your groin as possible Gently push your knees towards the floor Hold for 15 counts Side Stretch Open your arms to the side and continue lifting them until they are over your head Reach your righ...

Page 32: ...to adjust the level adjusters underneath the base frame until both rear wheels sit evenly on the floor and the spring knob can be locked in Computer LED does not show the pulse 1 First please press th...

Page 33: ...treadmill is located in If it has tripped reset or have an electrician replace the breaker in home Treadmill walking belt slows during use 1 Check to make sure the treadmill is securely plugged into a...

Page 34: ...Copyright 2003 Smooth Fitness 717 Fellowship Road Suite C Mt Laurel NJ 08054 Toll Free Customer Service 1 888 800 1167 Website www smoothfitness com...

Reviews: