background image


B

EFORE

 Y

OU 

B

EGIN

”   

Thank you for choosing the 

2 in 1 Recumbent 

Elliptical / Bike

We take great pride in producing this 

quality product and hope it will provide you many 

hours of quality exercise to making you look and feel 

better. 

Yes, it's a proven fact that a regular exercise 

program can improve your physical and mental health. 


Too often, our busy lifestyles limit our time and 

opportunity to exercise. This equipment will


provide a 

convenient and simple way to begin your journey of 

achieving a happier and healthier lifestyle. 

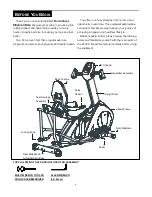
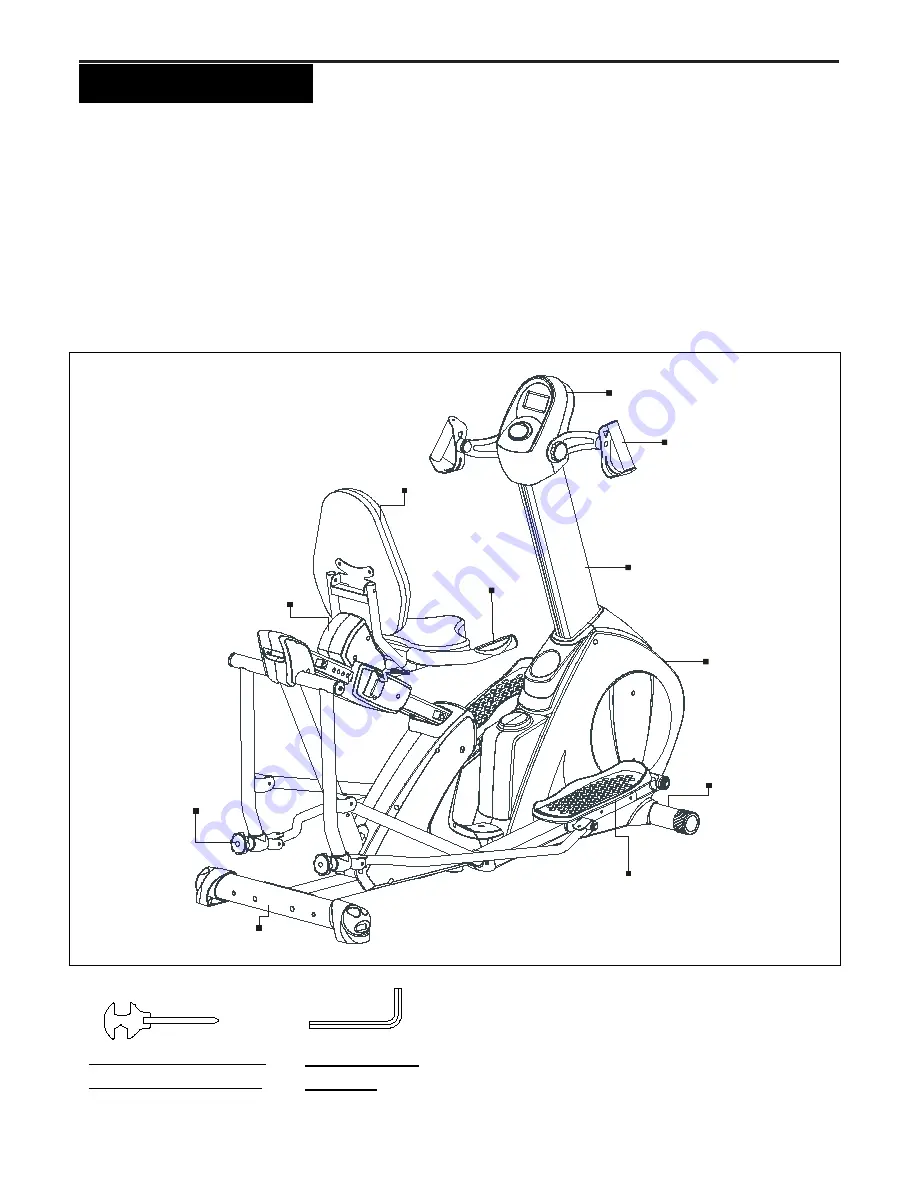
Before reading further, please review the drawing 

below and familiarize yourself with the main parts of 

the V2300.. Read this manual carefully before using 

the equipment.


THE FOLLOWING TOOLS ARE INCLUDED FOR ASSEMBLY:   


MULTI WRENCH TOOL W/ 

PHILLIPS SCREWDRIVER 

ALLEN WRENCH 

(5 & 6 mm) 

Console 

Handlebar Assembly 

Pulse   

Sensor 

Upright Post 

Main Frame 

Front Stabilizer 

Pedal 

Rear Stabilizer &   

Adjustable


EndCaps


Seat Carriage 

Assembly 

Locking Knob 


Back Cushion 

Summary of Contents for V2300

Page 1: ...OWNER S MANUAL V2300 MAXIMUM USER WEIGHT LIMIT 300LBS MADE IN TAIWAN V II www smoothfitness com RECUMBENT ELLIPTICAL BIKE ...

Page 2: ... theequipment 14 Never exercise in bare feet or socks always wear correct footwear such as running walking or cross training shoes 15 Be careful to maintain your balance while using mounting dismounting or assembling the equipment loss of balance may result in a fall and serious bodilyinjury 16 The equipment should not be used by persons weighing over 300 pounds 136 kgs 17 The equipment should be ...

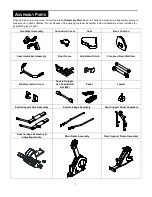
Page 3: ... hardware kit are included for assembling the product Handlebar Assembly Connection Cover Seat Back Cushion Seat Handlebar Assembly Seat Frame Adjustment Knob Front and Rear Stabilizer Rail Decoration Cover Square Stopper Hex Head Bolt Nut M8 Pedal Leveler Pedal Support Arm Assembly Pedal Linkage Assembly Seat Support Slider Assembly Seat Carriage Assembly Adjusting Handle Main Frame Assembly Rear...

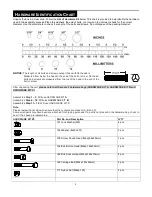
Page 4: ...f the bolt or screw After unpacking the unit please note that there are 3 hardware bags HARDWARE KIT A HARDWARE KIT B and HARDWARE KIT C Assembly s Step 1 5 Will use HARDWARE KIT A Assembly s Step 6 10 Will use HARDWARE KIT B Assembly s Step 11 12 Will use HARDWARE KIT C Note Please review the list below to ensure that the contents are present A B and C Some small parts may have been pre attached ...

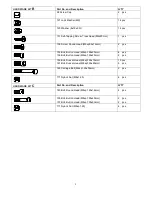
Page 5: ...Button Head M8xp1 25x20mm 155 Bolt Button Head M8xp1 25x40mm 4 pcs 2 pcs 159 Bolt Socket Head M8xp1 25x16mm 161 Bolt Socket Head M8xp1 25x40mm 10 pcs 4 pcs 163 Carriage Bolt M8xp1 25x50mm 2 pcs 171 Nylock Nut M8x1 25 4 pcs HARDWARE KIT C Part No and Description Q TY 143 Bolt Round Head M8xp1 25x16mm 4 pcs 155 Bolt Button Head M8xp1 25x40mm 157 Bolt Button Head M8xp1 25x90mm 2 pcs 2 pcs 171 Nylock ...

Page 6: ...ity to exercise This equipment will provide a convenient and simple way to begin your journey of achieving a happier and healthier lifestyle Before reading further please review the drawing below and familiarize yourself with the main parts of the V2300 Read this manual carefully before using the equipment THE FOLLOWING TOOLS ARE INCLUDED FOR ASSEMBLY MULTI WRENCH TOOL W PHILLIPS SCREWDRIVER ALLEN...

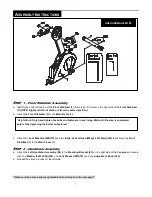
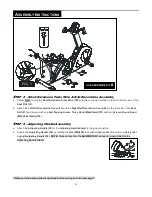
Page 7: ...m 162 that secure the Front Stabilizer 7 to the Main Frame 1 STEP 2 Handlebar Assembly a Attach the Left Handlebar Assembly 85 to the Mounting Bracket 83 on the right side of the Console and secure with one Washer 8x23x2 0t 124 one Lock Washer M8 121 and one Adjustment Knob 186 b Repeat the above process for the left side Make sure the above parts are tightened before moving on to the next page He...

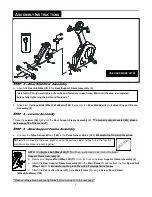
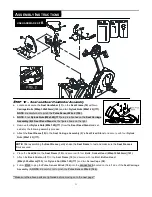
Page 8: ...ttached on the front of the Rear Support Frame Assembly 2 b Remove four Nylock Nut M8xp1 25 171 from the front of the Rear Support Frame Assembly 2 c Attach the Rear Support Frame Assembly 2 to the Main Frame 1 and reattach the four Nylock Nut M8xp1 25 171 Be careful not to pinch the wires Fully tighten nuts now d Attach the Connection Cover 27 to the Main Frame 1 using a Screw Round Head M5xp0 8x...

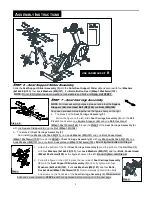
Page 9: ...Nut M8xp1 25 168 b The Hole 2 of Seat Carriage Assembly 9 Now install one Washer 8x16x2 0t 123 one Lock Washer M8 121 and one Bolt Socket Head M8xp1 25x16mm 159 through the Hole 2 of Seat Carriage Assembly 9 with one Washer 8x16x2 0t 123 one Lock Washer M8 121 and one Bolt Socket Head M8xp1 25x16mm 159 Do not tighten bolts until Step d c Attach the bottom of the front Seat Carriage Assembly 9 and ...

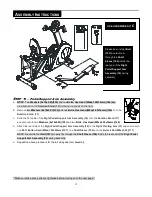
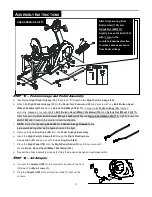
Page 10: ...ure with one Self Tapping Screw Truss Head M4x20mm 131 and two Screws Round Head M5xp0 8x15mm 138 STEP 9 Adjusting Handle Assembly a Attach the Adjusting Handle 55 to the Adjusting Handle Stand to the proper position b Secure the Adjusting Handle 55 by rotating the Nut M8 168 in counterclockwise direction until completely tight against Adjusting Handle 55 NOTE Please notice that the Nut M8 168 has...

Page 11: ...he Seat Carriage Assembly 9 s Seat Fixed Stand and secure with four Nylock Nuts M8x1 25 171 e Place the Seat 56 on the Seat Frame 10 and secure with four Bolts Socket Head M8xp1 25x40mm 161 f Attach the Back Cushion 57 to the Seat Frame 10 and secure with two Bolt Button Head M8xp1 25x40mm 155 two Nylock Nut M8x1 25 171 and two Screw Caps 58 g Follow FIG 2 to plug the Pulse Sensor Wire 4 184 into ...

Page 12: ...1 25x16mm 146 d Attach the rear side of the Right Pedal Support Arm Assembly 14 to the Right Pivoting Arm 13 and secure with one Bolt Button Head M8xp1 25x90mm 157 one Shaft Sleeve 106 and one Nylock Nut M8xp1 25 171 NOTE Be certain that Bolt 157 properly fits through the Shaft Sleeve 106 inside the rear end of the Right Pedal Support Arm Assembly 14 during assembly e Repeat the above procedure fo...

Page 13: ...Linkage Assembly are pre assembled together as the figure shows on the right d Remove the Locking Knob 68 from the Pedal Linkage Assembly e Insert the Right Pedal Linkage 19 through the Right Pivoting Arm Connection 67 and secure with the Locking Knob 68 f Place the Right Pedal 78 onto the Right Pedal Slider 16 and fully secure with the two Bolts Round Head M8xp1 25x16mm 143 g Repeat the above ass...

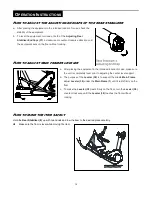
Page 14: ...a After placing the equipment in the intended location for use make sure the unit is completely level prior to adjusting the center level support b The purpose of the Leveler 38 is to support the middle Main Frame adjust Leveler 38 under the Main Frame 1 until it rests firmly on the floor c To make the Leveler 38 rests firmly on the floor turn the Leveler 38 counter clockwise until the Leveler 38 ...

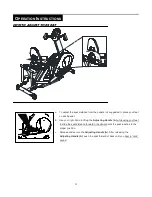
Page 15: ...t on each pedal b Use your right hand to lift up the Adjusting Handle A while using your feet to slide the seat distance forward or backward until the seat reaches to the proper position c Release and secure the Adjusting Handle A After releasing the Adjusting Handle A push the seat forward of back until you hear a click sound ...

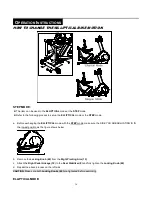
Page 16: ...xchanging the ELLIPTICAL mode with the STEP mode make sure the SIDE YOU ARE ADJUSTING IS IN the lowest position as the figure shows below b Remove the Locking Knob 68 from the Right Pivoting Arm 13 c Attach the Right Pedal Linkage 19 to the Rear Stabilizer 8 and fully tighten the Locking Knob 68 d Repeat the above process on the left side CAUTION Make sure both Locking Knobs 68 are tightened befor...

Page 17: ...17 To change to ELLIPTICAL mode make sure the Pedal Linkage 19 is attached to the Pivoting Arm 13 ...

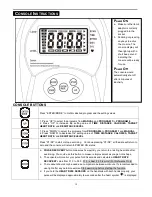
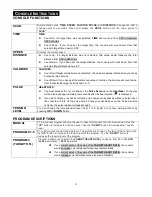
Page 18: ...exercising You could use this button to measure improvement as you get into shape b The console will monitor your pulse for 60 seconds and calculate a HEART RATE RECOVERY value from F1 0 to F6 0 F1 0 is best F6 0 is worst For Reference Only c The readout should only be used as a comparison between workouts It s recommended to use right after any aerobic exercise Stop exercising before starting the...

Page 19: ...Your pulse will be displayed approximately few seconds after the heart symbol is displayed If you do not place your hands correctly and a few seconds passes without a pulse input the console will turn off the pulse circuit Place your hands back on the Pulse Sensors correctly the pulse readout will appear again TENSION LEVEL You can change the torque tension level from 1 to 8 levels at any time dur...

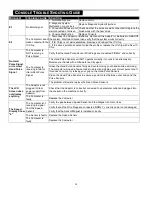
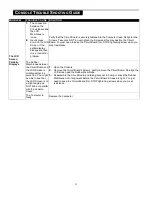
Page 20: ...se Signal The Hand Pulse Sensors will NOT operate correctly if your skin is extremely dry Moisten your hands with a little water and try again Grasp the Hand Pulse Sensors firmly and avoid moving your hands while exercising The computer will need a few seconds to detect and display your correct pulse rate If this does not work try relaxing your grip on the Hand Pulse Sensors Clean the Hand Pulse S...

Page 21: ...rd firm STOP tightening screw when you meet resistance The Rubber Membranes between the Circuit Board and the LCD Screen is misaligned not in a same line You might be able to see that the LCD Screen is on a slight angle and NOT inline or parallel with the Console Cover 1 Open the Console 2 Remove the Circuit Board s Screws gently remove the Circuit Board Re align the LCD screen and the Rubber Memb...

Page 22: ...and 85 of your maximum heart rate as you exercise This is known as your target zone You can find your target zone in the table below Target zones are listed for both unconditioned and conditioned persons according to age During the first few months of your exercise program keep your heart rate near the low end of your target zone as you exercise After a few months your heart rate can be increased ...

Page 23: ... the legs as wide as possible Stretch the upper body toward the knee on the right leg by using your arms to pull your chest to your thighs Hold this stretch 10 to 30 seconds DO NOT BOUNCE Do this stretch 10 times Repeat the stretch with the left leg Bent Torso Pulls While sitting on the floor have legs apart one leg straight and one knee bent Pull the chest down to touch the thigh on the leg that ...

Page 24: ...24 PRODUCT PARTS DRAWING A ...

Page 25: ...25 PRODUCT PARTS DRAWING B ...

Page 26: ...Rear Decoration Cover 1 30 Long Timing Belt 1 31 V Ribbed Belt for Pulley 1 32 Pulley 1 33 Magnet 1 NO Item Name Q TY 34 Bearing Housing 4 35 Transportation Wheel L R 2 36 Round EndCap 2 37 Adjusting Rear Stabilizer EndCap 2 38 leveler 1 39 Bushing 60x10mm 4 40 Slider Sleeve 1 41 Left Rail Decoration Cover 1 42 Right Rail Decoration Cover 1 43 Rail Connection Cap 1 44 Square Stopper 4 45 Console U...

Page 27: ...k 1 99 Linkage Connector 2 NO Item Name Q TY 100 Spring for Fixing Pin 1 101 Spring for Adjusting Handle Stand 1 102 Bushing for Seat Wheel 2 103 Spacer 8 12 6 5mm 4 104 Spacer 8 12 7 5mm 8 105 Spacer 8 2 12 59mm 2 106 Shaft Sleeve 8 2 12 74mm 2 107 Spacer 10 14 21mm 2 108 Key 6 6 16mm 2 109 Bearing 6002 2 110 Bearing 6004z 4 111 Internal Retaining Ring 2 112 C Ring 5 113 E Ring 4 114 Eye Bolt Swi...

Page 28: ...155 Bolt Button Head M8 p1 25 40mm 6 156 Bolt Button Head M8 p1 25 75mm 2 157 Bolt Button Head M8 p1 25 90mm 2 158 Bolt Socket Head M6 p1 0 15mm 2 159 Bolt Socket Head M8 p1 25 16mm 10 160 Bolt Socket Head M8 p1 25 25mm 4 161 Bolt Socket Head M8 p1 25 40mm 4 162 Bolt Socket Head M8 p1 25 70mm 2 163 Carriage Bolt M8 p1 25 50mm 2 NO Item Name Q TY 164 Carriage Bolt M8 p1 25 90mm 2 165 Bolt Button He...

Page 29: ... at its discretion can either 1 find a service technician in your area to perform warranty service 2 have a local dealer perform warranty service or 3 send the warranty parts to you and reimburse as described above To help the technician assist you please have the following information ready Model name or number from the cover of the manual Serial number located on the frame of the unit and The pa...

Reviews: