background image


39 


STRETCHING ROUTINE 


Warm up and cool down

A successful exercise program consists of a warm-up, aerobic exercise, and a cool-down.    Do the entire program at least two and 
preferably three times a week, resting for a day between workouts.    After several months, you can increase your workouts to four or 
five times per week. 
Warming up is an important part of your workout, and should begin every session.    It prepares your body for more strenuous 
exercise by heating up and stretching out your muscles, increasing your circulation and pulse rate, and delivering more oxygen to 
your muscles.    At the end of your workout, repeat these exercises to reduce sore muscle problems.    We suggest the warm-up and 
cool-down exercises on the following pages:
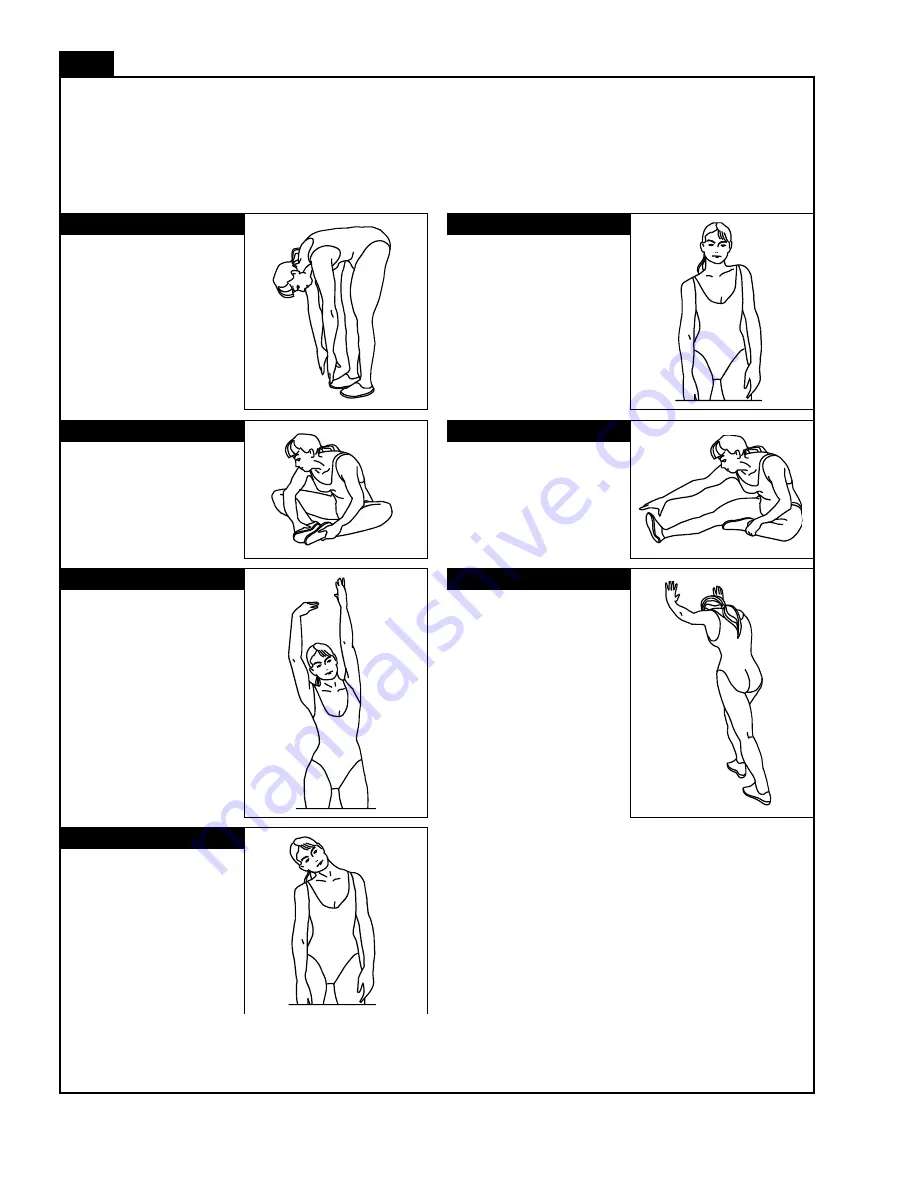


Toe Touch:


Slowly bend forward from 
your waist, letting your back 
and shoulders relax as you 
stretch toward your toes.   
Reach down as far as you 
can and hold for 15 counts.


Shoulder Lift:


Lift your right shoulder up 
toward your ear for one 
count.    Then lift your left 
shoulder up for one count as 
you lower your right shoulder.


Inner Thigh Stretch:


Sit with the soles of your feet 
together with your knees 
pointing outward.    Pull your 
feet as close into your groin 
as possible.    Gently push 
your knees towards the floor.   
Hold for 15 counts.


Hamstring Stretch:


Sit with your right leg 
extended.    Rest the sole of 
your left foot against your 
right inner thigh.    Stretch 
toward your toe as far as 
possible.    Hold for 15 
counts.    Relax and then 
repeat with left leg extended.


Side Stretch:


Open your arms to the side 
and continue lifting them until 
they are over your head. 
Reach your right arm as far 
upward toward the ceiling as 
you can for one count.    Feel 
the stretch up your right side. 
Repeat this action with your 
left arm.


Calf-Achilles Stretch:


Lean against a wall with your 
left leg in front of the right and 
your arms forward. Keep your 
right leg straight and the left 
foot on the floor; then bend 
the left leg and lean forward 
by moving your hips toward 
the wall.    Hold, and then 
repeat on the other side for 
15 counts.


Head Roll:


Rotate your head to the right 
for one count, feeling the 
stretch up the left side of your 
neck.    Next, rotate your 
head back for one count, 
stretching your chin to the 
ceiling and letting your mouth 
open.    Rotate your head to 
the left for one count, and 
finally, drop your head to your 
chest for one count.


Summary of Contents for VT-3.4

Page 1: ...v OWNER S MANUAL CAUTION WEIGHT ON THIS PRODUCT SHOULD NOT EXCEED 136KG 300LBS VERSION 20130108 Product May Vary Slightly From Picture MADE IN TAIWAN VT 3 4 VERTICAL TRAINER...

Page 2: ...thin them Always use common sense when exercising 12 Before using this product please consult your personal physician for a complete physical examination 13 Do not wear loose or dangling clothing whil...

Page 3: ...process is completed Assembly tools and hardware kit have included for you to use when assembling the product Console Upper Cover Console Bottom Cover Console Sleeve Upright Post Assembly Fixed Handl...

Page 4: ...ew Flat head bolts and screws are measured from the top of the head to the end of the bolt or screw After unpacking the unit you will notice that the package includes 3 bags of hardware HARDWARE KIT A...

Page 5: ...Self Tapping Screw Flat Head M4x10mm 6 pcs HARDWARE KIT B Part No and Description Q TY 79 Lock Washer M8 1 pcs 80 Washer 8x16x2 0t 1 pcs 88 Self Tapping Screw Flat Head M4x16mm 4 pcs 90 Bolt M5xp0 8x2...

Page 6: ...nd opportunity to exercise This equipment provides a convenient and simple method to begin your journey to get your body in shape and achieve a happier and healthier lifestyle Before reading further p...

Page 7: ...79 and 2pcs Bolts M8xp1 25x20mm 103 from the back of the Rear Stabilizer 3 c Next align the Rear Stabilizer 3 with the Main Frame 1 and then attach the Left and Right Sliding Rail 4 5 to the Rear Stab...

Page 8: ...the wires STEP 6 Linkage Linkage Plug Assembly NOTE For shipping purpose the 1pcs Bolt M8xp1 25x50mm 104 1pcs Nylon Nut M8xp1 25 112 and 1pcs Bolt M5xp0 8x25mm 92 are attached to the Pedal Arm Connect...

Page 9: ...o FIG 3 Place the Right Pedal Support Arm 14 onto the Right Sliding Rail 5 Lining up the groove of the Pedal Support Arm Roller with the Sliding Rail e Then place the Roller Spacer 56 through the Roll...

Page 10: ...25x16mm 102 from the Fixed Handlebar 7 b Insert the Fixed Handlebar 7 as pictured above through the Upright Post Assembly 6 and secure it with the 5pcs Washers 8x16x2 0t 80 5pcs Lock Washers M8 79 and...

Page 11: ...Handlebar Sleeve 44 onto the Right Upper Handlebar 9 c Insert the Right Upper Handlebar 9 into the Right Middle Handlebar 11 and secure it with the 2 Bolts M6xp1 0x35mm 99 and 2pcs Nylon Nuts M6xp1 0...

Page 12: ...ed to use both hands to hold the upper and lower end of the console and gently tilt the console to the best viewable angle HOW TO MOVETHE ITEM SAFELY Carefully pick the Rear Stabilizer 3 up with two h...

Page 13: ...ll the Spring Knob 48 Slide the Pivoting Arm 12 up or down to the proper desired position b Release the Spring Knob 48 and make sure the pin on the knob locks into the adjustment hole on the Pivoting...

Page 14: ...he tools structure and support you need to be fit and live healthy The 5 simple steps outlined in the customer care kit are proven to help you lose weight improve your health and make positive steps t...

Page 15: ...es the equipment s inclination or resistance Pick up the pace or slow down and experience Smooth Sync which synchronizes the video speed to your speed Multiple user profiles are available to store you...

Page 16: ...r ON a Make sure the item s adaptor is correctly plugged into the socket b Pedaling or pressing any key on the console will active the computer display The computer display will then light up with a s...

Page 17: ...al Press DOWN to decrease the values of the program settings PROGRAM TIME HEIGHT WEIGHT AGE TARGET H R and LEVEL in each time interval This function is only active for use when the USB is plugged into...

Page 18: ...your mobile device may not be compatible To record your exercise and health metrics you must log on to www mysmoothtrainer com Then sync your MY Smooth Virtual Fitness Trainer USB device Once complet...

Page 19: ...is would measure the total distance from 0 00 to 999 9 km mile Count Down If you have set the target distance the computer will count down from that selected target distance down to 0 Display POWER SU...

Page 20: ...product is not recommended for use by children HEIGHT Display range 3 FEET 4 INCHES 7 FEET 1 INCH increments 101 214 CM 1 CM increments this product is not recommended for use by children WEIGHT Disp...

Page 21: ...e button as an easy way to reset the computer and enter into POWER ON status Hold the START PAUSE button for a few seconds to reset the computer and return all workout values to zero and enter into PO...

Page 22: ...he console allows an age entry beginning at 10 years old the product is not recommended for use by children D SET YOUR HEIGHT a The HEIGHT setting will appear with HEIGHT flashing on the display b Use...

Page 23: ...r TIME Count Up If a target time was not selected the TIME will count up from 0 00 to a maximum of 99 59 minutes Count Down If you have set the target time the console will count down from that select...

Page 24: ...GRAM SELECTION ON PAGE 25 e Once the preferred program is displayed press enter to confirm f Enter your USER Data B SET YOUR GENDER a After pressing the UP or Down buttons to enter into MANUAL PROGRAM...

Page 25: ...UP or DOWN buttons to set your WEIGHT 45 TO 400 LBS 20 TO 181KGS in 1 LBS KG INCREMENTS c Press the ENTER button to confirm NOTE for WEIGHT The product is not recommended for use by children F SET THE...

Page 26: ...TION G START TO EXERCISE Press START PAUSE to begin your exercise H CHANGING THE RESISTANCE SETTING You can change the resistance level from 1 to 16 levels at any time during workout by pressing the U...

Page 27: ...27 COMPUTER OPERATION P1 WEIGHT LOSS P2 NOVICE INTERVAL P3 INTERMEDIATE INTERVAL P4 MOUNTAIN CLIMB P5 HILL CLIMB P6 ROLLING HILLS P7 GRADUATING INTERVAL P8 PLATEAU P9 ADVANCED INTERVAL P10 LADDER...

Page 28: ...to the socket c The computer would automatically shut off after 5 minutes of inactivity d Press the UP or DOWN buttons to select program 11 12 e Once the preferred program is displayed press enter to...

Page 29: ...HEIGHT a The HEIGHT setting will appear with HEIGHT flashing on the display b Use the UP or DOWN buttons to set your HEIGHT 3 FEET 4 INCHES 7 FEET in 1 INCH INCREMENTS 101 214 CM in 1 CM INCREMENTS c...

Page 30: ...ole will count down from that selected target time to 0 00 G START TO EXERCISE Press START PAUSE to begin your exercise H CHANGING THE RESISTANCE SETTING You can change the resistance level from 1 to...

Page 31: ...2 HOLD TO RESET button an easy way to reset and enter into POWER ON status Continue pressing the HOLD TO RESET button a few seconds all the data will reset to the initial value and the computer will...

Page 32: ...OTE for HEIGHT The product is not recommended for use by children E SET YOUR WEIGHT a The WEIGHT setting will appear with LBS flashing on the display b Use the UP or DOWN buttons to set your WEIGHT 45...

Page 33: ...els After the 3 minute warm up is complete then go into the H R C main program the time will change to your desired step up time the resistance will return to the Level 1 The console at this time will...

Page 34: ...way to reset and enter into POWER ON status Continue pressing HOLD TO RESET button a few seconds all the data will reset to the initial value and the console will return to POWER ON status 3 Normal wa...

Page 35: ...NTER button to confirm NOTE for HEIGHT The product is not recommended for use by children E SET YOUR WEIGHT a The WEIGHT setting will appear with LBS flashing on the display b Use the UP or DOWN butto...

Page 36: ...RATE is based on 60 of 220 your age d However if the default value of LOW TARGET HEART RATE doesn t match your fitness level you are able to press the UP or DOWN button to adjust your LOW TARGET HEART...

Page 37: ...t rate reaches the preset LOW TARGET HEART RATE value c Once your actual heart rate is in the LOW TARGET HEART RATE ZONE and the 2 minute period ends the console will start increasing the resistance l...

Page 38: ...lower body muscle groups These muscle groups are shown in gray color on the chart below MUSCLE GROUPS A Shoulder muscles Calf muscles G B Pectoral muscles Trapezius muscles H C Bicep muscle Tricep mus...

Page 39: ...etch Sit with the soles of your feet together with your knees pointing outward Pull your feet as close into your groin as possible Gently push your knees towards the floor Hold for 15 counts Hamstring...

Page 40: ...40 PRODUCT PARTS DRAWING A...

Page 41: ...41 PRODUCT PARTS DRAWING B...

Page 42: ...l Sleeve 2 32 Console 1 33 Console Bottom Cover 1 34 Left Console Sleeve 1 35 Right Console Sleeve 1 NO Part Name Q ty 36 Rotator Cuff 2 37 Upright Sleeve 1 38 Hand Pulse Upper Cover 2 39 Hand Pulse B...

Page 43: ...1 101 Bolt M8 p1 25 90mm 2 102 Bolt M8 p1 25 16mm 4 NO Part Name Q ty 103 Bolt M8 p1 25 20mm 4 104 Bolt M8 p1 25 50mm 2 105 Bolt M8 p1 25 65mm 2 106 Bolt M8 p1 25 90mm 2 107 Bolt M10 p1 5 85mm 2 108 B...

Page 44: ...Remedy Under This Warranty To obtain service on a Smooth Fitness product call Smooth Fitness In the instance that service is not available in an area Smooth Fitness at its discretion can either 1 find...

Page 45: ...45...

Reviews: