8
“
A
SSEMBLY
I
NSTRUCTIONS
”
S
TEP
4
–
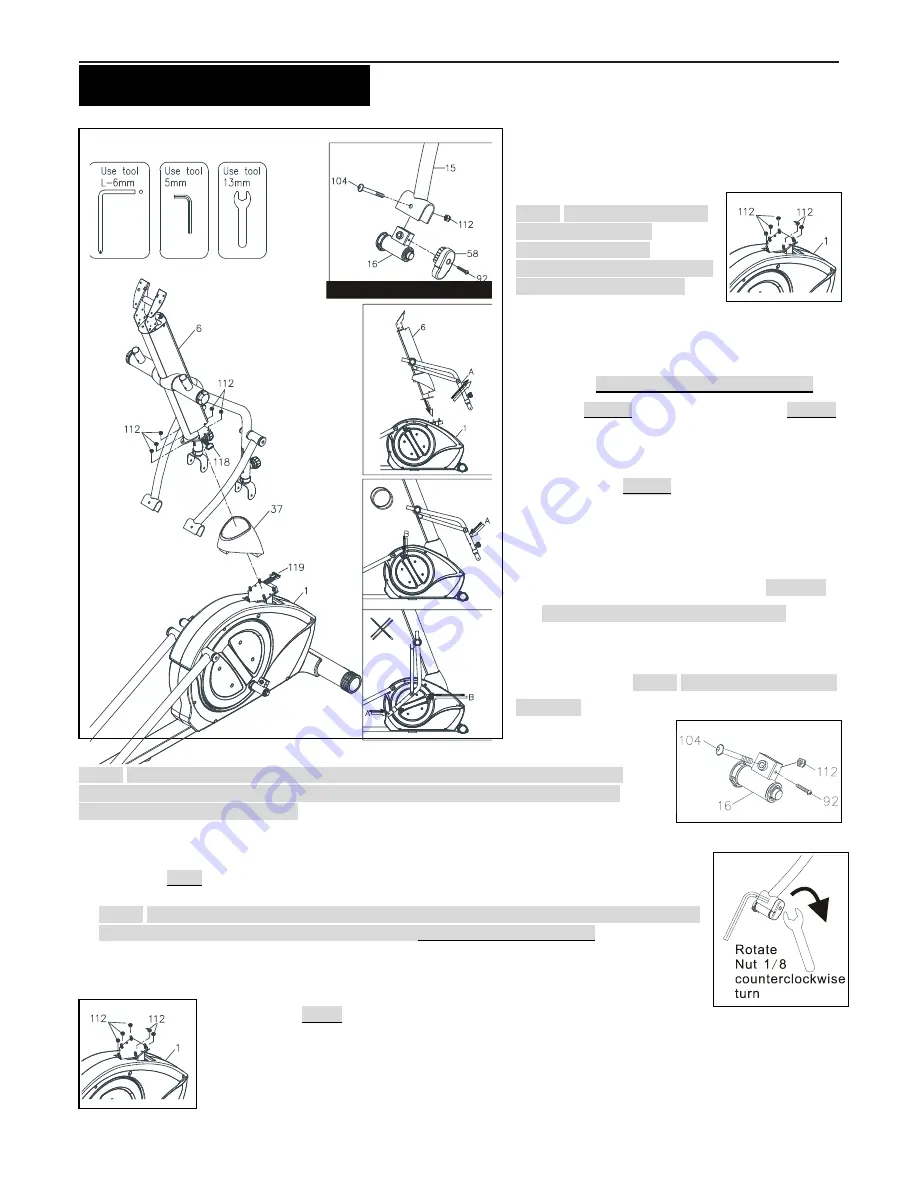
Upright Sleeve & Upright
Post Assembly
a. Slide the
Upright Sleeve (37)
onto the
Upright
Post (6)
.
NOTE:
For shipping purposes
the 5pcs
Nylon Nuts
(M8xp1.25)(112)
are
preinstalled in the
Main Frame
(1)
as pictured on the right.
b. Remove the 5pcs
Nylon
Nuts (M8xp1.25)(112)
from the
Main Frame
(1).
c. Refer to
the series of pictures on the left
noting
point A
(Middle Handlebar) and
point B
(Pedal Arm Connector) before attaching the
Upright Post (6)
to the
Main Frame (1)
, be
sure to raise
point A
(Middle Handlebar) to 45
degrees, when attaching the
Upright Post (6)
to the
Main Frame (1).
Now secure the
Upright
Post (6)
to the
Main Frame (1)
, by suing the
5pcs
Nylon Nuts (M8xp1.25)(112). **Do not
fully tighten nuts (112) until Step 6.**
S
TEP
5
–
Data Cable Assembly
Connect the
Middle Data Cable (118
) to the
Lower
Data Cable (119)
.
NOTE:
Be careful not to pinch
the wires.
S
TEP
6
–
Linkage & Linkage Plug Assembly
NOTE:
For shipping purpose, the 1pcs
Bolt (M8xp1.25x50mm)(104)
, 1pcs
Nylon Nut
(M8xp1.25)(112)
and
1pcs Bolt (M5xp0.8x25mm)(92)
are attached to the
Pedal Arm
Connector (16)
as pictured on the.
a. Remove the1pcs
Bolt (M8xp1.25x50mm)(104)
, 1pcs
Nylon Nut (M8xp1.25)(112)
and
1pcs
Bolt (M5xp0.8x25mm)(92)
from the
P edal Arm Connector (16).
b. Follow the
FIG 1
above, to attach the
Right Linkage (15)
to the
Right Pedal Arm Connector
(16)
and secure it with the 1pcs
Bolt (M8xp1.25x50mm)(104)
, 1pcs
Nylon Nut (M8xp1.25)(112).
NOTE:
In order to allow the Linkage (15) to rotate smoothly; after fully tightening the Bolts
(104) and Nuts (112), loosen the Nuts (112) only 1/8 counterclockwise turn.
c. Attach the
Right Linkage Plug (58)
to the
Right Pedal Arm Connector (16)
and secure with the
1pcs
Bolt (M5xp0.8x25mm)(92).
d. Repeat the process above for the left side.
e. Go back to Step 4 and fully tighten the 5pcs
Nylon Nuts (M8xp1.25)(112)
on the bottom of the
Upright Post (6)
.
f. Slide the
Upright Sleeve (37)
down to cover the open area of the
Main Frame (1)
.
FIG. 1
Summary of Contents for VT-3.4
Page 40: ...40 PRODUCT PARTS DRAWING A...
Page 41: ...41 PRODUCT PARTS DRAWING B...
Page 45: ...45...


