background image

POLYNESIA SPRINGERS

© SMP (PLAYGROUNDS) LTD, TEN ACRE LANE, THORPE, EGHAM, SURREY, TW20 8RJ

Section 1 Page 4

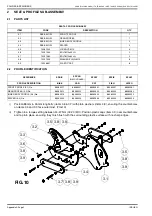
xi)

Place locators (item 1.15) into the rectangular holes in front
profile of the profile assembly (item 1.1). (FIG.6A).

xii) Slide handles (item 1.13) onto locators (item 1.15) and

secure with M10 x 65 resistorx bolts (item 1.16) and M10
washers (item 1.6). Tighten to a torque setting of 24-27 Nm
(18-20 lbf ft). (FIG.6A).

xiii) Position handle caps (item 1.14) in end of handles and tap

into position, ensuring they finish flush with the surrounding
plastic surface with no sharp edges.

4

POST INSTALLATION INSPECTION 

CHECK

CHECK

3

1

The unit is installed at the correct seat height.

‰

2

All fixings are tightened to the correct torque and have no protruding sharp edges.

‰

3

Paint work is not damaged.

‰

4

The polyethylene is not damaged.

‰

5

Concrete foundations are secure.

‰

6

Concrete has a water shed away from legs.

‰

7

Adequate provision of impact absorbing surfacing and no obstructions or trip points within
the equipments falling space.

‰

8

Site is clear of all tools and rubbish.

‰

9

Remove any warning signs.

‰

1.6

1.13

1.14

1.16

1.15

1.1

ISSUE N

FIG.6A

Summary of Contents for SPBIK

Page 1: ...E COPIED OR RE PRODUCED IN ANY FORM OR BY ANY MEANS WITH OUT THE EXPRESS WRITTEN PERMISSION OF SMP PLAYGROUNDS LTD E sales smp co uk W smp co uk T 44 0 845 260 1655 INSTALLATION INSTRUCTIONS POLYNESIA...

Page 2: ...INTENTIONALLY LEFT BLANK...

Page 3: ...age 2 3 INSTALLATION ASSY PROCEDURES Page 3 4 POST INSTALLATION INSPECTION Page 4 Appendix A SUB ASSEMBLIES Page 1 1 SPRING SUB ASSEMBLY CODE 86559999 Page 1 2 SEAT PROFILE SUB ASSEMBLY Page 2 2 1 PAR...

Page 4: ...INTENTIONALLY LEFT BLANK POLYNESIA SPRINGERS SMP PLAYGROUNDS LTD TEN ACRE LANE THORPE EGHAM SURREY TW20 8RJ Contents Page 2 ISSUE N...

Page 5: ...ver with certain loose fill materials a greater depth may be required This will need to be determined by allowing 100mm for dispersal in addition to the thickness required to achieve the required crit...

Page 6: ...5 BOLT M10x125 LG 2 1 6 10291000 WASHER PLAIN M10 12 1 7 10281000 LOCKNUT M10 4 1 8 19028651 PLASTIC CAP FLAT STEPPED HEAD 6 1 9 10121030 RESISTORX HEAD M10x30 LG 8 1 10 10121020 RESISTORX HEAD M10x20...

Page 7: ...unit location vi Place the unit into the hole then level and square the unit Pour concrete into the hole to a minimum thickness of 100mm Figs 1 2 Allow to cure before continuing Recommended initial cu...

Page 8: ...d tap into position ensuring they finish flush with the surrounding plastic surface with no sharp edges 4 POST INSTALLATION INSPECTION CHECK CHECK 3 1 The unit is installed at the correct seat height...

Page 9: ...uts 2 3 and washers 2 4 Fig 8 iii Place the top mounting bracket 2 13 onto the spring assy in the position shown so that it is in line with the four fixing holes of the base plate Figs 8 9 iv Place U...

Page 10: ...ILE SUB ASSY ITEM CODE DESCRIPTION QTY 3 1 SEE BELOW FRONT PROFILE 1 3 2 SEE BELOW REAR PROFILE 1 3 3 SEE BELOW INNER BODY PROFILE 2 3 4 SEE BELOW SPACER 2 3 5 10281000 LOCKNUT M10 4 3 6 10251044 BOLT...

Page 11: ...n Assy Procedures v Place Locator Item 4 3 through hole in Inner Body Profiles and Front Profile Slide handles item 4 1 onto locator item 4 3 and secure with M10 x 80 Hex head bolts item 4 5 and M10 w...

Page 12: ...INTENTIONALLY LEFT BLANK POLYNESIA SPRINGERS SMP PLAYGROUNDS LTD TEN ACRE LANE THORPE EGHAM SURREY TW20 8RJ Appendix B Page 2 ISSUE N...

Reviews: