background image

P

PR

RO

OB

BL

LE

EM

M

P

PO

OS

SS

SIIB

BL

LE

E  C

CA

AU

US

SE

E

S

SO

OL

LU

UT

TIIO

ON

N

MANDATORY MAINTENANCE 

A

Allll  m

ma

aiin

ntte

en

na

an

ncce

e  a

an

nd

d  rre

ep

pa

aiirrss  ssh

ho

ou

ulld

d  b

be

e  p

pe

errffo

orrm

me

ed

d  b

byy  a

an

n

a

au

utth

ho

orriizze

ed

d  rre

ep

pa

aiirr  ffa

acciilliittyy..    C

Ca

allll  1

1--8

88

88

8--2

27

78

8--8

80

09

92

2  tto

o  o

ob

btta

aiin

n  a

a  lliisstt  o

off  rre

ep

pa

aiirr  ffa

acciill--

iittiie

ess  iin

n  yyo

ou

urr  a

arre

ea

a  o

orr  tto

o  m

ma

akke

e  a

arrrra

an

ng

ge

em

me

en

nttss  tto

o  rre

ettu

urrn

n  tth

he

e  tto

oo

oll  ffo

orr  sse

errvviicce

e..

A

AC

CT

TIIO

ON

N

R

RE

EA

AS

SO

ON

N

O

OP

PE

ER

RA

AT

TIIO

ON

N

TROUBLESHOOTING

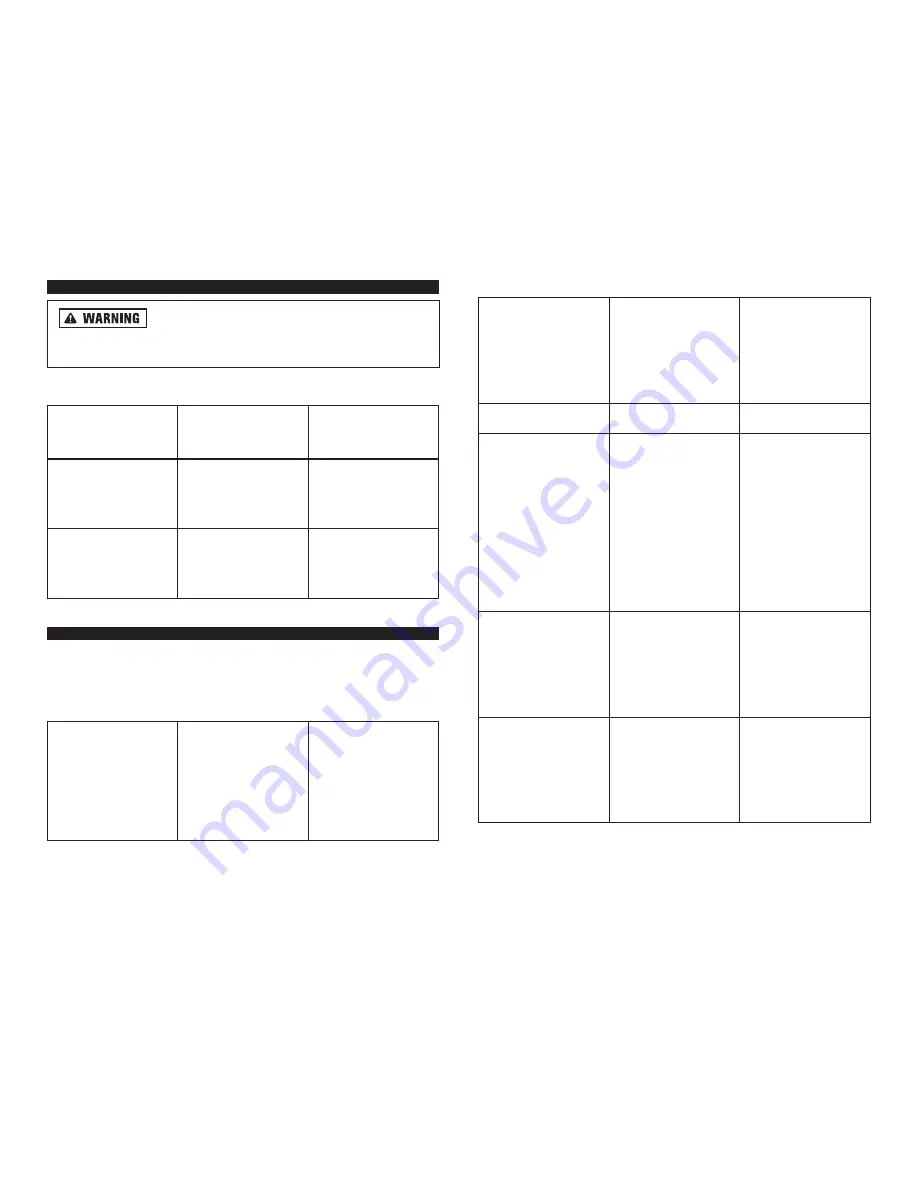
Most minor problems can be resolved quickly and easily using the troubleshooting
table below. For problems that cannot be solved, contact Alltrade Customer Service
(toll free) at 1-888-278-8092.

P

PR

RO

OB

BL

LE

EM

M

P

PO

OS

SS

SIIB

BL

LE

E  C

CA

AU

US

SE

E

S

SO

OL

LU

UT

TIIO

ON

N

Clean magazine and
feeder mechanism.

Prevents brad nailer
from jamming.

Use compressed air and
clean daily.

Inspect and ensure work
piece contact operates
properly.

Ensures operator safety
and keeps brad nailer
working efficiently.

Use compressed air and
clean daily.

Lubricate brad nailer
after every use using
pneumatic tool oil.

Extends life of brad nailer.

Apply 2 – 3 drops of
pneumatic tool oil to
brad nailer air inlet after
every use.

Weak drive. Slow to
cycle between nailings.

Ensure proper air pres-
sure is being used.
Inspect for worn driver
blade.
Inspect piston O-ring for
wear or damage.

Increase air pressure, 
Do not exceed 120 psig
(8.3 bars, 8.5 kg/cm

2

)

Contact Customer
Service.

Nails driven too deep.

Check air pressure.

Reduce air pressure.

Brad nailer feeds inter-
mittently or skips nails.

Ensure correct nails are
being used.
Inspect nail feeder
mechanism.
Piston O-ring damaged
or worn
Nail feeder worn or
damaged.

Use ONLY recommend-
ed nails.
Clean and lubricate nail
feeder.
Use recommended
pneumatic tool oil.
Contact Customer
Service.
Replace nail feeder.

Nails jam or driven nail
is bent.

Ensure correct nails are
being used.
Inspect for worn driver
blade.
Nail feeder worn or
damaged.

Use ONLY recommend-
ed nails.
Contact Customer
Service.
Replace nail feeder.

Drives nails properly
during normal nailing
operations, but fails to
drive nails fully at faster
operating speeds.

Check inside diameter of
air hose.

Switch to air hose with
larger inside diameter.

Nailer operates, but no
nail is driven.

Check for jammed nail.
Inspect nail feeder
mechanism.
Ensure correct nails are
being used.

Clear jammed nail.
Clean and lubricate nail
feeder.
Use ONLY recommend-
ed nails.

17

18

Summary of Contents for 870015

Page 1: ...LER INSTRUCTION MANUAL THIS MANUAL CONTAINS IMPORTANT INFORMATION REGARDING SAFETY OPERATION MAINTENANCE AND STORAGE OF THIS PRODUCT BEFORE USE READ CAREFULLY AND UNDERSTAND ALL CAUTIONS WARNINGS INSTRUCTIONS AND PRODUCT LABELS FAILURE TO DO SO COULD RESULT IN SERIOUS PERSONAL INJURY AND OR PROPERTY DAMAGE IF YOU SHOULD HAVE ANY QUESTIONS OR EXPERIENCE A PROBLEM WITH YOUR SNAP ON PRODUCT DO NOT RE...

Page 2: ...nd N NO OT TE E statements of this manual This is the safety alert symbol It is used to alert you to potential personal injury hazards Obey all safety messages that follow this symbol to avoid possible injury or death D DA AN NG GE ER R indicates an imminently hazardous situation which if not avoided will result in death or serious injury W WA AR RN NI IN NG G indicates a potentially hazardous sit...

Page 3: ... ai il le er r i is s b be ei in ng g u us se ed d Distractions can result in severe injury or even death to anyone who inadvertently gets in the way of nailing operations D Do o n no ot t u us se e o ox xy yg ge en n c co om mb bu us st ti ib bl le e o or r b bo ot tt tl le ed d g ga as se es s s su uc ch h a as s c ca ar rb bo on n d di io ox xi id de e o or r n ni it tr ro og ge en n a as s a a...

Page 4: ...idents E En ns su ur re e t th he e w wo or rk k a ar re ea a i is s s su uf ff fi ic ci ie en nt tl ly y i il ll lu um mi in na at te ed d t to o o op pe er ra at te e p po ow we er r t to oo ol ls s The work area should be clear and free of litter D Do o n no ot t c co on nn ne ec ct t b br ra ad d n na ai il le er r t to o a an n a ai ir r s so ou ur rc ce e c ca ap pa ab bl le e o of f g ge en...

Page 5: ...ply hoses shall have a minimum working pres sure of 150 psi 10 7 kg cm2 G or 150 of the maximum pressure produced by the compressor or whichever is higher L Lo ow w a ai ir r o ou ut tp pu ut t b by y t th he e c co om mp pr re es ss so or r o or r a a l lo on ng ge er r h ho os se e w wi it th h a a s sm ma al ll le er r i in ns si id de e d di ia am me et te er r i in n r re el la at ti io on n ...

Page 6: ... tape or joint compound to the connector threads before insertion 3 Snap the air hose onto the quick disconnect on the air nailer Check for air leaks L LU UB BR RI IC CA AT TI IO ON N To ensure maximum performance it is recommended to install an air set oiler reg ulator and air filter as close as possible to the air nailer Adjust the oiler so that approximately one drop of oil will be released for...

Page 7: ...ing decrease the air pressure In general the brad nailer will have a longer service life when the adjustment knob is set at a lower setting causing less wear and tear on the driving mechanism A Al lw wa ay ys s d di is sc co on nn ne ec ct t t th he e b br ra ad d n na ai il le er r b be ef fo or re e m ma ak ki in ng g a an ny y a ad dj ju us st tm me en nt ts s t to o t th he e n na ai il l d de...

Page 8: ...ce Install no mar nosepiece by pressing it into place on the nose frame See Figure 5 Store the no mar nosepiece in place when not being used N Ne ev ve er r u us se e a a n no on n r re el li ie ev vi in ng g a ai ir r c co ou up pl le er r w wi it th h t th he e b br ra ad d n na ai il l e er r A Al lw wa ay ys s u us se e c co ou up pl le er rs s t th ha at t r re el le ea as se e a an ny y b bu...

Page 9: ... n no ot t a at tt te em mp pt t t to o r re ep pa ai ir r t th he e b br ra ad d n na ai il le er r F Fa ai il lu ur re e t to o c co om mp pl ly y c ca an n r re es su ul lt t i in n m ma al lf fu un nc ct ti io on n o of f t th he e t to oo ol l a an nd d s se ev ve er re e i in nj ju ur ry y t to o t th he e o op pe er ra a t to or r o or r a an ny y b by ys st ta an nd de er rs s CHANGING DIR...

Page 10: ...ficiently Use compressed air and clean daily Lubricate brad nailer after every use using pneumatic tool oil Extends life of brad nailer Apply 2 3 drops of pneumatic tool oil to brad nailer air inlet after every use Weak drive Slow to cycle between nailings Ensure proper air pres sure is being used Inspect for worn driver blade Inspect piston O ring for wear or damage Increase air pressure Do not e...

Page 11: ...31 Washer 5 1 21 8 A0301 1551 Cap Top 9 A0311 0451 Seal Air 10 A0200 0221 O Ring 15 2 5 11 A0205 0651 Gasket 12 A0100 0631 Spring 13 K0300 2221 Firing Valve Piston Set 14 A0200 0711 O Ring 33 5 2 5 15 A0308 0341 Firing Valve Piston 16 A0200 0601 O Ring 26 59 2 95 17 A0313 0041 Piston Stopper 18 K0600 4291 Piston Unit 19 A0200 1281 O Ring 22 4 3 3 20 B0600 4271 Piston Set 21 A0305 0081 Sleeve Retai...

Page 12: ...ver 44 A0712 0341 Safety Guide Plate 45 A0100 0811 Spring 46 A0200 1091 O Ring 11 1 05 47 K0500 1381 Trigger Valve Set 48 K0500 1491 Trigger Set 49 K0800 0111 Driver Guide Cover Set 50 K0700 2531 Release Catch Assembly 51 A0005 0041 E Ring2 5 52 A0711 0841 Release Catch C 53 A0011 0181 Spring Pin 3 8 54 A0200 4301 O Ring 4 4 1 8 55 A0004 0181 Safety Adjustment Wheel 56 A0711 0831 Release Catch B 5...

Page 13: ...time or rental inconvenience commercial loss or consequential damages For the location of an Authorized Service Center nearest you please call customer service at 1 888 278 8092 E EX XC CL LU US SI IO ON NS S Air nailers and staplers need periodic maintenance to remain in proper operating condition Normal wear parts o rings and driver blades shall be warranted to the original purchaser to be free ...

Page 14: ...IAL OR WORKMANSHIP ARE NOT COVERED BY THIS WARRANTY Alltrade will not be liable for the following labor charges loss or damage resulting from improper operation maintenance or repairs made by other persons pre deliv ery services such as assembly oil and lubricants and adjustment maintenance services that are normally required to maintain the product The use of other than genuine Snap On Repair Par...

Reviews: