background image

5

Protection against Tipovers

(Continued From Previous Column)

7. Keep people and pets out of mowing area. Immediately
STOP blades, STOP engine, and STOP machine if anyone
enters the area.
8. Check shields, deflectors, switches, blade controls and
other safety devices frequently for proper operation and
location. 
9. Make sure all safety decals are clearly legible. Replace if
damaged. 
10. Protect yourself when mowing and wear safety glasses,
a dust mask, long pants and substantial footwear.
11. Know how to STOP blades and engine quickly in prepa-
ration for emergencies. 
12. Use extra care when loading or unloading the machine
into a trailer or truck. 
13. Check grass catcher components frequently for signs of
wear or deterioration and replace as needed to prevent
injury from thrown objects going through weak or worn
spots.

Safe Handling of Gasoline

To avoid personal injury or property damage, use extreme
care in handling gasoline. Gasoline is extremely flammable
and the vapors are explosive.
1. Extinguish all cigarettes, cigars, pipes and other sources
of ignition.
2. Use only an approved fuel container.
3. DO NOT remove fuel cap or add fuel with the engine run-
ning. Allow the engine to cool before refueling.
4. DO NOT refuel the machine indoors.
5. DO NOT store the machine or fuel container inside where
there is an open flame, spark or pilot light such as on a
water heater or other appliances.
6. DO NOT fill fuel containers inside a vehicle or on a truck
or trailer bed with a plastic liner. Always place the contain-
ers on the ground away from the vehicle before filling.
7. Remove gas-powered equipment from the vehicle or
trailer and refuel it on the ground.  If this is not possible,
then refuel equipment using a portable container, rather
than a gasoline dispenser nozzle.
8. DO NOT start gas powered equipment in enclosed vehi-
cles or trailers.
9. Keep the nozzle in contact with the rim of the fuel tank or
container opening at all times until fueling is complete. DO
NOT use a nozzle lock-open device
10. If fuel is spilled on clothing, change clothing immediate-
ly.
11. Never overfill a fuel tank. Replace fuel cap and tighten
securely.

Operation

1. Mount and dismount machine from left side. Keep clear
of discharge opening at all times.
2. Start engine from operator’s seat, if possible. Make sure
blades are OFF and parking brake is set. 
3. DO NOT leave machine with engine running. STOP
engine, STOP blades, SET brake, and Remove key before
leaving operators position of any reason.
4. DO NOT operate machine unless properly seated with
feet on feet rests or pedal(s).
5. STOP BLADES and ENGINE and make sure blades have
stopped before removing grass catcher or unclogging
mower to prevent loss of fingers or hand. 
6. Blades must be OFF except when cutting grass. Set
blades in highest position when mowing over rough
ground. 
7. Keep hands and feet away from rotating blades under-
neath deck. DO NOT place foot on ground while BLADES
are ON or machine is in motion. 
8. DO NOT operate machine without entire grass catcher or
guards in place and working. DO NOT point discharge at
people, passing cars, windows or doors. 
9. Slow down before turning. 
10. Watch out for traffic when near or crossing roadways.
11. STOP engine immediately after striking an obstruction.
Inspect machine and repair damage before resuming opera-
tion. 
12. Operate machine only in daylight or with good artificial
light. 
13. Exercise CAUTION when pulling loads. Limit loads to
those you can safely control and attach loads to hitch plate
as specified with attachment instructions.
14. On slopes, the weight of the towed equipment may
cause loss of traction and loss of control. When towing,
travel slowly and allow extra distance to stop.
15. DO NOT operate engine in enclosed areas. Engine
exhaust gases contain carbon monoxide, a deadly poison. 
16. DO NOT discharge material against a wall or obstruc-
tion. Material may ricochet back towards the operator.
17. Only use accessories approved by the manufacturer.
See manufacturer’s instructions for proper operation and
installation of accessories.

Operator Safety

Not 

for  

Reproduction

Summary of Contents for 2811524BV

Page 1: ...rator s Manual Manual No 7104742 Rev REAR ENGINE RIDING MOWER SERIES 24 Model No Description 7800784 2811524BV 7800785 2812524BVE 7800786 3014524BVE 7800787 3317524BVE N o t f o r R e p r o d u c t i...

Page 2: ...t or operate this equipment Save these original instructions for future reference Complete the following information on your purchase Date of Purchase__________________________________________________...

Page 3: ...k and Component Adjustments 24 Rear Engine Rider Drive Components 27 Mower Blade Replacement 28 Mower Drive Belt Replacement 29 Battery 30 Troubleshooting 32 Warranty 34 Slope Guide 35 WARNING Battery...

Page 4: ...10 degrees 18 grade Turn blades OFF when traveling uphill Use a slow speed and avoid sudden or sharp turns 3 DO NOT operate machine back and forth across face of slopes Operate up and down Practice o...

Page 5: ...eling is complete DO NOT use a nozzle lock open device 10 If fuel is spilled on clothing change clothing immediate ly 11 Never overfill a fuel tank Replace fuel cap and tighten securely Operation 1 Mo...

Page 6: ...properly tight Check that all cotter pins are in proper position Maintenance Continued From Previous Column 6 Always provide adequate ventilation when running engine Exhaust gases contain carbon monox...

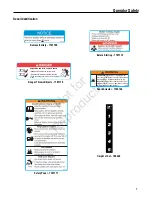
Page 7: ...tor should contact local fire agencies for laws or regulations relating to fire prevention requirements WARNING 7102746 Spark Arrestor 7102746 Height of Cut 703440 7103440 Danger Thrown Objects 710111...

Page 8: ...y 7105102 WARNING AVOID SERIOUS INJURY OR DEATH 7105103 Read Operator s Manual before working with battery Always wear goggles when working near battery Keep children open flames and sparks away from...

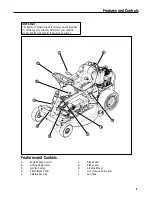
Page 9: ...Contact your dealer if you have questions Features and Controls A Engine Speed Control B Cutting Height Lever C Ignition Switch D Clutch Brake Pedal E Park Brake Latch F Blade Pedal G Blade Lever H St...

Page 10: ...cutting deck and engine of any accumulation of dirt grass oil etc Keep the engine air intake screen and cooling fins clear at all times 8 Add fuel to the fuel tank after pushing the Rear Engine Rider...

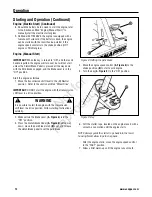
Page 11: ...engine 4 Move the engine speed control A Figure 6 to the choke position B to start a cold engine 5 Turn the ignition key A Figure 7 to the START position until the engine starts NOTE If after 5 secon...

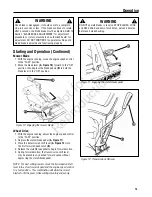
Page 12: ...o the section entitled Wheel Drive IMPORTANT DO NOT start the engine with the transmission shift lever in a drive position 2 Make certain the Blade Lever A Figure 4 is in the OFF position 3 Press the...

Page 13: ...results move the transmission shift lever into a slow forward speed and the engine speed control to a fast position This combination will allow the mower blades to lift the grass while cutting smoothl...

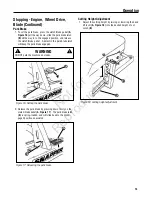
Page 14: ...hine with the engine running STOP Blade STOP engine Shift to neutral and engage park brake Remove key WARNING Once blade is disengaged it should come to a complete stop in 3 seconds or less If the bla...

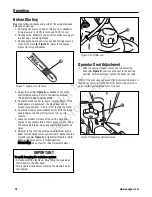
Page 15: ...park brake by pressing down firmly on the clutch brake pedal A Figure 17 The park brake latch B is spring loaded and will slide back to the disen gaged position unassisted Cutting Height Adjustment 1...

Page 16: ...r can be pushed and held before starting the blade and will allow reverse operation until the blade pedals are released at which time the system will return to its Reverse Lockout mode This feature sh...

Page 17: ...mower blades ENGINE First 5 Hours Change engine oil Every 8 Hours or Daily Check engine oil level Every 25 Hours or Annually Clean engine air filter and pre cleaner Every 50 Hours or Annually Change...

Page 18: ...cleaner and cartridge require service Refer to the Engine Manual for recommended service procedures Check Mower Blade 1 Follow the WARNING statement found on this page 2 Carefully stand the Rear Engin...

Page 19: ...not operate the machine Refer to the section entitled BLADE BRAKE ADJUSTMENT or contact your SNAPPER dealer for assistance Service Brake Park Brake 1 Check the machine brake for proper function Engag...

Page 20: ...ion entitled SHIFT LEVER LUBRICATION Check Engine 1 Change the engine oil Refer to the section entitled CHANGE ENGINE OIL Refer to the engine manual for oil specifications 2 Change the air filter Pull...

Page 21: ...all mower deck linkage pivot points with a light coat of motor oil Front Wheel Bearing Lubrication Lubricate the front wheel grease fittings A Figure 25 with five shots of general purpose grease from...

Page 22: ...T Overfilling of the differential with lubricant will cause lubricant to leak onto drive components of the Rear Engine Rider 3 Check the fill level plug A Figure 29 on the chain case B for damage If s...

Page 23: ...e the Rear Engine Rider will operate properly when taken out of storage 1 Thoroughly clean the Rear Engine Rider by removing all grass clippings and debris 2 Perform maintenance and lubrication as req...

Page 24: ...BELT COVER REMOVAL 3 If the dimension is greater than 3 1 4 rotate the brake adjustment nut A Figure 32 clockwise to increase brake tension If the dimension is less than 3 rotate the nut counter clock...

Page 25: ...til the blade tips are at the front and rear of the deck Measure the distance from the blade tips to the floor Figure 34 The distance should be the same or the rear 1 8 to 1 4 lower than the front If...

Page 26: ...complete it will be necessary to check Clutch Brake Cable slack Disengage the park ing brake and allow the pedal A Figure 37 to remain in the engaged wheel drive Up position The clutch brake cable sho...

Page 27: ...igure 40 Hold the clutch brake cable B to the chain case bracket 6 Adjust the cable up or down using the jam nuts to obtain a distance of 3 4 between the end of the clutch brake cable adjustment shown...

Page 28: ...g bolts to the recommended range of 30 to 40 ft lbs WARNING DO NOT attempt any adjustments maintenance service or repairs with the engine running STOP engine STOP blade Engage parking brake Remove key...

Page 29: ...uide B Route the belt as shown 9 Reinstall the idler removed in Step 8 The idler belt guide tab should be positioned in the hole located on the idler arm Tighten the idler pulley bolt securely 10 Adju...

Page 30: ...grease over the terminals to prevent corrosion 5 Reinstall the positive terminal cover B over the positive terminal 6 Reinstall the battery holddown bracket B Figure 48 securing with the removed hard...

Page 31: ...ection entitled BATTERY REMOVAL 2 Charge the battery Refer to the section entitled BATTERY CHARGING 3 Store the battery in an area away from the rider on a wood surface DO NOT STORE THE BATTERY ON A C...

Page 32: ...able loose broken or disconnected 12 Connect starter cable If broken replace with new starter cable 13 Electrical wiring harness disconnected or broken 13 Connect or replace with new wiring harness En...

Page 33: ...t cutting height 3 Engine speed too slow 3 Move throttle control to FAST position 4 Forward speed too fast 4 Move transmission shift lever to a slower speed 5 Terraced cut side to side 5 Adjust side t...

Page 34: ...time warranty service is requested the manufacturing date of the product will be used to determine warranty eligibility ABOUT YOUR WARRANTY We welcome warranty repair and apologize to you for being i...

Page 35: ...35 Slope Guide N o t f o r R e p r o d u c t i o n...

Page 36: ...n piece of power equipment This differ ence is due to a variety of factors including but not limited to the variety of engine components air cleaner exhaust charg ing cooling carburetor fuel pump etc...

Reviews: