background image


13 

Section 5 - REPAIR & ADJUSTMENTS 


WARNING 

DO NOT attempt any adjustments, maintenance, 
service, or repairs with engine running. Stop auger. 
Stop engine.  Remove key. Remove spark plug wire 
and secure wire away from spark plug. 


5.1  AUGER BELT ADJUSTMENT/REPLACEMENT 

When operating machine release the auger clutch 
control. The auger should come to a complete stop in 
5 seconds. If the auger does not come to a complete 
stop in the required time, check and adjust belt 
tension. Inspect belt frequently for signs of excessive 
wear. Observe drive belt for slippage due to wear 
when operating machine. If slippage does occur 
adjust as follows. 
 
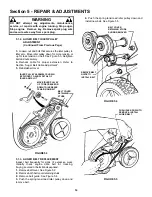
5.1.1.  AUGER BELT CABLE ADJUSTMENT 
1.  
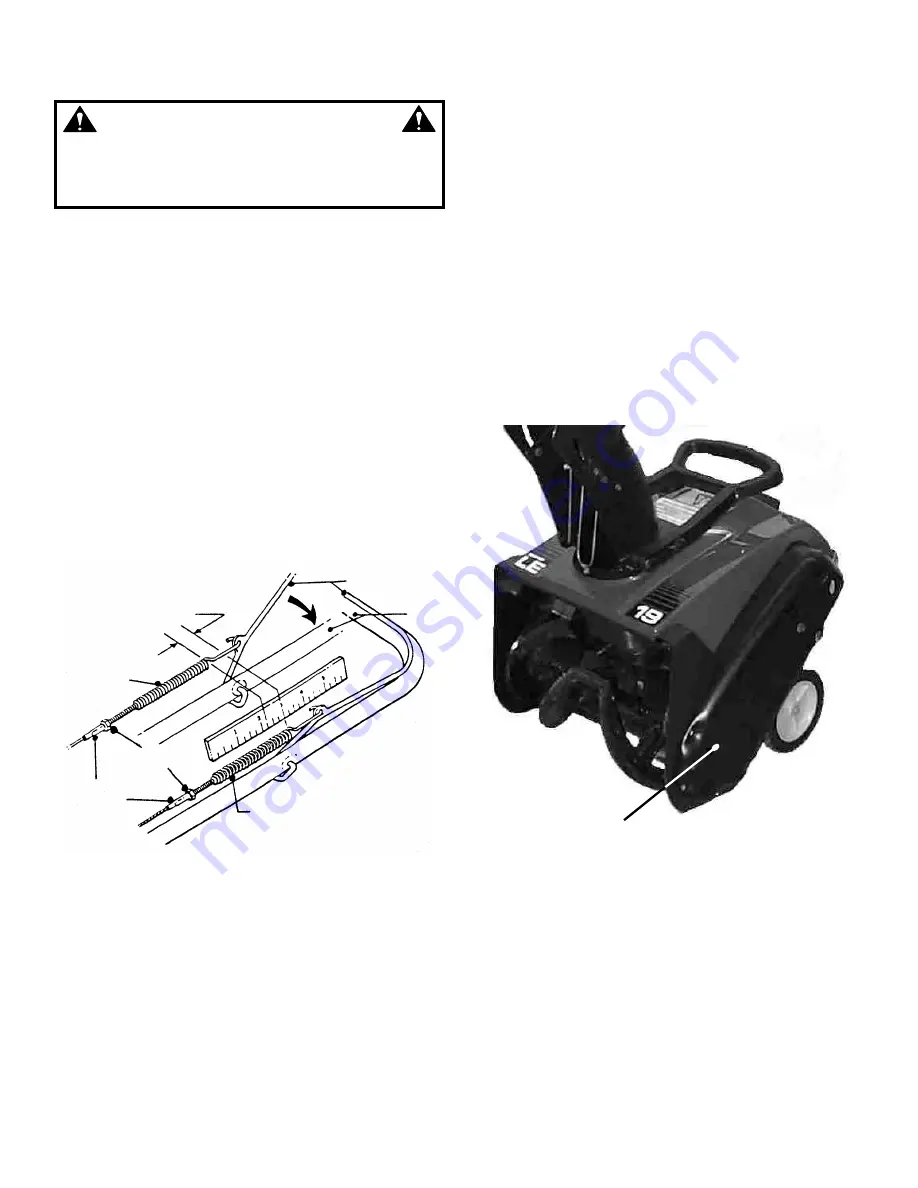
Measure control cable extension from a relaxed 
position to full extended position. Move control lever 
against handle. Measure the overall length of the 
spring. The length of the cable spring should 
increase by 1/2” to 3/4” when the clutch control is 
depressed. See Figure 5.1. 


FIGURE 5.1 


2.  Loosen jam nut at the upper end of cable. Hold 

threaded end of cable and then turn cable clockwise 
until correct extension is achieved. Retighten jam nut. 


IMPORTANT: DO NOT over tighten cable. The control 
cable must have slack for the auger brake to function 
properly. If the auger control cannot be properly adjusted, 
belt adjustment and/or replacement will be required. 
Refer to Section “Auger Belt Idler Pulley Adjustment”. 


5.1.2.   AUGER BELT IDLER PULLEY 

ADJUSTMENT 

NOTE: To adjust the idler pulley and properly tension 
the auger belt, the auger control cable adjustment 
must first be loosened as described in the following 
step. Cable adjustment must be checked after 
completing the idler pulley adjustment. 
 
1.  
Loosen jam nut at the upper end of cable. Hold 
threaded end of cable and then turn metal housing of 
cable counter clockwise until threaded portion of cable 
is extracted from metal housing. Reinstall 1/2” of the 
threaded portion of cable back into metal housing. 
Retighten jam nut. 
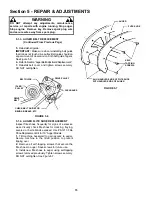
2.  Remove belt cover. See Figure 5.2. 


FIGURE 5.2 


(Continued on the Next Page) 


UPPER 
HANDLE 

CABLE SPRING 
SHOULD EXTEND 
1/2” TO 3/4” 

AUGER CLUTCH 
CONTROL 

RELAXED 

CABLE 
HOUSING 

JAM 
NUT 

EXTENDED 

REMOVE COVER 
FOR IDLER PULLEY 
ADJUSTMENT 

Summary of Contents for ELE3190R

Page 1: ...ration R Recoil Start 3 3 0 HP Engine Horse Power Thank you for buying a SNAPPER Product Before operating your Snow Thrower read this manual carefully and pay particular attention to the IMPORTANT SAFETY INSTRUCTIONS on Pages 2 3 Remember that all power equipment can be dangerous if used improperly Also keep in mind that SAFETY requires careful use in accordance with the operating instructions and...

Page 2: ...e the snow thrower safely enough to protect themselves and others from serious injury 4 Disengage all clutches and shift into neutral before starting the engine motor 5 Wear adequate winter clothing including boots which will give you maximum footing on slippery surfaces Exercise CAUTION to avoid slipping or falling 6 Before the first snow fall check the area to be cleared and remove all objects s...

Page 3: ... when backing 18 Disengage power to the auger impeller when snow thrower is transported or not in use 19 Use only attachments and accessories approved by the manufacturer of the snow thrower such as wheel weights counterweights cabs and the like 20 Never operate the snow thrower without good visibility or light Always be sure of your footing and keep a firm hold on the handles Walk never run MAINT...

Page 4: ...Start Models 10 11 Starting Stopping Auger 10 11 SECTION 4 MAINTENANCE INSTRUCTIONS 12 Checking Auger Drive Belt 12 Checking Auger Flite Shoes 12 Checking Clutch Control Cable 12 Annually End of Each Season 12 Engine 12 Spark Plug 12 Storage Procedure 12 SECTION 5 REPAIR AND ADJUSTMENTS 13 15 Auger Drive Belt Adjustment 13 14 Auger Drive Belt Replacement 14 15 Auger Flite Shoe Replacement 15 TROUB...

Page 5: ...wthrower SAFETY INSTRUCTIONS TO PREVENT INJURY 1 Read Owner s Manual for operating and safety instructions 2 Observe all labels and instructions 3 DO NOT defeat safety features of controls They are for your protection 4 Stop engine wait for all moving parts to stop remove spark plug wire before unclogging or servicing machine 5 Never allow children to operate the equipment Never allow adults to op...

Page 6: ... FIRE HAZARD Remove all fuel from fuel tank and carburetor before tipping machine HEARING PROTECTION REQUIRED MAXIMUM HANDLE VIBRATION 34 M SEC 2 YEAR OF MANUFACTURE SOUND POWER LEVEL EUROPEAN COMMUNITY CHOKE OFF ON OFF ON IGNITION SWITCH ENGINE PRIMER ...

Page 7: ...ndoors 3 1 4 Mix fresh good quality unleaded gasoline and SNAPPER 2 cycle engine oil or equivalent Mix fuel and oil to a 32 1 ratio See Figure 3 2 3 1 5 Add premix fuel to tank after pushing the machine outside where fumes can safely dissipate Make sure cap is tightened after refueling Refer to Engine Owners Manual for specifications 3 1 6 Check auger housing must be free of all obstructions Clean...

Page 8: ...ion cord that is heavy enough to carry the correct amount of current to the machine See Figure 3 3 for correct size to use depending on cord length and nameplate ampere rating If in doubt use the next heavier gauge cord MINIMUM GAUGE FOR CORD SETS 120 Volt Total Length of Cord in Feet Rating Amps 25 ft 50 ft 100 ft 150 ft More Than Not More Than A W G 0 6 18 16 16 14 6 10 18 16 14 12 10 12 16 16 1...

Page 9: ...tection Keep people and pets away from area 3 2 2 ENGAGING AUGER 1 Pull auger control against handle to engage auger See Figure 3 5 WARNING Release auger clutch control and make sure auger impeller has STOPPED before rotating discharge chute or adjusting deflector DO NOT place hands near auger impeller while engine is running 3 2 3 DISCHARGE CHUTE and DEFLECTOR ADJUSTMENT 1 Release auger control a...

Page 10: ...ch box on machine s control panel then plug the other end into 120 volt AC receptacle 2 Turn ignition key to the ON position 3 Move choke control to the choke ON position See Figure 3 8 4 Push primer button three times to start a cold engine NOTE Do not use primer button to start warm engine 5 Push the electric starter button DO NOT hold button for more than 20 seconds to avoid damaging the starti...

Page 11: ...eller has STOPPED before rotating discharge chute or adjusting deflector DO NOT place hands near auger impeller while engine is running 3 2 7 DISCHARGE CHUTE and DEFLECTOR ADJUSTMENT 1 Release auger control and allow auger to come to a complete stop before performing any adjustments 2 Loosen deflector knob and position deflector to desired angle Retighten knob 3 Rotate discharge chute in desired d...

Page 12: ... Figure 4 3 FIGURE 4 3 4 3 ANNUALLY END OF EACH SEASON Perform all maintenance as described in the maintenance schedule 4 3 1 Engine Refer to engine owner s manual for service instructions 4 3 2 Spark Plug Refer to engine owner s manual for service instructions 4 4 STORAGE PROCEDURE Refer to the Engine Owner s Manual for directions regarding engine storage preparations Prepare the snow thrower for...

Page 13: ...end of cable Hold threaded end of cable and then turn cable clockwise until correct extension is achieved Retighten jam nut IMPORTANT DO NOT over tighten cable The control cable must have slack for the auger brake to function properly If the auger control cannot be properly adjusted belt adjustment and or replacement will be required Refer to Section Auger Belt Idler Pulley Adjustment 5 1 2 AUGER ...

Page 14: ...nstall belt cover FIGURE 5 3 5 1 3 AUGER BELT REPLACEMENT Inspect belt frequently for signs of excessive wear Visually check engine drive belt for cracking fraying severed or belt strands exposed 1 Remove belt cover See Figure 5 2 2 Remove both belt cover retaining studs 2 Remove belt guide See Figure 5 4 3 Push the spring tensioned idler pulley down and remove belt 4 Push the spring tensioned idl...

Page 15: ...en FIGURE 5 6 5 1 4 AUGER FLITE SHOE REPLACEMENT Inspect flite shoes frequently for signs of excessive wear Visually check flite shoes for cracking fraying severed or belt strands exposed Use 6 1213 Flite Shoe Replacement Kit for 19 Auger Models 1 Tilt machine backward to gain access to auger Secure machine in the tilted position to prevent tipping over 2 Remove all self tapping screws that secure...

Page 16: ...ew in line filter Engine Loses Power 1 Fuel and 2 Cycle oil mixture ratio incorrect 1 Mix fuel and 2 Cycle oil to 32 1 ratio 2 Spark plug faulty 2 Service spark plug 3 Water debris or stale fuel in fuel system 3 Drain and clean fuel system Excessive Vibration 1 Damaged out of balance or bent auger 1 Service auger 2 Loose engine or auger components 2 Service and tighten loose components 3 Loose or ...

Page 17: ...iginal purchase date SNAPPER will not be responsible for any installation cost incurred The battery warranty only covers original equipment batteries and does not cover damage to the battery or machine caused by neglect or abuse destruction by fire explosion freezing overcharging improper maintenance or use of improper electrolyte There is no other express warranty DISCLAIMER OF WARRANTY Implied w...

Page 18: ... If you have any questions about your Snapper product contact your local authorized Snapper dealer or contact Snapper Customer Service at Snapper McDonough GA 30253 Phone 1 800 935 2967 COPYRIGHT 2001 SNAPPER INC ALL RIGHTS RESERVED INSTRUCTION No 7 4235 I R 1 29 01 WARNING ENGINE EXHAUST SOME OF ITS CONSTITUENTS AND CERTAIN VEHICLE COMPONENTS CONTAIN OR EMIT CHEMICALS KNOWN TO THE STATE OF CALIFO...

Reviews: