14
Section 4 - ADJUSTMENTS & REPAIR
WARNING
DO NOT attempt any adjustments, maintenance or
service with the engine and blade running. STOP
engine and blade. Remove key. Disconnect spark
plug wire and secure away from spark plug. Engine
and components are HOT. Avoid serious burns,
allow sufficient time for all components to cool. DO
NOT attempt to service or charge the battery while it
is installed on the machine.
4.4 BATTERY
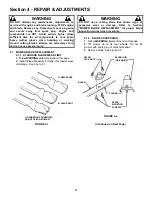
4.4.1. BATTERY REMOVAL
1. Loosen bolts that secure battery bracket to the
deck. See Figure 4.8.
FIGURE 4.8
2. Unplug battery harness from main harness. See
Figure 4.9.
3. Carefully slide battery from battery bracket.
WARNING
Cables must be connected to battery terminals in the
proper position. DO NOT attempt to charge battery
while installed on the machine. DO NOT use
“BOOST” chargers on the battery.
4.4.2. BATTERY
INSTALLATION
1. Slide battery into battery bracket. Tighten bolts.
2. Plug battery harness into main harness. See Figure
4.9.
4.4.3. BATTERY SERVICE
The battery supplied with the electric start model
mowers is a sealed lead acid type battery. After
initial activation the battery is sealed. No fluid level
maintenance is required. DO NOT attempt to check
or adjust fluid level in battery.
1. Remove battery. Refer to Section “BATTERY
REMOVAL”.
2. Place battery in a well ventilated area on a level
surface.
3. Slow charge battery at 1 amp for 10 hours.
4. If battery will not accept charge or is partially
charged after 10 hours of charging at 1 amp,
replace with new battery.
4.4.4. BATTERY STORAGE
If mower is to be stored, it is recommended the
battery be removed, charged and stored.
1. Remove battery. Refer to Section “BATTERY
REMOVAL”.
2. Perform battery service.
3. Bring battery to full charge, if required.
4. Store battery in an area away from the machine on
a wood surface. DO NOT STORE BATTERY ON A
CONCRETE SURFACE.
(Continue to next page for Battery Testing)
POSITIVE
TERMINAL
BATTERY
BATTERY
BRACKET
TERMINAL
COVER
BATTERY
HARNESS
ENGINE
HARNESS
NEGATIVE
TERMINAL
MAIN
HARNESS


