background image


STEP 10 (Continued) 
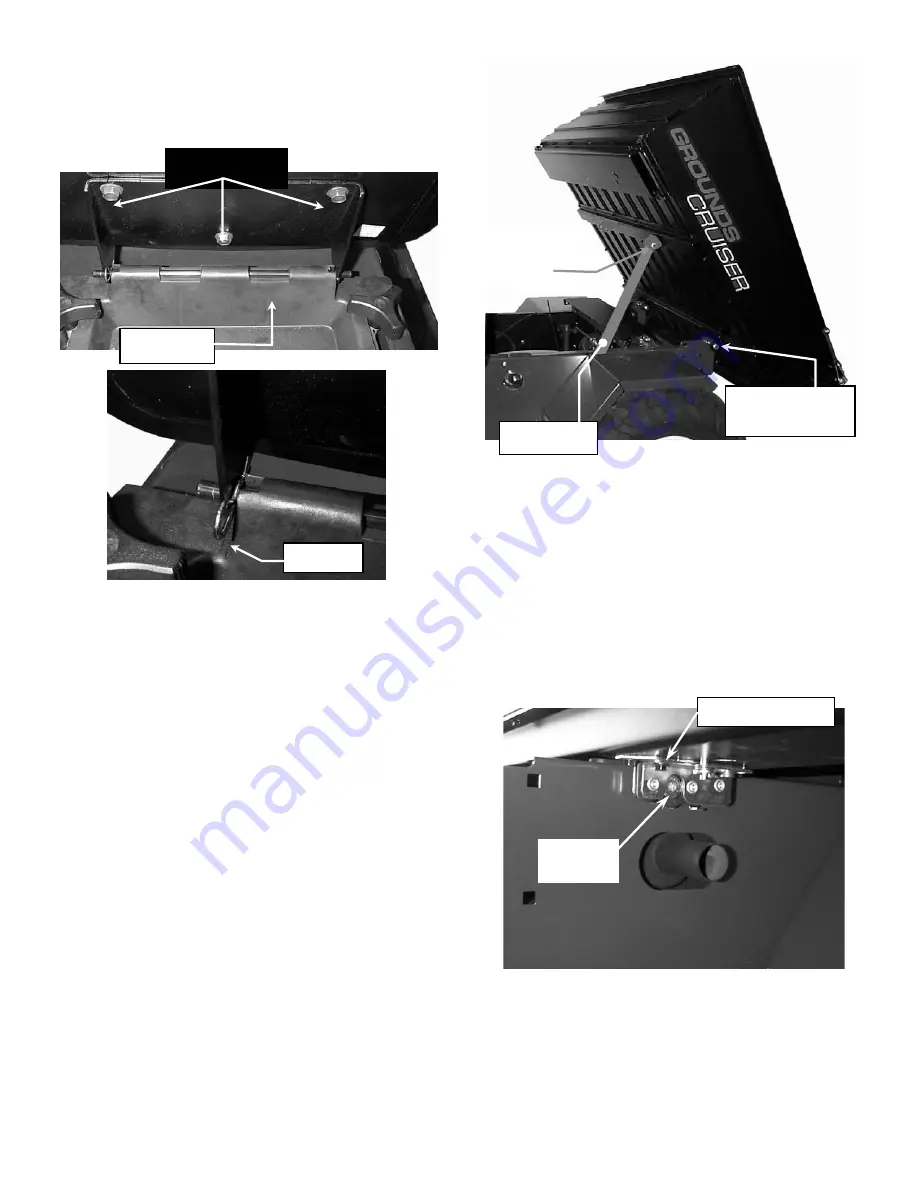
INSTALL OPERATOR’S AND PASSENGER’S 
SEAT 


FIGURE 1.7 


STEP 11 
ATTACH CARGO BED 

Attach bed to pivots at rear of frame. A prop rod is 
provided to support an empty cargo bed only in a raised 
position. 
1.  Align brackets on bottom rear of cargo bed with left 

and right pivots located at rear of frame. See Figure 
1.8. 

2.  Insert (1) 1/2-13 x 3 3/4” bolt into each left and right 

pivot and secure with 1/2-13 NyLoc nuts. Tighten 
securely. 

3.  Attach prop rod to bracket on bottom of cargo bed 

using (1) 1/2-13 x 3” bolt and (1) 1/2-13 NyLoc nut. 
Tighten to a snug rotating fit. 


FIGURE 1.8 


STEP 12 
ALIGN LATCH IF NECCESARY 

Lower the Cargo bed slowly until the latch contacts the 
striker pin.  The head of the striker pin should be inside 
of the latch as shown in figure 1.9. If it is not aligned 
correctly, loosen the bolts that attach the left and right 
bed pivot brackets.  Then, position the latch over the 
striker pin as shown in figure 1.9 and re-tighten the bed 
pivot bracket bolts. 


FIGURE 1.9 


(3) SEAT BOLTS 

HINGE ROD 

HAIRPIN 

PROP ROD 

1/2-13 X 3” 
BOLT & 1/2-13 
NYLOC NUT 

1/2-13 X 3 3/4” 
BOLT & 1/2-13 
NYLOC NUT 


LATCH ASSEMBLY 

STRIKER 

PIN 

Summary of Contents for GC9520KWV

Page 1: ...moved before lifting the machine The device used to lift the machine must have a capacity greater than 1230 lb The cargo bed is attached to the frame of the machine with plastic straps Carefully remove the straps and set the cargo bed aside for installation later FIGURE 1 1 1 Loosen only two lug nuts at left and right rear wheel hubs 2 Remove the four bolts securing the left and right support plat...

Page 2: ...mounting hole The seat belt with the buckle is attached at the inside or middle mounting hole Tighten hardware to a snug rotating fit as described below IMPORTANT The large 2 1 2 diameter flat washers must be installed on the inside surface of the seat support structure See Figure 1 3 1 Remove the top two bolts from the fuel tank straps and slide tank out This will allow clearance to install the b...

Page 3: ...nsmission fluid level Bring to full level as necessary using MOBILFLUID 424 or equivalent Check with dipstick fully threaded STEP 8 ACTIVATE BATTERY Battery is located under the operator s seat Remove battery from compartment before activating or charging Activate and charge the battery in well ventilated area away from sparks and flame Do Not smoke 1 Remove battery from the battery compartment be...

Page 4: ... aligned perfectly straight before installing the steering wheel 1 Make sure that front tires are pointing straight forward 2 Slide foam cover over steering shaft 3 Remove plastic cover from center of steering wheel 4 Orientate the steering wheel so that spokes are horizontal and align splines 5 Place washer and nut on steering shaft Torque nut to 50 70 ft lb 6 Install plastic cover in center of s...

Page 5: ... bracket on bottom of cargo bed using 1 1 2 13 x 3 bolt and 1 1 2 13 NyLoc nut Tighten to a snug rotating fit FIGURE 1 8 STEP 12 ALIGN LATCH IF NECCESARY Lower the Cargo bed slowly until the latch contacts the striker pin The head of the striker pin should be inside of the latch as shown in figure 1 9 If it is not aligned correctly loosen the bolts that attach the left and right bed pivot brackets...

Page 6: ...checked and all function correctly Refer to Operator s manual _____ TRANSMISSION shifts into forward and reverse without excessive grinding of gears _____ CLUTCH engages and accelerates smoothly and does not drag at idle _____ STEERING checked and functions properly _____ SERVICE BRAKE AND PARK BRAKE checked and both function properly Refer to Operator s manual DEALER S RECORDS FINAL CHECK _____ P...

Reviews: