background image

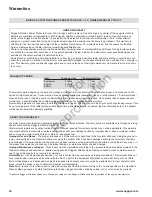
Maintenance

RIDER aND MOWER
Every 8 Hours or Daily

Check safety interlock system
Clean debris off rider and mower deck
Clean debris from engine compartment

Every 25 Hours or annually *

Check tire pressure
Check mower blade stopping time
Check rider and mower for loose hardware

Every 50 Hours or annually *

Check rider brakes

See Dealer annually to

Lubricate rider and mower
Clean battery and cables
Check mower blades **

ENGINE
first 5 Hours

Change engine oil

Every 8 Hours or Daily

Check engine oil level

Every 25 Hours or annually *

Clean engine air filter and pre-cleaner **

Every 50 Hours or annually *

Change engine oil
Replace oil filter

annually

Replace air filter
Replace pre-cleaner

See Dealer annually to

Inspect muffler and spark arrester
Replace spark plug
Replace fuel filter
Clean engine air cooling system

 *  Whichever comes first

 **  Check blades more often in regions with sandy soils or 

high dust conditions.

 *  Whichever comes first

 **  Clean more often in dusty conditions or when airborne 

debris is present.

Maintenance chart

www.snapper.com

20  

Not 

for  

Reproduction

Not 

for  

Reproduction

Summary of Contents for RZT26520

Page 1: ...rator s Manual 285Z Series Zero Turn Rider Mfg No Description 7800765 RZT26520 26HP Zero Turn Rider with 52 Mower 7104691 Revision N o t f o r R e p r o d u c t i o n N o t f o r R e p r o d u c t i o...

Page 2: ...and maintained according to the instructions in this manual your SNAPPER product will provide many years of dependable service This manual contains safety information to make you aware of the hazards...

Page 3: ...Operator Safety 4 Safety Interlock Systems Tests 12 Features and Controls 13 Control Functions 13 Operation 15 General Operating Safety 15 Checks Before Starting 15 Starting the Engine 16 Stopping the...

Page 4: ...act your local authorized dealer Read the Manual The operator s manual contains important safety infor mation you need to be aware of BEFORE you operate your unit as well as DURING operation Safe oper...

Page 5: ...ure a bystander Be sure to clean up the area to be mowed and remove objects that could be thrown by the blade BEFORE you start mowing Do not operate this unit without the entire grass catcher or disch...

Page 6: ...f grass leaves and excess oil Be sure to perform the maintenance proce dures listed in this manual especially periodically testing the safety system Retaining Walls Drop Offs and Water Retaining walls...

Page 7: ...rcise EXTREME CAUTION on all slopes Turn blades OFF when traveling uphill Use a slow speed and avoid sudden or sharp turns 3 DO NOT operate machine back and forth across face of slopes Operate up and...

Page 8: ...nd tigh ten securely OPERATION 1 Mount and dismount machine from left side Keep clear of discharge opening at all times 2 Start engine from operator s seat if possible Make sure blades are OFF and par...

Page 9: ...without safety blocks 9 Service engine and make adjustments only when engine is stopped Remove spark plug wire s from spark plug s and secure wire s away from spark plug s 10 DO NOT change engine gov...

Page 10: ...dotted line indicated above 2 Hold page before you so that its left edge is vertically parallel to a tree trunk or other upright structure 3 Sight across the fold in the direction of hill slope you w...

Page 11: ...eplace them at once See your local dealer for replacements These decals are easily applied and will act as a con stant visual reminder to you and others who may use the equipment to follow the safety...

Page 12: ...are locked into their START PARK positions Test 3 Engine should SHUT OFF if Operator rises off seat with PTO engaged OR Operator rises off seat with parking brake dis enaged OR Operator rises off sea...

Page 13: ...ols the engine speed and choke Move the engine speed control to the FAST position to increase engine speed and to the SLOW position to decrease engine speed Move the engine speed choke control past th...

Page 14: ...rmly in the rider seat for the PTO to function Transmission Release Levers The transmission release levers deactivate the transmissions so that the unit can be pushed by hand see Pushing the Unit by H...

Page 15: ...Do not stop or park rider over dry leaves grass or combustible materials Gasoline is highly flammable and must be handled with care Never fill the tank when the engine is still hot from recent operati...

Page 16: ...rking brake is engaged the ground speed levers are locked in their START PARK positions and the operator is in the seat 2 Start the engine see Starting the Engine 3 Set the mower cutting height see Cu...

Page 17: ...several minutes before attempt ing to do so near objects The rider turns as sharply in reverse as when going forward and backing up straight takes practice Zero Turn Driving Practice The ground speed...

Page 18: ...will learn more maneuvers that will make your mowing time easier and more enjoyable Remember the more you practice the better your control of the rider will be Executing Turns Figure 6 Turning Around...

Page 19: ...uce towed weight when operating on slopes The surface being driven on greatly impacts traction and stability Wet or slippery surfaces can greatly reduce traction and the ability to stop or turn Carefu...

Page 20: ...Every 8 Hours or Daily Check engine oil level Every 25 Hours or Annually Clean engine air filter and pre cleaner Every 50 Hours or Annually Change engine oil Replace oil filter Annually Replace air fi...

Page 21: ...ter A Figure 11 4 Remove hoses from filter 5 Install new filter in proper flow direction in fuel line 6 Secure with hose clamps 7 Reconnect the negative battery cable when finished Engine Maintenance...

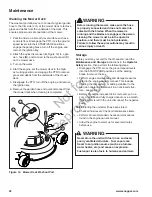
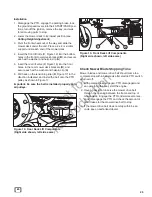
Page 22: ...e no bystanders Failure to follow these precautions may result in serious injury or death Figure 12 Mower Deck Washout Port B A C Storage Before you store your unit for the off season read the Mainten...

Page 23: ...esigned A B 13 lb ft 18 Nm 13 lb ft 18 Nm Figure 14 Ground Speed Lever Adjustment Ground Speed Lever Adjustment Remove the ground speed lever mounting hardware and bracket see Figure 14 Move the lever...

Page 24: ...ving parts to stop 2 Place a 2 x 4 or similiar support under each end of the mower deck then lower the mower deck to its lowest position See Cutting Height Adjustment 3 Pull back on the tensioning idl...

Page 25: ...sher and hairpin clip A 6 Pull back on the tensioning idler D Figure 17 in the direction indicated and install the belt onto the PTO pulley as shown in Figure 17 Important Be sure the belt is installe...

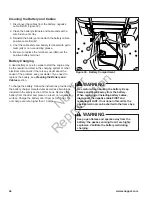
Page 26: ...ver B over the positive battery terminal Battery Charging A dead battery or one too weak to start the engine may be the result of a defect in the charging system or other electrical component If there...

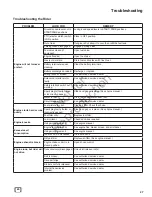
Page 27: ...ill with fresh fuel Circuit breaker blown See authorized service dealer Engine starts hard or runs poorly Fuel mixture too rich Clean air filter Check the choke Spark plug faulty fouled or incorrectly...

Page 28: ...or worn See authorized service dealer Blades not properly fastened to spindles See Servicing the Mower Blades Engine stalls easily with mower engaged Engine speed too slow Set engine speed control to...

Page 29: ...ocedure and rating performance has been obtained and corrected in accordance with SAE J1995 Revision 2002 05 Torque values are derived at 3060 RPM horsepow er values are derived at 3600 RPM Net power...

Page 30: ...s requested the manufacturing date of the product will be used to determine warranty eligibility About Your Warranty We welcome warranty repair and apologize to you for being inconvenienced Warranty s...

Page 31: ...31 en N o t f o r R e p r o d u c t i o n N o t f o r R e p r o d u c t i o n...

Page 32: ...www snapper com N o t f o r R e p r o d u c t i o n N o t f o r R e p r o d u c t i o n...

Page 33: ...nual del Operador Unidad Cero Giro Serie 285Z Mfg No Descripci n 7800765 Unidad Cero Giro 26HP con Cortac sped de 52 pulg RZT26520 N o t f o r R e p r o d u c t i o n N o t f o r R e p r o d u c t i o...

Page 34: ...de alta calidad Le agradecemos la confianza que ha depositado en la marca SNAPPER Si usa y realiza el mantenimiento del equipo de conformidad con las instrucciones de este manual su producto SNAPPER...

Page 35: ...tema de Interbloqueo de Seguridad 12 Caracter sticas y controles 13 Funciones de control 13 Funcionamiento 15 Seguridad de funcionamiento general 15 Verificaciones antes del arranque 15 C mo arrancar...

Page 36: ...autorizado local Lea el manual El manual del operador contiene informaci n de seguridad importante que usted debe conocer ANTES de utilizar su unidad as como DURANTE su funcionamiento Se incluyen t c...

Page 37: ...te a un transe nte Aseg rese de limpiar el rea a ser cortada y retirar objetos que podr an ser arrojados por la cuchilla ANTES de comenzar a cortar el c sped No opere este unidad sin el recolector de...

Page 38: ...dad libre de c sped hojas y exceso de aceite Aseg rese de realizar los procedimientos de mantenimiento indicados en este manual especialmente pruebas peri dicas de la seguridad del sistema Paredes de...

Page 39: ...pendientes DESCONECTE las cuchillas cuando suba una pendiente Utilice una velocidad lenta evitando giros bruscos 3 NO MANEJE la m quina hacia adelante y hacia atr s en medio de las pendientes Man jela...

Page 40: ...memente FUNCIONAMIENTO 1 Monte y desmonte la m quina desde el lado izquierdo Mant ngase alejado del agujero de descarga en todo momento 2 Si es posible encienda el motor desde el asiento del usuario A...

Page 41: ...d 9 nicamente realice reparaciones y ajustes en el motor cuando ste se halle parado Retire el los cable s de buj a del enchufe de la buj a y fije el los cable s lejos del los enchufe s de la buj a 10...

Page 42: ...ci n mayor a 10 grados Gire gradualmente para evitar volcarse o perder el control Tenga mucho cuidado al cambiar de direcci n en una pendiente Los accessorios tendr n un efecto al momento de frenar Re...

Page 43: ...a de inmediato Vea al distribuidor autorizada para su reemplazo Estas calcoman as se aplican con facilidad y act an como un recordatorio visual constante para usted y otras personas que puedan usar el...

Page 44: ...velocidad de desplazamiento est n trabadas en sus posiciones de ARRANCAR ESTACIONAR Prueba 3 El motor debe APAGARSE si El operador se levanta del asiento con el PTO activado O El operador se levanta d...

Page 45: ...ara instrucciones de realizaci n de maniobras Velocidad del motor Control del estrangulador Choke O Matic El control de velocidad estrangulador del motor controla la velocidad y la estrangulaci n del...

Page 46: ...one Palancas de liberaci n de la transmisi n Las palancas de liberaci n de la transmisi n desactivan las transmisiones de modo que se pueda empujar la unidad manualmente ver Empujar la unidad manualme...

Page 47: ...sped hojas y exceso de grasa No se detenga o estacione la unidad sobre hojas secas hierba o materiales combustibles La gasolina es altamente inflamable y debe manipularse con cuidado Nunca llene el t...

Page 48: ...esactivado el freno de estacionamiento est activado y las palancas de velocidad de desplazamiento est n en la posici n de ARRANCAR ESTACIONAR 2 Arranque el motor vea C mo arrancar el motor 3 Ajuste la...

Page 49: ...dad de desplazamiento de manera pareja HACIA ATR S desde la posici n neutral Desacelere y repita Practique retroceder durante unos cuantos minutos antes de intentar hacerlo cerca de objetos La unidad...

Page 50: ...m s experimentado aprender m s maniobras que facilitar n su tiempo de cortado y har n que sea m s disfrutable Recuerde cuando m s practique tendr mayor control de la unidad Figura 6 C mo girar en una...

Page 51: ...La superficie sobre la que se conduce tiene gran impacto sobre la tracci n y la estabilidad Las superficies mojadas o resbaladizas pueden reducir significativamente la tracci n y la capacidad de dete...

Page 52: ...ite del motor Cada 8 horas o diariamente Verifique el nivel del aceite del motor Cada 25 horas o anualmente Limpie el filtro de aire y el prelimpiador del motor Cada 50 horas o anualmente Cambie el ac...

Page 53: ...rampas del filtro de combustible A Figura 11 4 Retire las mangueras del filtro 5 Instale un filtro nuevo en la direcci n correcta del flujo en la l nea de combustible 6 Suj telo con las grampas de man...

Page 54: ...esto puede resultar en lesiones graves o muerte Figura 12 Orificio de lavado de la cubierta del cortac sped B A C Almacenaje Antes de almacenar su unidad fuera de temporada lea las instrucciones de Ma...

Page 55: ...alanca se trabe en las ranuras B en la base del asiento Ajuste de la palanca de velocidad de desplazamiento Retire los herrajes de montaje de la palanca de velocidad de desplazamiento y el soporte ver...

Page 56: ...delanteras C y tirando retire las varillas de los orificios en los soportes Guarde todos los herrajes extra dos 6 Pivote las ruedas delanteras retir ndolas del camino y deslice la cubierta del cortac...

Page 57: ...rquilla A 6 Tire de la polea tensora hacia atr s D Figura 17 en la direcci n indicada e instale la correo en la polea del PTO como indica la Figura 16 Importante Aseg rese que la correa est correctame...

Page 58: ...de terminal B sobre el terminal de bater a positivo Carga de bater a Una bater a muerta o demasiado d bil para arrancar el motor puede ser el resultado de un defecto en el sistema de carga u otro com...

Page 59: ...combustible nuevo Se quem el disyuntor Vea al distribuidor de servicio autorizado El motor no arranca bien o no funciona bien La mezcla de combustible es demasiado rica Limpie el filtro de aire Verif...

Page 60: ...e la transmisi n del cortac sped se resbala porque est muy aceitada o desgastada Vea al distribuidor de servicio autorizado Las cuchillas no est n sujetadas correctamente a los husos C mo dar servicio...

Page 61: ...del Motor Peque o y la clasificaci n de desempe o se ha obtenido y se ha corregido de acuerdo con SAE J1995 Revisi n 2002 05 Los valores de Torque se derivan a 3060 RPM los valores de potencia se der...

Page 62: ...de garant a se encuentra disponible solamente a trav s de concesionarios de servicio autorizados por Briggs Stratton o BSPPG LLC La mayor a de las reparaciones por el servicio de garant a se gestionan...

Page 63: ...31 es N o t f o r R e p r o d u c t i o n N o t f o r R e p r o d u c t i o n...

Page 64: ...www snapper com N o t f o r R e p r o d u c t i o n N o t f o r R e p r o d u c t i o n...

Reviews: