background image

8

OPERATION

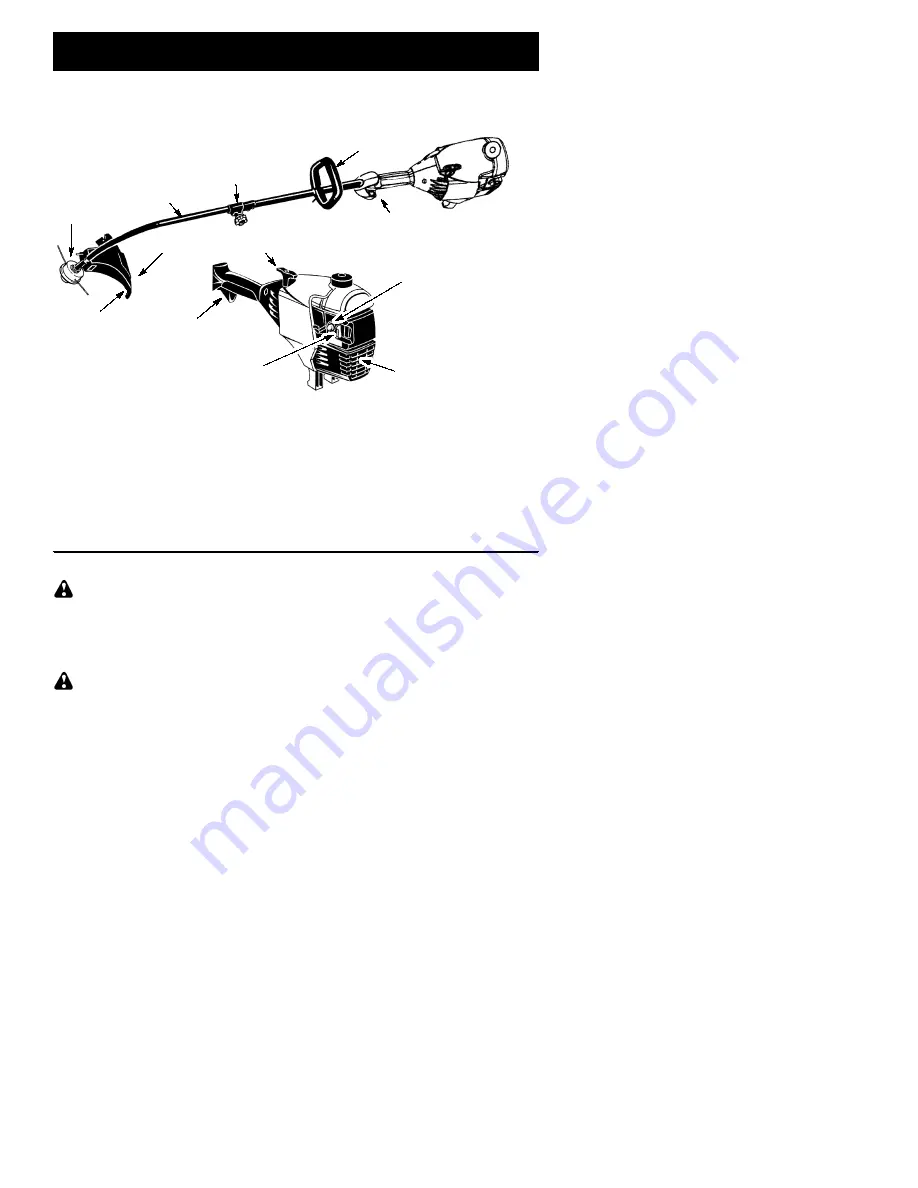
KNOW YOUR TRIMMER

READ THIS INSTRUCTION MANUAL AND SAFETY RULES BEFORE OPERATING YOUR UNIT.
Compare the illustrations with your unit to familiarize yourself with the location of the various controls
and adjustments. Save this manual for future reference.

Line Limiter
Blade

Primer Bulb

Assist Handle

Starter
Handle

Throttle Trigger

Choke
Lever

Shield

Trimmer
Head

Tube

Muffler

ON/OFF Switch

Coupler

ON/OFF SWITCH

The ON/OFF switch is located on the trigger
handle and is used to stop the engine. Move the
switch to the OFF position to stop the engine.

PRIMER BULB

The PRIMER BULB removes air from the car-
buretor and fuel lines and fills them with fuel.
This allows you to start the engine with fewer
pulls on the starter rope. Activate the primer
bulb by pressing it and allowing it to return to
its original form.

CHOKE

The CHOKE helps to supply fuel to the engine
to aid in cold starting. Activate the choke by
moving the choke lever to the FULL CHOKE
position. After the engine attempts to start, move
the choke lever to the HALF CHOKE position.
Once engine has started, move the choke lever
to the OFF CHOKE position.

COUPLER

The COUPLER enables optional attach-
ments to be installed on the unit.

BEFORE STARTING ENGINE

WARNING:

Be sure to read the fuel

information in the safety rules before you be-
gin. If you do not understand the safety rules,
do not attempt to fuel your unit. Call
1-800-554-6723.

FUELING ENGINE

WARNING:

Remove fuel cap slowly

when refueling.
This engine is certified

to operate on

unleaded gasoline. Before operation, gasoline
must be mixed with a good quality synthetic
2-cycle air-cooled engine oil designed to be
mixed at a ratio of 40:1. Snapper

t

/Weed

Eater

"

brand synthetic oil is recommended.

Mix gasoline and oil at a ratio of 40:1. A 40:1
ratio is obtained by mixing 3.2 ounces (95 ml)
of oil with 1 gallon (4 liters) of unleaded
gasoline.

DO NOT USE automotive oil or

boat oil. These oils will cause engine damage.
When mixing fuel, follow instructions printed
on container. Once oil is added to gasoline,
shake container momentarily to assure that

the fuel is thoroughly mixed. Always read and
follow the safety rules relating to fuel before
fueling your unit.

IMPORTANT

Experience indicates that alcohol blended
fuels (called gasohol or using ethanol or
methanol) can attract moisture which leads to
separation and formation of acids during stor-
age. Acidic gas can damage the fuel system
of an engine while in storage.
To avoid engine problems, empty the fuel sys-
tem before storage for 30 days or longer.
Drain the gas tank, start the engine and let it
run until the fuel lines and carburetor are
empty. Use fresh fuel next season.
Never use engine or carburetor cleaner prod-
ucts in the fuel tank or permanent damage
may occur.
See the STORAGE section for additional in-
formation.

HOW TO STOP YOUR UNIT

S

To stop the engine, move the ON/OFF
switch to the OFF position.

S

If engine does not stop, move choke lever
to FULL CHOKE position.

For Parts Call K&T 606-678-9623 or 606-561-4983

www.mymowerparts.com

Summary of Contents for S31SNG

Page 1: ...iones graves AVERTISSEMENT Lire le manuel d instructions et bien respecter tous les avertisse ments et toutes les instructions de s curit Tout d faut de le faire pourrait entra ner des blessures grave...

Page 2: ...rs away Stop unit immediately if ap proached If situations occur which are not covered in this manual use care and good judgment If you need assistance contact your authorized service dealer or call 1...

Page 3: ...oints of people prone to circulation disorders or ab normal swellings Prolonged use in cold weather has been linked to blood vessel dam age in otherwise healthy people If symptoms occur such as numbne...

Page 4: ...e of air can cause rocks dirt or sticks to be thrown or to ricochet which can hurt people or animals break glass or cause other damage S Never run unit without the proper equip ment attached When usin...

Page 5: ...a terial when the blade is in motion Make sure the switch is in the OFF position the spark plug wire is disconnected and the blade has stopped moving before removing jammed material from the cutting b...

Page 6: ...here the unit is to be used Remove objects that could be thrown or damage the unit Some objects may be hidden by fallen snow be alert for the possibility S Direct material discharge away from glass en...

Page 7: ...Release Button Lower Attachment Guide Recess WARNING Make sure the locking release button is locked in the primary hole and the knob is securely tightened before op erating the unit All attachments a...

Page 8: ...ING ENGINE WARNING Remove fuel cap slowly when refueling This engine is certified to operate on unleaded gasoline Before operation gasoline must be mixed with a good quality synthetic 2 cycle air cool...

Page 9: ...until the engine runs but no more than 6 pulls If the engine doesn t start repeat procedure 2 additional times NOTE If engine still doesn t start it is probably flooded Proceed to STARTING A FLOODED E...

Page 10: ...ing release button is locked in the primary hole and the knob is securely tightened before op erating the unit OPERATING POSITION Eye Protection Long Pants Heavy Shoes ALWAYS WEAR Cut from your right...

Page 11: ...lean job TRIMMING Hold the bottom of the trimmer head about 3 in 8 cm above the ground and at an angle Allow only the tip of the line to make contact Do not force trimmer line into work area Trimming...

Page 12: ...s missile 4 Insert ends of the lines about 1 2 inch 1 cm into the small holes on the inside of spool Small Holes Spool Hub Line in Notch Line in Notch Line exit holes 5 Wind the line evenly and tightl...

Page 13: ...f your unit is to be stored for a period of time S Clean the entire unit before lengthy storage S Store in a clean dry area S Lightly oil external metal surfaces FUEL SYSTEM Under FUELING ENGINE in th...

Page 14: ...low Engine will not accelerate lacks power or dies under a load 1 Clean or replace air filter 2 Clean or replace plug and regap 3 Contact an authorized service dealer 4 Contact an authorized service d...

Page 15: ...engine for the peri ods of time listed below provided there has been no abuse neglect or improper mainte nance of your small off road engine Your emission control system includes parts such as the ca...

Page 16: ...DD ON OR MODIFIED PARTS The use of add on or modified parts can be grounds for disallowing a warranty claim ELECTROLUX HOME PRODUCTS INC is not liable to cover failures of warranted parts caused by th...

Reviews: