19
SECTION 6 – ADJUSTMENTS & REPAIRS
6.4 HANDLE HEIGHT ADJUSTMENT
The operator handle can be adjusted for operator
comfort as follows:
1.
Loosen the two bolts on either side of handle
assembly. See Figure 6.4.
2.
Raise or lower handle to desired height.
3.
Retighten bolts securely.
NOTE: After adjusting handle height, upper traction rods
may need to be adjusted.
FIGURE 6.4
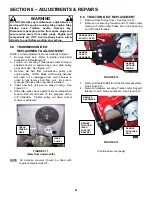
6.5 TRANSMISSION SHIFT INDICATOR
ADJUSTMENT
1.
Loosen hardware securing Transmission Shift
Indicator Plate to machine. See Figure 6.5.
2.
Move the Transmission Shift Lever to the neutral (N)
position.
3.
Adjust the indicator plate until the ‘N’ is clearly
aligned clearly under the hole in the shift lever.
Then move the shift lever throughout the speed
range, making sure that all other gears are visible.
4.
Tighten indicator hardware.
FIGURE 6.5
6.6 CUTTING HEIGHT ADJUSTMENT
The mower has two methods of adjusting cutting height:
1.
Moving position of CUTTING BLADE on cutting
blade spindle shaft.
2.
Moving position of CUTTING DECK.
6.6.1. CUTTING BLADE ADJUSTMENT
Each cutting blade assembly is equipped with six 1/4"
spacers – four below the blade spindle, and two above. To
change cutting height of Blades, move the Spacers from
under the Spindle Housing to above the Spindle Housing
Pulley. Each Spacer moved above the Spindle Housing
Pulley will provide an additional 1/4” of cutting height.
DO
NOT put any Spacers below Blade.
See Figures 6.6 and
6.7.
FIGURE 6.6
NOTE:
Changing cutting height of blades does not
change the cutting deck ground clearance. If an
undesirable cutting pattern results, then cutting height
adjustment must be made by adjusting rear axle and
caster wheels.
Install Blades (Air Lift Up) with retaining hardware as
shown below and tighten to 60 to 75 ft.-lbs. See Figure 6.7.
FIGURE 6.7
LOOSEN
HARDWARE
ADJUST
HANDLE
HEIGHT
ADJUSTING
SPACERS
AIR LIFT
BEVEL
WASHER
BLADE
BLADE
MOUNTING
BOLT
TIGHTEN TO 60-75 FOOT POUNDS
SPINDLE
HOUSING
PULLEY
SPACERS
ON TOP
SPINDLE
HOUSING
BLADE
SPACERS ON
BOTTOM
LOOSEN
BOLTS
Summary of Contents for SGV13321KW
Page 27: ...27 PRIMARY MAINTENANCE...
Page 28: ...28 PRIMARY MAINTENANCE...
Page 29: ...29 PRIMARY MAINTENANCE...
Page 30: ...30 PRIMARY MAINTENANCE...
Page 31: ...31 NOTES...

