background image

Record Product Information

Before setting up and operating your new equipment, please 

locate the model plate on the equipment and record the 

information in the provided area to the right. You can locate the 

model plate by standing at the operator’s position and looking 

down at the rear of the deck. This information will be necessary, 

should you seek technical support via our web site, Customer 

Support Department, or with a local authorized service dealer.

M

odel

 N

uMber

S

erial

 N

uMber

Safe Operation Practices ........................................ 3

Assembly & Set-Up .................................................. 9

Controls & Features ................................................13

Operation ................................................................14

Maintenance  & Adjustment .................................16

Service .....................................................................18

Troubleshooting .....................................................19

Replacement Parts .................................................21

Warranty ................................................................ 24

Spanish ................................................................... 25

Thank you for purchasing a Snapper lawn mower

.

 It was carefully 

engineered to provide excellent performance when properly 

operated and maintained. 
Please read this entire manual prior to operating the equipment.  

It instructs you how to safely and easily set up, operate and 

maintain your machine.  Please be sure that you, and any other 

persons who will operate the machine, carefully follow the 

recommended safety practices at all times.  Failure to do so could 

result in personal injury or property damage. 
All information in this manual is relative to the most recent 

product information available at the time of printing.  Review 

this manual frequently to familiarize yourself with the machine, 

its features and operation.  Please be aware that this Operator’s 

Manual may cover a range of product specifications for various 

models. Characteristics and features discussed and/or illustrated 

in this manual may not be applicable to all models. We reserve 

the right to change product specifications, designs and 

equipment without notice and without incurring obligation.

If applicable, the power testing information used to establish 

the power rating of the engine equipped on this machine can be 

found at www.opei.org or the engine manufacturer’s web site. 
If you have any problems or questions concerning the machine, 

phone a authorized Snapper service dealer or contact us directly.  

Snapper’s Customer Support telephone number, website address 

and mailing address can be found on this page. We want to 

ensure your complete satisfaction at all times.
Throughout this manual, all references to 

right

 and 

left

 side of the 

machine  are observed from the operating position.

Customer Support

Please do NOT return the machine to the retailer or dealer without first contacting the Customer Support Department.

If you have difficulty assembling this product or have any questions regarding the controls, operation, or maintenance of 

this machine, you can seek help from the experts. Choose from the options below:
◊  Visit us on the web at www.snapper.com
◊  Call a Customer Support Representative at (800) 317-7833
◊  Write to Briggs & Stratton Power Products Group, LLC • 12301 West Wirth St. • Wauwatosa • WI  53222

To The Owner

1

2

Table of Contents

Summary of Contents for washer-extractor

Page 1: ...peration Maintenance Service Troubleshooting Warranty WARNING READ AND FOLLOW ALL SAFETY RULES AND INSTRUCTIONS IN THIS MANUAL BEFORE ATTEMPTING TO OPERATE THIS MACHINE FAILURE TO COMPLY WITH THESE IN...

Page 2: ...with the machine its features and operation Please be aware that this Operator s Manual may cover a range of product specifications for various models Characteristics and features discussed and or il...

Page 3: ...and pets at least 75 feet from mower while it is in operation Stop machine if anyone enters area 9 Always wear safety glasses or safety goggles during operation and while performing an adjustment or...

Page 4: ...ries made for this machine by the manufacturer Failure to do so can result in personal injury 27 When starting engine pull cord slowly until resistance is felt then pull rapidly Rapid retraction of st...

Page 5: ...ngine mounting bolts at frequent intervals for proper tightness Also visually inspect blade for damage e g bent cracked worn Replace blade with the original equipment manufacture s O E M blade only li...

Page 6: ...317 7833 Power Ratings The gross power rating for individual gas engine models is labeled in accordance with SAE Society of Automotive Engineers code J1940 Small Engine Power Torque Rating Procedure...

Page 7: ...jury keep hands and feet away Do not operate unless discharge cover or grass catcher is in its proper place If damaged replace immediately DANGER BYSTANDERS Do not mow when children or others are arou...

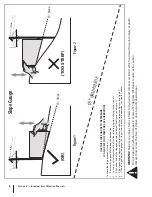
Page 8: ...ct See Figure 1 and Figure 2 4 Adjust gauge up or down until the left corner touches the slope See Figure 1 and Figure 2 5 If there is a gap below the gauge the slope is too steep for safe operation S...

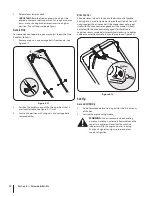
Page 9: ...2 Do not crimp cable while lifting the handle up B Figure 3 2 Assembly NOTE This unit is shipped without gasoline or oil in the engine Fill up with gasoline and oil as instructed BEFORE operating your...

Page 10: ...e assembling warning label will be on the outside a Place bag over frame so that its black plastic side is at the bottom 2 Remove the T bolts from the handle brackets as shown in Figure 3 3 Figure 3 3...

Page 11: ...hange in cutting height See Figure 3 10 3 2 1 2 3 1 Lower Lower Higher Higher Figure 3 10 b Slip plastic channel of grass bag over hooks on the frame See Figure 3 7 B A Figure 3 7 2 Follow steps below...

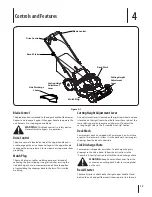
Page 12: ...nt wheel is located in the drive control handle housing and is used to tighten or loosen the drive belt You will need to adjust the drive control if the mower does not propel itself with the drive con...

Page 13: ...lever is located on the right rear wheel and one is located on the right front wheel Both levers have to be at the same relative position to ensure a uniform cut To adjust the cutting height refer to...

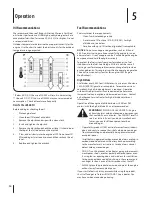
Page 14: ...s occur change fuel providers or change brands This engine is certified to operate on gasoline The emissions control system for this engine is EM Engine Modifications High Altitude At altitudes over 5...

Page 15: ...ts which could damage lawn mower or engine Such objects could be accidently thrown by the mower in any direction and cause serious personal injury to the operator and others 1 Once the engine is runni...

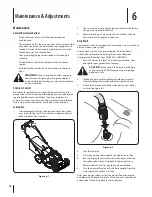
Page 16: ...he transmission is pre lubricated and sealed at the factory and does not require lubrication 3 Refer to the Engine Care section for lubrication schedule and instruction for engine lubrication Deck Was...

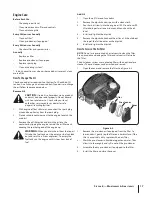
Page 17: ...lose the cover Engine Care Before Each Use Check engine oil level Clean area around muffler and controls Clean air intake grille Every 25 Hours or Annually Clean air filter Clean pre cleaner if equipp...

Page 18: ...heck the blade bolt for correct torque Belt Care NOTE Several components must be removed in order to change the mower s belt See an authorized Service Dealer to have your belt replaced Off Season Stor...

Page 19: ...g until it snaps into place 2 Charge battery 3 Debris may be blocking blade operation Stop engine remove Electric Start Key and disconnect spark plug boot Verify grass or other debris is not obstructi...

Page 20: ...grass is wet wait until later to cut 2 Mow once at a high cutting height then mow again at desired height or make a narrower cutting path 3 Sharpen or replace blade Uneven cut 1 Wheels not positioned...

Page 21: ...odel number and serial number ready Parts Manual downloads are also available free of charge at www snapper com Component Part Number and Description 594056 Spark Plug 593260 Air Filter 594061 Fuel Ca...

Page 22: ...ou warranty coverage if your engine equipment or a part has failed due to abuse neglect improper maintenance or unapproved modifications You are responsible for presenting your engine equipment to a B...

Page 23: ...ning time Intermediate Engines at or less than 80 cc displacement are certified to be emissions compliant for 125 hours of actual engine running time Engines greater than 80 cc displacement are certif...

Page 24: ...proof of the initial purchase date at the time warranty service is requested the manufacturing date of the product will be used to determine the warranty period Product registration is not required t...

Page 25: ...s Garant a ADVERTENCIA LEA Y SIGA TODAS LAS INSTRUCCIONES DE ESTE MANUAL ANTES DE PONER EN FUNCIONAMIENTO ESTA M QUINA SI NO RESPETA ESTAS INSTRUCCIONES PUEDE PROVOCAR LESIONES PERSONALES Briggs Strat...

Page 26: ...izado o p ngase en contacto directamente con nosotros Los n meros de tel fono direcci n del sitio web y direcci n postal de la Asistencia al Cliente de Snapper se encuentran en esta p gina Queremos ga...

Page 27: ...iliarizado con estas reglas de seguridad para la operaci n deber n usar esta m quina 4 Inspeccione minuciosamente el rea en donde utilizar el equipo Saque todas las piedras palos cables huesos juguete...

Page 28: ...ue el motor se ha apagado Nunca coloque ninguna parte del cuerpo en el rea de la cuchilla hasta que est seguro que la cuchilla ha detenido su movimiento rotatorio 20 Nunca opere la cortadora sin las g...

Page 29: ...e la tapa del gas ni agregue combustible mientras el motor est caliente o en marcha Deje que el motor se enfr e por lo menos dos minutos antes de volver a cargar combustible 9 Nunca recargue el tanque...

Page 30: ...plomo y pueden incluir los siguientes sistemas de control de emisiones Modificaci n de motor EM y catalizador de tres v as TWC si est n equipados de esa manera Guardachispas ADVERTENCIA Esta m quina e...

Page 31: ...ceptor de hierba est n en su lugar apropiado De ser da ado sustituya inmediatamente PELIGRO ESPECTADORES No siegue cuando los ni os o los otros est n alrededor PELIGRO CORTE DE PIE Guarde manos y pies...

Page 32: ...hasta los toques esquina izquierda el pendiente consultar Figura 1 and Figura 2 5 Si hay un espacio por debajo de la pendiente de calibre el pendiente es demasiado escarpa por operaci n segura consul...

Page 33: ...aque que pudiera estar entre las manijas superior e inferior a Quite los tornillos y tuercas de mariposa transporte desde el mango como se muestra en Figura 3 1 No afloje o quitar adyacentes tornillos...

Page 34: ...el lado antes de reunir la advertencia de la etiqueta ser por fuera a Coloque la bolsa sobre el marco con el lado negro de pl stico en el fondo b Deslice el canal de pl stico sobre los ganchos del mar...

Page 35: ...altura de corte deseado Vea Figura 3 10 3 2 1 2 3 1 Inferior Inferior Superior Superior Figura 3 10 B A Figura 3 7 2 Para acoplar el colector de c sped a Levante la puerta de descarga posterior b Lug...

Page 36: ...la manija de control de transmisi n y se utiliza para ajustar o aflojar la correa de transmisi n Deber ajustar el control de transmisi n si la podadora no se autopropulsa con el control de transmisi...

Page 37: ...de ajuste se encuentra en la rueda trasera derecha y el otro se encuentra en la rueda delantera derecha Los dos palancas tienen que estar en la misma posici n relativa para asegurar un corte uniforme...

Page 38: ...tir de rendimiento o problemas cambiar de proveedor de combustible o cambie de marca Este motor est certificado para funcionar con gasolina El sistema de control de emisiones para este motor es EM Mod...

Page 39: ...ibre de piedras palos cables u otros objetos que pudiesen da ar la cortadora o el motor Dichos objetos pueden ser arrojados accidentalmente por la podadora en cualquier direcci n y provocar lesiones p...

Page 40: ...acer funcionar el motor durante dos minutos como m nimo permitiendo que la parte inferior de la plataforma de corte se lave a fondo Mantenimiento Recomendaciones Generales Respete siempre las reglas d...

Page 41: ...oloque un recipiente adecuado cerca del motor para recoger el aceite usado 3 Quite la tapa varilla medidora del nivel de aceite y drene el aceite al recipiente inclinando el motor hacia el tubo de lle...

Page 42: ...adas con los orificios peque os de la cuchilla 7 Vuelva a colocar el perno hexagonal y aj stelo seg n Los siguientes valores de torsi n 450 lb pulg como m nimo 600 lb pulg como m ximo Para asegurar la...

Page 43: ...empezar a causa de aceite o gasolina contamine el filtro de aire y o la buj a Almacenamiento Fuera de Temporada Se deben seguir estos pasos para la preparaci n de la podadora y motor para su almacenam...

Page 44: ...en la caja de arranque Inserte hasta que encaje en su lugar 2 Cargue la bater a 3 Escombros puede estar bloqueando el funcionamiento de la cuchilla Pare el motor retire Arranque el ctrico Key y desco...

Page 45: ...ona el c sped 1 C sped h medo 2 C sped excesivamente alto 3 La cuchilla de la cortadora no est afilada 1 No corte el c sped cuando est mojado espere hasta que sea m s tarde para hacerlo 2 Pode una vez...

Page 46: ...ecomienda conservar todos los recibos relativos al mantenimiento del motor o equipo pero B S no puede denegar la garant a bas ndose nicamente en la falta de recibos o en la imposibilidad por parte del...

Page 47: ...real de funcionamiento Intermedio Los motores con desplazamiento inferior a 80 cc tienen certificaci n de conformidad de emisiones por 125 horas del tiempo real de funcionamiento del motor Los motores...

Page 48: ...compra inicial en el momento se solicitar servicio de garant a se utilizar la fecha de fabricaci n del producto para determinar el per odo de garant a No es necesario el registro del producto para obt...

Reviews: