background image

MAINTENANCE

28

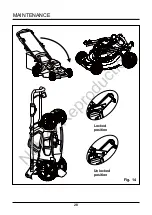
Fig. 14

Locked

position

Unlocked

position

Not 

for 

Reproduction

Summary of Contents for XD 1696777

Page 1: ...Ion Cordless Mower Read all safety rules and instructions carefully before operating this tool Owner s Manual TOLL FREE HELPLINE 1 800 317 7833 www snapper com 1696777 SXDWM82 N o t f o r R e p r o d...

Page 2: ...d View 34 Parts List 35 PRODUCT SPECIFICATIONS 82 V LITHIUM ION CORDLESS MOWER Battery type 82V Lithium ion No load speed 2800 RPM Max Deck size 21 53 3 cm Height adjustments 1 3 8 3 3 4 3 5 9 5 cm Fu...

Page 3: ...his mower should be restricted to individuals who have read and understoood and will follow the warnings and instructions that are printed in this manual and on the mower W A R N I N G For safe operat...

Page 4: ...ng or jewelry that can get caught in moving parts The wearing of protective gloves and safety footwear is recommended Many injuries occur as a result of the mower being pulled over the operator s foot...

Page 5: ...mower Inspect lawn mover cord periodically and if damaged have it repaired by an authorized service facility Use identical replacement blades only Do not open or mutilate the battery Released electrol...

Page 6: ...educe the risk of electric shock For best results your battery tool should be charged in a location where the temperature is more than 43 F but less than 104 F To reduce the risk of serious personal i...

Page 7: ...come fully charged unplug the charger from the power supply and remove the battery pack W A R N I N G When transporting or servicing unit always remove the battery W A R N I N G P R O P O S I T I O N...

Page 8: ...fety Alert Precautions that involve your safety Wet Conditions Alert Do not expose to rain or use in damp locations Read The Operator s Manual To reduce the risk of injury user must read and understan...

Page 9: ...833 for assistance W A R N I N G The operation of any power tool can result in foreign objects being thrown into your eyes which can result in severe eye damage Before beginning power tool operation a...

Page 10: ...rder to familiarize yourself with the location of various controls and adjustments Save this manual for future reference Height adjustment lever Bail lever Grass catcher bag Lower handle Side discharg...

Page 11: ...hute 1 Grass Catcher Bag 1 Handle Knob 4 Handle Bolt 4 Owner s Manual 1 82V Lithium Ion Cordless Mower Read all safety rules and instructions carefully before operating this tool Owner s Manual TOLL F...

Page 12: ...ify this product or create accessories not recommended for use with this product Any such alteration or modification is misuse and could result in a hazardous condition leading to possible serious per...

Page 13: ...dle knobs 1 90 on both sides to loosen the lower handles 2 on both sides Move the lower handles to the operating position You may raise or lower the handle to a position comfortable for you There are...

Page 14: ...e 3 Align the mounting holes on the upper handle 1 and the lower handle 2 Insert the carriage bolts 3 and use the knobs 4 to tighten them Repeat the operation on the other side Fig 3 4 Knob 3 Bolt 1 U...

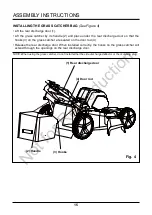
Page 15: ...r are seated on the door rod 4 Release the rear discharge door When installed correctly the hooks on the grass catcher will extend through the openings on the rear discharge door NOTE When using the g...

Page 16: ...mulching plug out using the handle The mulching plug 3 is inserted at an angle so it requires some force to remove it The mulching plug must be removed in order to install the grass catcher bag The m...

Page 17: ...th the pins 4 on the underside of the discharge cover 1 Lower the discharge chute until the hooks on the mower deck are secured in the openings in the discharge chute Release the side discharge cover...

Page 18: ...eration If the machine is not going to be used immediately remove the battery Close the door ASSEMBLY INSTRUCTIONS Fig 7 18 TO REMOVE BATTERY PACK See Figure 7 Release the bail lever to stop the mower...

Page 19: ...ensure there is nothing obstructing the blade and that the blade can spin freely by hand Even a small amount of grass on start up will prevent the softstart from turning the mower on C A U T I O N Do...

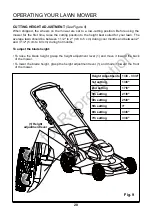
Page 20: ...1 2 5 cm to 8 3 cm during hot months To adjust the blade height To raise the blade height grasp the height adjustment lever 1 and move it toward the back of the mower To lower the blade height grasp...

Page 21: ...s or bumps that may cause a slip or a trip Tall grass can hide obstacles Always be sure of your footing If you feel like you are losing your balance release the blade motor control handle immediately...

Page 22: ...WHERE THE MOWER IS TO BE USED AND REMOVE ALL STONES STICKS WIRE BONES AND OTHER DEBRIS THAT MIGHT BE THROWN BY THE ROTATING BLADE Release the bail lever to turn the mower OFF when crossing any gravel...

Page 23: ...o completely stop and remove the battery Lift the rear discharge cover Lift the grass catcher bag by its handle to remove from mower Empty grass clippings Lift the rear discharge cover and reinstall t...

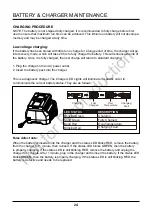
Page 24: ...tic charger The Charger LED Lights will illuminate in specific order to communicate the current battery status They are as follows False defect note When the battery is inserted into the charger and t...

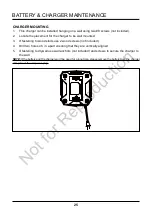
Page 25: ...to wood studs use 2 wood screws not included 4 Drill two holes 4 5 in apart ensuring that they are vertically aligned 5 If fastening to drywall use wall anchors not included and screws to secure the...

Page 26: ...nch or 27 mm socket loosen the bolt 1 and remove the blade 2 Turn the bolt COUNTERCLOCKWISE to loosen it and CLOCKWISE to tighten it Remove the bolt 1 and the blade 2 To re install the blade position...

Page 27: ...ower in a dry clean location Do not store it next to corrosive materials such as fertilizer or rock salt Store the mower indoors in a cool dry place out of the reach of children Do not cover the lawn...

Page 28: ...MAINTENANCE 28 Fig 14 Locked position Unlocked position N o t f o r R e p r o d u c t i o n...

Page 29: ...st and safest performance maintain the mower with care Keep the mower blade sharp and clean Mower blades are sharp and can cut Wrap the blades or wear gloves and use extra caution when servicing Keep...

Page 30: ...avoid injury and the risk of fire explosion or electric shock and to avoid damage to the environment Cover the battery s terminals with heavy duty adhesive tape Do not attempt to remove or destroy any...

Page 31: ...cutting height is too low The rear of the grass catcher bag is dragging in thick grass The motor shaft is bent The blade is unbalanced Charge the battery Replace the switch call the tollfree helpline...

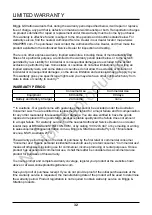
Page 32: ...months 90 days Battery and Battery Charger 24 months none In Australia Our goods come with guarantees that cannot be excluded under the Australian Consumer Law You are entitled to a replacement or re...

Page 33: ...Stratton parts or equivalent Damage caused by lack of maintenance or use of non original parts is not covered by warranty Normal Wear and Tear Like most mechanical devices your unit is subject to wear...

Page 34: ...3 54 55 58 59 60 61 62 63 64 69 70 75 101 102 103 104 105 106 107 108 109 110 109 111 112 112 110 111 113 114 72 73 74 94 131 132 32 133 134 135 137 138 136 139 140 154 1 155A 124 156 123 147 1 152 15...

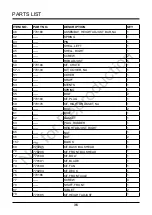
Page 35: ...ING 1 16 770173 KIT BUTTON 1 17 BUTTON THE START 1 18 SPRING 1 19 GASKET 1 20 SCREW 1 21 770172 KIT SWITCH BOX COMPONENT NA 1 22 COVER DOWN 1 23 SLIDER SWITCH 1 24 SPRING 1 25 SWITCH 1 26 BOARD RIGID...

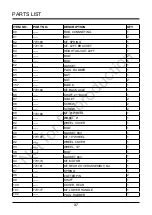
Page 36: ...SPRING 1 55 BOLT 2 58 770183 KIT PLUG 1 59 770178 KIT RIGHT BRACKET NA 1 60 BOLT 2 61 BOLT 1 62 GASKET 1 63 PLUG RUBBER 1 64 HEIGHT ADJUST RIGHT 1 65 NUT 1 66 NUT 2 157 BLOCK 1 69 770205 KIT BACK BULK...

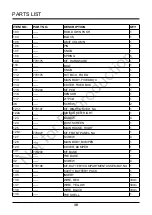
Page 37: ...84 KIT BACK AXLE 1 86 SHAFT 21 BACK 1 87 TABLET 2 88 SCREW 2 77 SCREW 2 89 770188 KIT 8 WHEEL 1 90 WHEEL 8 1 92 WHEEL COVER 1 38 BOLT 1 40 GASKET 80V 1 91 770187 KIT 10 WHEEL 1 92 WHEEL COVER 1 93 WHE...

Page 38: ...SENSOR 1 117 21 PCB 1 46 SCREW 2 121 1 770197 KIT RIGHT COVER NA 1 122A SIDE COVER RIGHT 1 123 SCREW 4 124 DUST SCREEN 1 125 MAIN HOUSE RIGHT 1 126 1 770477 KIT FRONT PANEL NA 1 127 SCREW 4 128 MAIN B...

Page 39: ...T TOP COVER NA 1 152 770195 KIT BATTERY COVER 1 151 BATTERY DOOR 1 153 SCREW 2 154 1 770198 KIT LEFT COVER NA 1 155A COVER LEFT SIDE 1 156 MAIN HOUSING LEFT 1 123 SCREW 4 124 DUST SCREEN 1 125A 176026...

Page 40: ...TOLL FREE HELPLINE 1 800 317 7833 388011548 Rev 00 07 28 16 Briggs Stratton Power Products Group LLC P O Box 702 Milwaukee WI 53201 N o t f o r R e p r o d u c t i o n...

Page 41: ...d utiliser le produit veuillez lire et suivre toutes les consignes de s curit et les instructions d utilisation Guide d utilisation LIGNE D ASSISTANCE SANS FRAIS 1 800 317 7833 www snapper com 169677...

Page 42: ...5 Liste des pi ces 36 FICHE TECHNIQUE TONDEUSEUSE BATTERIE AU LITHIUM ION DE 82 V Batterie 82V Lithium ion Vitesse vide 2800 tr min Dimensions du ch ssis 21 53 3 cm R glage de hauteur 1 3 8 po 3 3 4 p...

Page 43: ...z vous de lire et de bien comprendre toutes les instructions contenues dans le pr sent guide car le non respect des consignes de s curit pourrait causer des blessures A V E R T I S S E M E N T Pour un...

Page 44: ...causer de graves blessures aux yeux Portez toujours un masque facial ou antipoussi re quand vous utilisez la tondeuse dans un milieu poussi reux Portez des v tements appropri s Ne portez pas de v teme...

Page 45: ...orcer la tondeuse gazon Elle effectuera un meilleur travail dans de meilleures conditions de s curit si elle est utilis e dans les limites de ses capacit s Rangez votre tondeuse l int rieur lorsque vo...

Page 46: ...onctionnement Tenir compte des dangers possibles lorsque l outil n est pas en usage et lors du remplacement des piles Le respect de cette consigne r duira les risques d incendie de choc lectrique et d...

Page 47: ...mp rature est inf rieure 27 C 80 F et l abri de l humidit Remiser les blocs de piles 30 50 charg s Tous les deux mois de remisage charger normalement le bloc de piles MESURES DE S CURIT RELATIVES AU C...

Page 48: ...omb des peintures base de plomb Silice cristalline des briques et du ciment ou d autres produits de ma onnerie et Arsenic et chrome du bois trait chimiquement Le niveau de risque r sultant de votre ex...

Page 49: ...Z87 1 aussi bien que le protection auditive en op rant ce produit Garder les mains et les pieds l cart Garder les mains et les pieds l cart de la lame et de la zone de coupe Se tenir lion Ne pas mett...

Page 50: ...ient le 1 800 317 7833 pour obtenir de l aide A V E R T I S S E M E N T L utilisation de tout outil motoris peut causer la projection d objets en direction du visage et entra ner des l sions oculaires...

Page 51: ...curit avant d utiliser votre tondeuse gazon Comparez l illustration ci dessus fig 1 votre tondeuse afin de vous familiariser avec l emplacement des commandes et r glages Conservez ce manuel pour cons...

Page 52: ...lat ral 1 Sac arri re 1 Bouton du guidon 4 Boulon du guidon 4 Manuel d utilisation 1 82V Lithium Ion Cordless Mower Read all safety rules and instructions carefully before operating this tool Owner s...

Page 53: ...fabriquer des accessoires non recommand s pour l utilisation avec ce produit Toute alt ration ou modifi cation de ce type constitue un m susage peut entra ner des dangers susceptibles de provoquer des...

Page 54: ...e 1 90 sur les deux c t s desserrer les poign es inf rieures 2 sur les deux c t s D placez les poign es inf rieures vers la position de fonctionnement Vous pouvez monter ou baisser la poign e une pos...

Page 55: ...ge sur la poign e sup rieure 1 et la poign e inf rieure 2 Ins rez les boulons m caniques 3 et employez les boutons 4 afin de les serrer R p tez l op ration sur l autre c t Fig 3 4 Boutons 3 Boulons 2...

Page 56: ...sur la barre du couvercle 4 Rel chez le couvercle de la bouche d vacuation Si l installation est correcte les crochets sur le collecteur d herbe passeront travers les ouvertures sur le couvercle de la...

Page 57: ...bouche d vacuation 1 Saisissez l accessoire de d chiquetage par la poign e 2 et tirez sur la poign e L accessoire de d chiquetage 3 est ins r angle il faut donc exercer une certaine force pour l enlev...

Page 58: ...les 4 sur le c t int rieur du couvercle 1 Abaissez le d flecteur jusqu ce que les crochets sur le ch ssis de la tondeuse soient bien ins r s dans les ouvertures du d flecteur Rel chez le d flecteur et...

Page 59: ...e en marche Si l appareil n est pas utilis dans l imm diat retirez la batterie Refermez le couvercle ASSEMBLAGE Fig 7 19 1 Couvercle du compartiment de batterie 2 Pack batterie 3 Bouton d jection de l...

Page 60: ...re pas Retirez la batterie puis v rifiez le ch ssis afin de s assure qu aucun objet n obstrue les lames assurez vous que les lames peuvent tourner librement en les faisant tourner la main M me une pet...

Page 61: ...m pendant les mois de temps chaud Pour r gler la hauteur de la lame Pour augmenter la hauteur de la lame attrapez le levier de r glage de la hauteur et poussezle vers l arri re de la tondeuse Pour dim...

Page 62: ...s de pierres d objets cach s ou de bosses qui pourraient vous faire glisser ou tr bucher Les herbes hautes peuvent cacher les obstacles Maintenez toujours votre quilibre Si vous avez l impression de p...

Page 63: ...Z LES PIERRES LESBRANCHES LES C BLES LES OS ET AUTRES D BRIS QUI POURRAIENT TRE JECT S PAR LA LAME Lorsque vous traversez une zone recouverte de gravier rel chez le levier de commande de la lame du mo...

Page 64: ...irez la batterie Soulevez le couvercle de la bouche d vacuation Soulevez le sac arri re par sa poign e pour le retirer de la tondeuse Videz l herbe du bac Soulevez le couvercle de la bouche d vacuatio...

Page 65: ...oyants LED de Charge s allumeront dans un ordre particulier pour vous renseigner sur l tat de la batterie Leur comportement est le suivant Indication de d fectuosit Lorsque la pile est ins r e dans le...

Page 66: ...vis bois non incluses 4 Percez deux trous dans le centre avec une distance de 11 43 cm entre chaque trou et assurez vous qu ils sont align s verticalement 5 Si la pose se fait sur des cloisons s ches...

Page 67: ...on DANS LE SENS INVERSE DES AIGUILLES D UNE MONTRE pour le desserrer et DANS LE SENS DES AIGUILLES D UNE MONTRE pour le serrer Enlevez le boulon 1 et la lame 2 Pour r assembler le tout positionnez la...

Page 68: ...s que l engrais et le sel gemme Rangez la tondeuse l int rieur dans un endroit frais et sec hors de la port e des enfants Ne couvrez pas la tondeuse avec une b che de plastique rigide En emprisonnant...

Page 69: ...ENTRETIEN 29 Position verrouill e Position d ver rouill e Fig 14 N o t f o r R e p r o d u c t i o n...

Page 70: ...entretenez la avec soin Gardez ses les lames toujours propres et bien aff t es Les lames de la tondeuse sont tranchantes et peuvent vous couper Au moment de l entretien enveloppez les lames ou portez...

Page 71: ...TENTEZ PAS DE R PARER LA BATTERIE Suivez les consignes suivantes pour viter les blessures les risques d incendie d explosion et de choc lectrique ainsi que les dommages caus s l environnement Couvrez...

Page 72: ...u moteur est tordu La lame est d s quilibr e Chargez la batterie Faites remplacer le levier de commande du moteur de la lame appelez le Service d assistance t l phonique sans frais au 1 800 317 7833 E...

Page 73: ...Vous pouvez obtenir un remplacement ou un remboursement en cas de d faillance majeure ou en compensation de toute perte ou de tout dommage survenu dans le cadre des conditions raisonnablement pr visi...

Page 74: ...utre il doit tre d pann ou r par en utilisant des pi ces d origine Briggs Stratton ou des pi ces quivalentes Les dommages caus s par un manque d entretien ou l utilisation de pi ces n tant pas d origi...

Page 75: ...54 55 58 59 60 61 62 63 64 69 70 75 101 102 103 104 105 106 107 108 109 110 109 111 112 112 110 111 113 114 72 73 74 94 131 132 32 133 134 135 137 138 136 139 140 154 1 155A 124 156 123 147 1 152 151...

Page 76: ...RT 1 16 770173 KIT MOLETTE 1 17 BOUTON LE D BUT 1 18 RESSORT 1 19 JOINT 1 20 VIS 1 21 770172 KIT BO TE DE COMMUTATION COMPOSANT NA 1 22 COUVERCLE INF RIEUR 1 23 GLISSI RE COMMUTATEUR 1 24 RESSORT 1 25...

Page 77: ...54 RESSORT 1 55 BOULON 2 58 770183 KIT FICHE 1 59 770178 KIT DROITE SUPPORT NA 1 60 BOULON 2 61 BOULON 1 62 JOINT 1 63 FICHE CAOUTCHOUC 1 64 R GLAGE DE LA HAUTEUR DROITE 1 65 CROU 1 66 CROU 2 157 BLOC...

Page 78: ...XE 21 NOIR 1 87 TABLETTE 2 88 VIS 2 77 VIS 2 89 770188 KIT 8 ROUE 1 90 ROUE 8 1 92 COUVERCLE DE LA ROUE 1 38 BOULON 1 40 JOINT 80 V 1 91 770187 KIT 10 ROUE 1 92 COUVERCLE DE LA ROUE 1 93 ROUE DE 10 1...

Page 79: ...117 PCB 21 1 46 VIS 2 121 1 770197 KIT DROITE COUVERCLE NA 1 122A DROITE COUVERCLE LAT RAL 1 123 VIS 4 124 CRAN ANTI POUSSI RE 1 125 COUVERCLE PRINCIPAL DROITE 1 126 1 770477 KIT PANNEAU AVANT NA 1 1...

Page 80: ...OMPARTIMENT BATTERIE 1 151 COUVERCLE DU COMPARTIMENT A PILES 1 153 VIS 2 154 1 770198 KIT GAUCHE COUVERCLE NA 1 155A COUVERCLE C T GAUCHE 1 156 BO TIER PRINCIPAL GAUCHE 1 123 VIS 4 124 CRAN ANTI POUSS...

Page 81: ...TOLL FREE HELPLINE 1 800 317 7833 388011548 Rev 00 07 28 16 Briggs Stratton Power Products Group LLC P O Box 702 Milwaukee WI 53201 N o t f o r R e p r o d u c t i o n...

Page 82: ...de 82 V Antes de hacer funcionar esta herramienta lea cuidadosamente todas las reglas de seguridad y las instrucciones Manual del Propietario L NEA DE AYUDA GRATUITA 1 800 317 7833 www snapper com 169...

Page 83: ...35 Lista de piezas 36 ESPECIFICACIONES DEL PRODUCTO PODADORA INAL MBRICA DE 21 PULG DE I N DE LITIO DE 82 V Tipo de bater a 82V Lithium ion Velocidad 2800 RPM Tama o de la cubierta 21 53 3 cm Ajustes...

Page 84: ...mprendieron y que seguir n las advertencias e instrucciones en este manual y en la podadora deben utilizarla A D V E R T E N C I A Para contar con un funcionamiento seguro lea y comprendael manual de...

Page 85: ...casionar lesiones oculares graves Siempre utilice una m scara facial o una m scara para polvo si usa la podadora en condiciones de polvo Use la ropa adecuada No use ropa holgada ni joyas que puedan qu...

Page 86: ...Cuando no est en uso el cortac sped debe ser almacenado en un lugar seco y mirado hacia arriba fuera del alcance de los ni os Mantener el cortac sped Mantenga los bordes de corte afilados y limpios p...

Page 87: ...la bater a Nunca utilice una bater a o cargador que se ha ca do aplastado recibido un golpe contundente o ha sido da ado a de alguna manera Las bater as da adas pueden sufrir explosiones Deseche de i...

Page 88: ...C 80 F y lejos de la humedad Guarde el paquete de bater as cargado 30 50 Cargue la bater a de manera normal cada dos meses de almacenamiento NORMAS DE SEGURIDAD PARA EL CARGADOR Cargue la bater a en...

Page 89: ...jemplos de estos qu micos son Plomo de pinturas con base de plomo S lice cristalina de ladrillos cemento y otros productos de mamposter a Ars nico y cromo de madera tratada con qu micos El riesgo que...

Page 90: ...use en lugares h medos Lea el manual del operador Para reducia el riesgo de lesiones el usuario debe leer y comprender el manual del operador antes de usar este producto Protecci n ocular Use protecc...

Page 91: ...R T E N C I A Cualquier producto en funcionamiento puede lanzar objetos hacia los ojos lo cual puede causar serios da os a los mismos Antes de iniciar la operaci n de herramientas de corriente siempre...

Page 92: ...as normas de seguridad antes de manejar la podadora Compare la ilustraci n en Fig 1 con la podadora para familiarizarse con la ubicaci n de los diferentes controles y ajustes Guarde este manual para r...

Page 93: ...descarga lateral 1 Bolsa colectora de c sped 1 Perilla de la empu adura 4 Perno del asa 4 Manual 1 82V Lithium Ion Cordless Mower Read all safety rules and instructions carefully before operating thi...

Page 94: ...A No intente midofi car este producto o crear accesorios que no fueron recommendados para usar con eate producto Cualquier alteracion o midifi cacion se considerara como mal uso y podra resultar en u...

Page 95: ...1 que est n a los dos lados para aflojar los mangos inferiores 2 de los dos lados Mueva los mangos inferiores hasta la posici n de funcionamiento Puede elevar o bajar el mango hasta colocarlo en la p...

Page 96: ...e los agujeros para montar de la manija superior 1 y la manija inferior 2 Introduzca el perno 3 de cabeza de hongo y utilice las perillas 4 para apretarlos Repita la operaci n por el otro lado Fig 3 4...

Page 97: ...tados en la barra de la puerta 4 Suelte la puerta de descarga posterior Cuando est n correctamente instalados los ganchos del receptor de hierba saldr n por las aberturas de la puerta de descarga post...

Page 98: ...n para cubrimiento con hojarasca y s quelo mediante la manija El tap n de la funci n para cubrimiento con hojarasca 3 se inserta angulado por lo que es necesario ejercer un poco de fuerza para quitarl...

Page 99: ...os pasadores 4 de la Puerta de descarga lateral 1 Baje el deflector hasta que los ganchos del piso de la podadora est n asegurados en las aberturas del deflector Suelte el deflector y la puerta INSTRU...

Page 100: ...peraci n Si la m quina no se va a utilizar inmediatamente retire la bater a Cierre la tapa INSTRUCCIONES DE ENSAMBLADO Fig 7 19 1 Tapa de la bater a 2 Bater a 3 Bot n de liberaci n de la bater a PARA...

Page 101: ...bater a y compruebe bajo la plataforma de corte para asegurarse de que no hay nada obstruyendo la cuchilla y que puede girar libremente con la mano Incluso una peque a cantidad de hierba en la puesta...

Page 102: ...50 mm y 83 mm durante los meses c lidos Para ajustar la altura de la hoja Eleve la altura de la hoja sujetando la palanca de ajuste de altura 1 y movi ndola hacia la parte posterior de la podadora Ba...

Page 103: ...to puede ocultar obst culos Retire todos los objetos como piedras ramas de rboles etc que puedan provocar tropezones o ser lanzados por la cuchilla Siempre aseg rese de su postura Un resbal n y ca da...

Page 104: ...ONE EL REA DONDE UTILIZAR LA PODADORA Y RETIRE PIEDRAS PALOS CABLES HUESOS Y OTROS DESECHOS QUE LA CUCHILLA GIRATORIA PUEDA ARROJAR Libere la palanca de control para apagar la podadora si cruza un rea...

Page 105: ...retire la bater a Levante la cubierta de descarga trasera Levante la bolsa para ensacar la hierba por el mango para retirarla de la podadora Vierta el c sped triturado para vaciar la bolsa Levante la...

Page 106: ...or con diagn stico Las l mparas LED del cargador se iluminan de acuerdo a un orden espec fico para indicar el estado actual de la bater a Ellos son los siguientes Nota de defecto falso Cuando la bater...

Page 107: ...dos tornillos especiales para madera no incluidos 4 Taladre dos hoyos en el centro a una distancia de 11 43 cm y aseg rese de que est n alineados verticalmente 5 Si la pared es de yeso utilice anclaj...

Page 108: ...r la cuchilla 2 Gire la tuerca EN DIRECCI N CONTRARIA A LAS MANECILLAS DEL RELOJ para aflojarla y EN LA MISMA DIRECCI N QUE LAS MANECILLAS DEL RELOJ para ajustarla Retire la perilla 1 y la cuchilla 2...

Page 109: ...a en un rea seca y limpia No la almacene cerca de materiales corrosivos como fertilizantes y cloruro s dico Guarde la podadora en un lugar fresco y seco bajo techo fuera del alcance de los ni os No la...

Page 110: ...MANTENIMIENTO 29 Fig 14 Posici n de bloqueo Posici n de desbloqueo N o t f o r R e p r o d u c t i o n...

Page 111: ...Inspeccione visualmente si la cuchilla est da ada es decir si est doblada agrietada o desgastada Mantenga la podadora con cuidado para el mejor y m s seguro funcionamiento Mantenga la cuchilla afilad...

Page 112: ...incendio explosi n o choques el ctricos y para evitar da os al medio ambiente Para evitar lesiones y riesgo de incendio explosi n y descarga el ctrica as como da os al medio ambiente Cubra las termin...

Page 113: ...la carcaza de la podadora y la cuchilla se traban debido a que la grama es muy densa El eje del motor est doblado La cuchilla no est equilibrada Cargue la bater a Reemplace el interruptor de control L...

Page 114: ...t n cubiertos por garant as ineludibles de acuerdo con la legislaci n sobre consumo de este pa s Tiene derecho a un recambio o devoluci n en caso de aver a grave y a una compensaci n por las posibles...

Page 115: ...uerdo con los procedimientos y plazos establecidos en el manual del usuario y para el mantenimiento y las reparaciones se deben utilizar piezas Briggs Stratton originales o equivalentes La garant a no...

Page 116: ...53 54 55 58 59 60 61 62 63 64 69 70 75 101 102 103 104 105 106 107 108 109 110 109 111 112 112 110 111 113 114 72 73 74 94 131 132 32 133 134 135 137 138 136 139 140 154 1 155A 124 156 123 147 1 152...

Page 117: ...KIT BOT N 1 17 BOT N INICIO 1 18 RESORTE 1 19 JUNTA 1 20 TORNILLO 1 21 770172 KIT CAJA DE INTERRUPTORES COMPONENTE NA 1 22 CUBIERTA ABAJO 1 23 DESLIZADOR INTERRUPTOR 1 24 RESORTE 1 25 INTERRUPTOR 1 2...

Page 118: ...4 RESORTE 1 55 PERNO 2 58 770183 KIT ENCHUFE 1 59 770178 KIT DERECHO SOPORTE NA 1 60 PERNO 2 61 PERNO 1 62 JUNTA 1 63 PLUG GOMA 1 64 ALTURA DE AJUSTE DERECHO 1 65 TUERCA 1 66 TUERCA 2 157 BLOQUEO 1 69...

Page 119: ...84 KIT TRASERA EJE 1 86 EJE 21 TRASERA 1 87 TABLETA 2 88 TORNILLO 2 77 TORNILLO 2 89 770188 KIT 8 RUEDA 1 90 RUEDA 8 1 92 CUBIERTA DE LA RUEDA 1 38 PERNO 1 40 JUNTA 80V 1 91 770187 KIT 10 RUEDA 1 92 C...

Page 120: ...DE 21 1 46 TORNILLO 2 121 1 770197 KIT DERECHA CUBIERTA NA 1 122A CUBIERTA LATERAL DERECHA 1 123 TORNILLO 4 124 PANTALLA DE POLVO 1 125 CUERPO PRINCIPAL DERECHO 1 126 1 770477 KIT DELANTERO PANEL NA...

Page 121: ...CUBIERTA DE LA BATER A 1 151 COMPUERTA DE LA BATER A 1 153 TORNILLO 2 154 1 770198 KIT IZQUIERDA CUBIERTA NA 1 155A CUBIERTA LADO IZQUIERDO 1 156 ALOJAMIENTO PRINCIPAL IZQUIERDO 1 123 TORNILLO 4 124...

Page 122: ...L NEA DE AYUDA GRATUITA 1 800 317 7833 388011548 Rev 00 07 28 16 Briggs Stratton Power Products Group LLC P O Box 702 Milwaukee WI 53201 N o t f o r R e p r o d u c t i o n...

Reviews: