background image

5 Clock Sources

The ACME-4 can use 3 different sources as its clock reference. There are two external clock sources
(analog und USB-Midi clock) as well as an internal clock generator. External clock sources are turned
off while the internal clock generator is running, and vice versa. Also, one should make sure to apply
only one external clock at any time.

5.1 Analog Clock Input

At its audio input the ACME-4 expects to see a clock signal based on 16th steps. This signal can
come from one of our clock generating plugins or from a special sample file being played by a DAW,
both available on our website. Analog clocks comming from an analog sequencer or even a square-
wave LFO can also by used as clock signals.

Ableton Live is used as an example for working with plugins:

1. Connect an output of your audio interface to the audio input of the ACME-4.

2. Create an audio track in Live and assign it to the output the ACME-4 is connected to.

3. On this track open one of the clock generating plugins from our website.

4. Make sure that the output level is high enough (at least 0dBm pp).

5. Make sure that your Live song and the ACME-4 are set to the same measure.

6. Start Ableton Live. The ACME-4 will start sending out clocks after a lead-in of one bar.

When using an AKAI MPC proceed is follows:

1. Download the clock sample from our website.

2. Load the sample into your MPC and set it to “Single Shot”.

3. Assign an individual audio ouput to that sample and connect that output to the ACME-4.

4. Create a track with a continuous 16th pattern of one bar length and loop that bar.

5. Make sure the playback level is set to max.

6. When you now hit “Play”, the MPC should output 16th triggers on the output connected to the

ACME-4, which in turn will start after a one-bar lead-in.

5.2 USB Midi Clock

If you wish to synchronize it by means of midi clock, set your software to send out clock on the fifth
midi port of the ACME-4. USB Midi clock is supported only for convenience when doing quick test
runs. Because of design flaws in both Windows and Mac OS (not in the ACME-4!) it has a much
higher jitter and is not recommended for serious work. We therefor urge you to use the audio input.

13

Summary of Contents for ACME-4

Page 1: ...SND ACME 4 Advanced Clock Management Engine operating instructions August 2nd 2015...

Page 2: ...2 Sync Midi Outputs channels 1 2 12 4 6 3 Analog Clock Outputs channels 3 4 12 5 Clock Sources 13 5 1 Analog Clock Input 13 5 2 USB Midi Clock 13 5 3 Internal Clock Generator 14 6 Clock Channels 15 6...

Page 3: ...r 23 8 3 6 Clock Polarity 23 8 3 7 Skip First Note 23 8 3 8 Sending and Receiving Setups 23 8 3 9 Loading and Saving of Setups 23 8 3 10 Reset 23 9 Appendix 24 9 1 Troubleshooting FAQ 24 9 2 Default S...

Page 4: ...le every even count is shifted Using the editor software custom swing patterns can be designed And it is even possible to use a differnt swing pattern for each clock channel In order to implement all...

Page 5: ...he song position pointer starts on a bar of your track If you wish to use the internal clock generator of the ACME 4 simply press the grey clock button In either case the clock LED lights up and the A...

Page 6: ...without a computer any standard USB power supply can be used Btw it is intentional that the USB cable supplied requires a little determination when plugged into the ACME 4 Normal USB connections are s...

Page 7: ...the left channel tip an analog clock is send out while the right channel ring supplies a reset signal Polarity of these signals can be selected as well as the clock divider setup The reset signal is...

Page 8: ...ou can design your own swing patterns The 12 swing patterns that the ACME 4 contains as factory defaults are listed here The editor allows you to reload these defaults at any time Changes in settings...

Page 9: ...selected measure also influences when changes in the run halt buttons and the tempo switches are executed These functtions always occure at the beginning of a bar Note A change of measure only takes e...

Page 10: ...he Recall LED will stop flashing and all parameters have been written to memory 4 5 2 Recall Preset To load a preset first select the memory location just like you did for saving Again watch for the m...

Page 11: ...Clock LEDs flash simultaneously Exit Setup Modus without Storing To exit setup mode again press Manual and while holding it down press Clock This will leave the setup mode without permanently storing...

Page 12: ...you can leave the setup mode Don t forget to save your setup 4 6 2 Sync Midi Outputs channels 1 2 In setup mode the second outputs of channels 1 2 can switched to DIN sync or Midi Pressing Run Halt w...

Page 13: ...ating plugins from our website 4 Make sure that the output level is high enough at least 0dBm pp 5 Make sure that your Live song and the ACME 4 are set to the same measure 6 Start Ableton Live The ACM...

Page 14: ...eived While it is running the external clock sources are disabled The function of the rotary memory tempo control will automatically jump to Tempo as indicated by the LED below Turning the control adj...

Page 15: ...ight beat and 100 to indicate a delay to the next step This would be the next 16th for a 16th swing We consider the second method to be more obvious so we use that one The maximum usable range for bea...

Page 16: ...nels 6 2 Shift ne The Shift fine controls allow each clock channel to be time shifted up to a 32nd note in very fine steps Turning the control clock wise will delay the channel turning it ccw will shi...

Page 17: ...ck channel to be time shifted in 16th note steps The max imum shift range forward ahead depends on the selected measure For mesures below 8 8 the maximum shift forward is one bar For all other measure...

Page 18: ...ock channels to be turned on and off while the master clock is running Like with the tempo switches changes take effect at the beginning of the next bar The corresponding channel LED will flash when a...

Page 19: ...ime and system exclusive Output port 5 and the input port allow communication with the ACME 4 itself for remote control and for the editor foftware 7 2 Midi Remote Control Almost all functions of the...

Page 20: ...r current firmware version If an older version is shown here please install the latest version first to be found at www s n d com acme 4 downloads html Should the program not find the ACME 4 you will...

Page 21: ...pattern from the ACME 4 by pressing Receive Send and Receive always refer to the pattern currently selected 8 2 2 Copying Swing Patterns Choose the pattern to be copied by clicking on one of the Patt...

Page 22: ...Therefor the ACME 4 comes from the factory with a Clock Pulse Width setting of 9 which should work fine for most machines If you want to use more extreme swing you should adjust this parameter for the...

Page 23: ...reset signals See also Setup 8 3 7 Skip First Note Analog sequencers react differently to reset signals Some are set to the first step such that the first clock pulse will take them to step 2 Others...

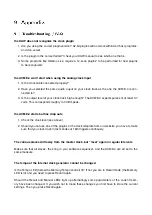
Page 24: ...orresponds roughly to 0 dBm peak the ACME 4 starts but has drop outs 1 Check the clock level see above 2 Should you not use one of the plugins or the clock template from our website you have to make s...

Page 25: ...9 Appendix 9 2 Default Swing Patterns...

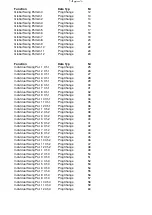
Page 26: ...Controller 23 0 7 Function Data Typ Nr Value Shift 16th Channel 1 Controller 48 0 16 Shift 16th Channel 2 Controller 49 0 16 Shift 16th Channel 3 Controller 50 0 16 Shift 16th Channel 4 Controller 51...

Page 27: ...ng Pat 10 Ch 1 ProgChange 34 Individual Swing Pat 11 Ch 1 ProgChange 35 Individual Swing Pat 12 Ch 1 ProgChange 36 Individual Swing Pat 1 Ch 2 ProgChange 37 Individual Swing Pat 2 Ch 2 ProgChange 38 I...

Page 28: ...Individual Swing Pat 10 Ch 4 ProgChange 70 Individual Swing Pat 11 Ch 4 ProgChange 71 Individual Swing Pat 12 Ch 4 ProgChange 72 9 4 Software Updates New firmware can be transfered into the ACME 4 vi...

Reviews: