background image

SOS Contacts

The SOS Contacts feature allows you to select up to five (5) contacts 

from your Phonebook to alert in the event of an emergency.

Important - If you have sosPlus Mobile Monitoring Service™, leave 

sosPlus™ in the 1st & 2nd positions and NEVER delete them from 

your Phonebook. You may select any other three (3) contacts from 

your Phonebook for positions 3, 4, and 5.

If you do not have sosPlus Mobile Monitoring Service™, we encour-

age you to select 911 for position 1.

SOS Message

The SOS Message option allows you to customize the SMS text 

message that will be sent to your Contacts when the SOS Button is 

pressed. 

The default message pre-programmed into the phone is: 

(Line 1) “Emergency, please help! 

(Line 2) <Signal><Format=CID><Code=E101>”

For sosPlus Mobile Monitoring Service™ subscribers, it is important 

that you not alter Line 2 of this message!  

35

Summary of Contents for ezTWO3G

Page 1: ... for seniors Model ezTWO3G Owner s Manual Tech Data GSM 850 900 1800 1900 MHz WCDMA 3G GSM 850 1900 2100 MHz Battery Li Ion 3 7V 1000mAh Dimensions 118 5 x 57 5 x 15 3mm Weight 90g 3G Compatible Hearing Aid M3 T3 3G ...

Page 2: ...g a Call Answering an Incoming Call Ending a Call or Ignoring a Call Call Waiting Adding Contacts Field Definitions Icons High Intensity LED Flashlight Keypad Lock Camera Launch Shutter Button Volume Button Lanyard Connection Headphone Port Power Port 2 8 8 8 9 9 9 9 9 10 10 11 12 12 12 12 12 13 13 13 2 Included in the Box 5 Safety Precautions 6 ...

Page 3: ...ns for Saved Contacts To Delete All Phonebook Contacts To Write a Message Inbox Draft Outbox Sent Delete Messages Missed Calls Dialed Calls Recieved Calls Delete Call Logs All Call Logs Photo Album Camera 13 14 15 16 The Menu Phonebook Messaging Call History Photos 17 22 22 22 23 23 23 24 25 25 26 17 17 17 18 18 19 20 20 21 21 21 22 3 ...

Page 4: ...tus Siren SOS Contacts SOS Message 26 27 27 27 Settings SOS Settings Alarm Silent Mode Installing the BATTERY SIM Card Optional Micro SD Figure 1 SIM Card Installation Diagram Figure 2 Battery Installation Diagram Figure 3 Removing the Back Cover Warranty to the Orginal Purchaser Repair or Replacement Due To Defect 30 37 38 39 40 41 43 42 28 29 30 30 30 31 33 34 35 34 35 36 4 ...

Page 5: ...Included in the Box Intended Usage 43 Disposal 43 Correspondence RMAs 44 5 ...

Page 6: ...rface Serious damage and or injury may result if the unit falls Do not cover slots and openings on the unit They are provided for ventilation and protection against overheating Install the unit in a place where it cannot be walked on Never push any objects through slots in this unit This may result in the risk of fire or electric shock Never spill any liquid on the unit To reduce the risk of electr...

Page 7: ...l devices There should be a minimum distance between switched on phone and a pacemaker Do not operate a vehicle while holding or using your mobile telephone Follow the local laws and traffic rules of the area you are in Always power your mobile telephone off while in an airplane Do not use near gas stations or other explosive materials Never shine the LED flashlight into a human s or animal s eyes pro...

Page 8: ...ss and hold the red PWR button for 3 5 seconds Release the button when the phone plays its start up or power off chime and the screen animation begins After the phone has powered on and has connected with the carrier press and hold the 1 button on the phone s keypad until it begins to call your voicemail box When the call connects simply follow the spoken instructions You may choose to have or not ...

Page 9: ... Option Buttons when the second incoming call is displayed To swap between lines when call waiting is in use select swap from the Options menu or press the green OK Send button one time From the Home screen press the Option Right button for Names Highlight the Add contact line with the Navigation button and press Option Left to Select then enter the contact s name number Or manage contacts online ...

Page 10: ...n Field Definitions 1 Signal Status Indicator 5 Time 2 Battery Charge Indicator 6 Date 3 Icons 7 Option Left 4 Cellular Service Type 8 Option Right 10 Names Menu Fri Apr 22 snapMobile 3G Names Menu Fri Apr 22 snapMobile 3G 3G ...

Page 11: ... Button Enabled Ring Only Vibrate Ring Vibrate Only Alarm Set Missed Call You have Voicemail s Bluetooth You have SMS Text Message s Hands Free Headset Keypad Lock Engaged Silent Mode Engaged Operating in 3G 11 ...

Page 12: ... be answered when the keypad is locked Press this button for 3 5 seconds to launch the camera Once the camera is open press this button to take a picture See page 26 for a full list of functions and features Volume Button This button adjusts the phone s ringer in call and hands free volume Ringer Volume may be adjusted any time a call is not engaged by pressing the Volume button as desired In Call...

Page 13: ... with an optional lanyard The Snapfōn ezTWO uses a mini USB connection to charge the phone with your wall charger car charger or your computer s USB port The keypad will be used for dialing phone numbers entering text for contacts and SMS text messages controlling many of the phone s features progressing through menus making calls and terminating them 13 ...

Page 14: ...Diagram of External Features 3G USB Port Headset Port Lanyard Connection Flashlight Camera SOS Button Flashlight On Off Keypad Lock On Off Volume Up Down Camera Launch 14 ...

Page 15: ...haracters Camera Press to take a picture Standby Press once to dial twice to dial or three times to dial P for international numbers Text Entry Press to bring up punctuation options Move left through menus Short Press Dial 1 Long Press Call Voice Mail Short Press Dial 2 9 Long Press Dial speed dial contact if assigned Standby Press to dial Text Entry Press to change Case Numbers Move right through...

Page 16: ...return to Home Screen Standby Mode Home Screen Dial 0 Operating Press and hold to engage Speaker Text Entry Inserts a space between characters Camera Press to take a picture Standby Mode Home Screen Press once to dial twice to dial or three times to dial P for international numbers Text Entry Press to bring up punctuation options Any Menu or List Moves side to side Operating In call Press to adjus...

Page 17: ...From the Home Screen Press the Option Right button under Names Press the Navigation button Up once to highlight Add contact then press the Option Left button to Add Type in the Contact s name Press the Navigation button Down one time Enter the Contact s 10 digit phone number Press Option Left Options and then press it 2 more times to confirm the save To Call a Saved Contact From the Home Screen Pre...

Page 18: ...Names Press the Navigation button Up or Down to locate the Contact and highlight them with the white bar Once highlighted press the Option Left button for Options Press the Navigation button down twice to Edit and press the Option Left button again Edit the name and number as needed Press Option Left for Options Select whether to Save or Cancel If Saving press Option Left again to confirm the Save ...

Page 19: ...tton Up four times to Settings and press the Option Left button for OK Press the Navigation button Down once to Phone Settings and press the Option Left button for OK Press the Navigation button Down twice and press the Option Left button for OK Press the Navigation button Down twice to Delete All and press the Option Left button for OK Select whether to Delete from SIM or Phone and press the Opti...

Page 20: ...ssage and press Option Left twice Once in a message you have the options to View Reply Call the Sender Forward the message Delete the message or Delete All messages To Write a Message From the Home Screen Press the Option Left button for Menu Press the Navigation button Down once to Messaging and press the Option Left button again for OK Press Option Left to Write a Message Type your message using...

Page 21: ...t to you For each folder the number in beside the Inbox Drafts etc is the number of messages in that folder Draft The Draft folder contains all the text messages you have written but have not sent Outbox The Outbox stores any messages you have attempted to send but which did not actually successfully transmit The typical reason a message would not successfully transmit is if you attempted to send ...

Page 22: ...Call History menu stores a record of all Missed Dialed and Received calls Viewing any call list you will have the option to return the call see greater detail about the call send the caller a SMS text message add the caller to your Phonebook or delete the call from the call record Missed Calls The Missed Call listing displays any calls that were not answered with the newest call at the top As each...

Page 23: ...by pressing the Left Option button Received Calls Received Calls will display any calls made to and answered by your phone number with the most recent at the top Like the Missed and Dialed Call lists you may redial one of these numbers by highlighting it and pressing the Send button or you may see all of your options by pressing the Option Left button Delete Call Logs Delete Call Logs allows you t...

Page 24: ...All Call Logs You may also access a view of All Calls by pressing the green Send button from the Home Screen Callers may be called directly from this screen and call details may be viewed as well 24 ...

Page 25: ... Press the Option Left button for OK again for Photo Album Use the Navigation button to scroll up and down through your photos in thumbnail view To view pictures in full screen press the Option Left button for Options on any picture and select View This will open the picture to full size Using the Navigation Button you may continue to scroll through your pictures You may also Rename or Delete the ...

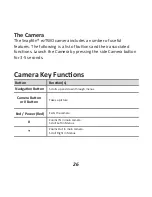
Page 26: ...ctions Launch the Camera by pressing the side Camera button for 3 5 seconds Camera Key Functions Navigation Button Button Function s End Power Red Scrolls up and down through menus Takes a picture Exits the camera Zooms IN in main camera Scroll Left in Menus Zooms Out in main camera Scroll Right in Menus Camera Button or 0 Button 26 ...

Page 27: ...ion Time and Date To set the time date enter the 4 digit time using the number buttons Move to the AM PM field using the down arrow on the navigation button and set it with the or button Use the down arrow button to navigate to the date field and enter the 2 digit month 2 digit day and 4 digit year using the numeric keypad When done press the left option button and the changes will be saved Note Whe...

Page 28: ...until dialing begins Language The Snapfōn ezTWO supports both English and Spanish languages To change to Spanish rather than the default English highlight and enter the language option then highlight the language you prefer to use and press the left option button to save your selection SIM Card The SIM card menu shows Memory Status how many contacts are saved to your SIM card or directly to the ph...

Page 29: ...such as your car or computer In some states use of a hands free device is required while operating a vehicle Paired Devices This will list any devices the phone is currently paired to Search for Devices This will allow you to search for Bluetooth devices with which to pair Phone Name Displays your phone s name and allows you to edit it The factory programmed name is Snapfon ezTWO Advanced The adva...

Page 30: ...e alert may be turned off if you don t want to use it and you may customize the message sent by the phone Low Battery Contacts may be managed remotely using our optional ezContacts service Restore Factory Settings Restoring your phone s factory settings will take the phone back to its original state and eliminate all of your customized settings You will need your phone s password to do this 0000 Ca...

Page 31: ...s to limit the phone s ability to make calls only to contacts that are in the Phonebook By enabling Secured Calling users may answer any incoming calls and receive any text messages but they can only reply to them if those calls or texts are contacts entered in the Phonebook All SOS Speed Dial and Low Battery contacts that are added by the ezContacts system can be used while the Secured Calling fe...

Page 32: ...and press the Option Left button for OK Highlight the On option by pressing the Navigation Button and press the Option Left button for OK Enter the passcode 1357 and press the Option left button To disable Secured Calling follow the same steps but select Off and use the same passcode If you have further questions please contact Snapfōn Customer Service 32 ...

Page 33: ... someone does answer your emergency call the Snapfōn immediately becomes a speakerphone This section will tell you how to get the most out of the SOS Button Note If you subscribe to ezContacts your SOS Button s contacts may be managed remotely from your snapfon com account page If you ordered a Premium Plan with sosPlus Mobile Monitoring Service the SOS Button will be pre programmed with the sosPl...

Page 34: ... will not work if the phone is powered off Siren The Siren when engaged sounds when the SOS Button is pressed for 3 5 seconds and is intended to alert those around you that you need help If you prefer you may disengage the siren by selecting the Siren menu option and selecting off Disengaging the siren will not affect any of the SOS Button s other features The siren s current status will be displayed...

Page 35: ... from your Phonebook for positions 3 4 and 5 If you do not have sosPlus Mobile Monitoring Service we encour age you to select 911 for position 1 SOS Message The SOS Message option allows you to customize the SMS text message that will be sent to your Contacts when the SOS Button is pressed The default message pre programmed into the phone is Line 1 Emergency please help Line 2 Signal Format CID Co...

Page 36: ... turn the alarm from off to on Press the down arrow on the navigation button and set the time with the numeric keypad use hh mm format Press the down arrow again to move to the AM PM field and use the or buttons to select either AM or PM Press the down arrow again to move to the Repeat selection This allows you to select using the or buttons whether the alarm will go off one time Once the same time e...

Page 37: ...rough 10 minutes Last press the Navigation Button Down one more time and select whether you would like the alarm to Vibrate Ring Ring Only or Vibrate Only When you are done press the Option Right button once for Done and the Option Left button to confirm the Save Yes Silent Mode To engage or disengage Silent Mode from the Home Screen Press the Option Left button to enter the Menu Press the Navigati...

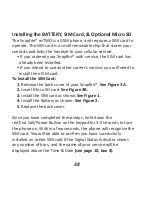
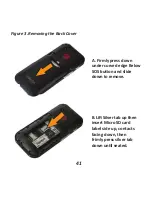
Page 38: ... Card 1 Remove the back cover of your Snapfōn See Figure 3A 2 Insert Micro SD card See Figure 3B 3 Install the SIM card as shown See Figure 1 4 Install the Battery as shown See Figure 2 5 Replace the back cover Once you have completed these steps hold down the red End Call Power Button on the keypad for 3 5 seconds to turn the phone on Within a few seconds the phone will recognize the SIM card You...

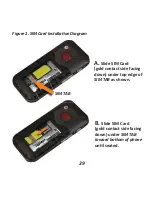
Page 39: ...A Slide SIM Card gold contact side facing down under top edge of SIM TAB as shown SIM Card Installation Diagram B Slide SIM Card gold contact side facing down under SIM TAB toward bottom of phone until seated SIM TAB 39 ...

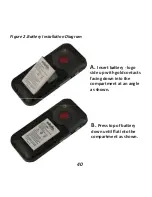
Page 40: ...e 2 Battery Installation Diagram A Insert battery logo side up with gold contacts facing down into the compartment at an angle as shown B Press top of battery down until flat into the compartment as shown 40 ...

Page 41: ...nder curved edge Below SOS button and slide down to remove B Lift Silver tab up then insert Micro SD card label side up contacts facing down then frimly press silver tab down until seated Figure 3 Removing the Back Cover 41 ...

Page 42: ...s other than genuine Snapfōn or Snapfōn authorized or recommended batteries have been used If a problem develops due to a third party battery or charging adapter please contact the manufacturer of that accessory for redress or compensation If a problem develops during the warranty period please return your phone to us and we will either repair it or replace it with a new or refurbished unit Shippi...

Page 43: ...sture and impacts Do not expose to prolonged direct sunlight Improper use may lead to damage of product and could be associated with hazards such as electrical shock or fire The entire product may not be altered or rebuilt nor may the housing be opened The power adapter is designed for use in household wall outlets with public electricity grids of 100 240 VAC 50 60 Hz Disposal Packaging and packagi...

Page 44: ... the instructions may cause harmful interference to radio communications However there is no guarantee that interference will not occur in a particular installation If this equipment does cause harmful interference to radio or television reception which can be determined by turning the equipment off and on the user is encouraged to try to correct the interference by one or more of the following mea...

Page 45: ...on distance between the user s body and the back of the handset The use of belt clips holsters and similar accessories should not contain metallic compo nents in its assembly The use of accessories that do not satisfy these requirements may not comply with FCC RF exposure requirements and should be avoided NOTE The manufacturer is not responsible for any radio or TV interfer ence caused by unautho...

Page 46: ...Correspondence RMAs 800 937 1532 website www snapfon com email customerservice seniortechllc com 46 ...

Reviews: