18
C pole with black sticker
③
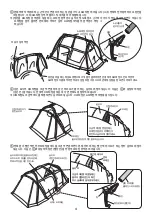
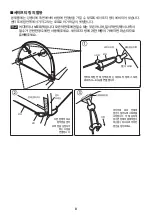
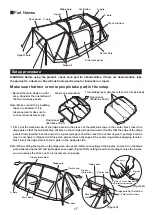
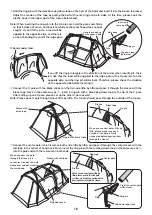
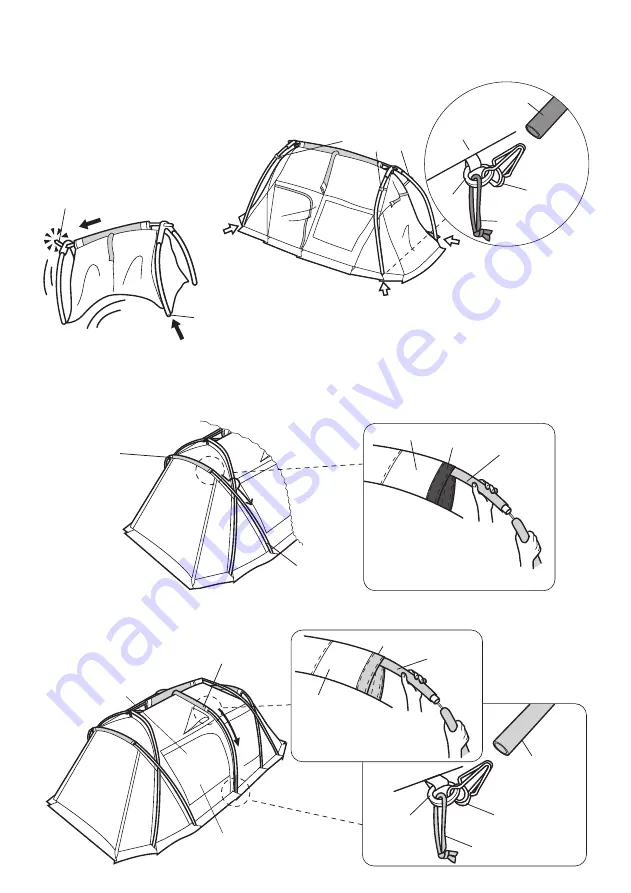
Hold the ring pin with the dark blue peg down loop on the hem of the body and insert it into the A pole. (4 places)
Adjust the tension of the tape by pulling the belt with center rings on both sides. At this time, please hook the
plastic hook in the upper part of the A pole beforehand.
Note: When inserting the ring pin into the A pole end, hold the pole ends firmly
so that it does not move, and insert carefully so that your finger does not get
caught. If you lift the pole, a load will be
applied to the opposite side, and there is
a risk of bending the end of the ridge pole.
If you lift the ring pin largely in the direction of the arrow when inserting it, there
is a risk that the load will be applied to the ridge pole of the A pole joint on the
opposite side, and the ring pin will be bent. Therefore, please check the situation
on the opposite side before inserting it.
④
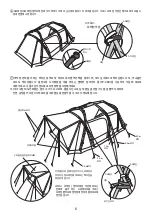
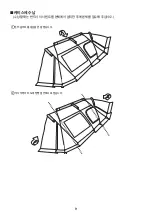
Connect the C pole with the black sticker on the tip node little by little and pass it through the sleeve with the
black tape. Next, in the same way as
③
, insert a ring pin with a black peg down loop to the tip of the C pole.
After setting up one C pole, please set up the other C pole as well.
Note: Please pass C pole through sleeve little by little. The C pole should pass through the outside of the A pole.
⑤
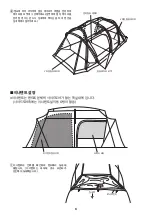
Connect the center pole, which is red on both ends, little by little, and pass it through the center sleeve with the
red tape in the center of Land Lock. Next, insert the ring pin with the red peg down loop in the same way as
③
into the pole end with the red seal on both ends.
When you pass the pole
through the sleeve, it is
convenient to open the side
door panel and get closer to
the main body.
When you connect poles little by
little, please ensure that the pole
sections are firmly connected before
passing them through the sleeve.
Ring
Tip of A pole
(dark blue)
Main body
Ring pin
Peg down loop
(dark blue)
Hang the hook only
on the upper A pole
It bends under load.
C pole
Black tape
Sleeve
Sleeve with
black tape
When you connect poles little by
little, please make sure each
section of the pole is firmly
connected before passing them
through the sleeve.
Center pole
Tip of the center pole
without seal
Red tape
Sleeve
Sleeve with red tape
Side door panel
Ring pin
Peg down loop (red)
Ring
Summary of Contents for FES-091
Page 1: ...Ver 1 00 Pro RED FRAME EDITION FES 091...
Page 2: ...1 1 7m 2 3 5m 6 2 5m 4 1 5m 2 A 2 C 2 1 1 2 1 1 21cm 31 1 1 2 6 6 1 2 1 1...
Page 3: ...2 2 1kg...
Page 4: ...3 A 2 3 A A 2 A A A A A B 2 A A C C 3 A A A A B...
Page 5: ...4 C A 4 A A A A A C C C C A A A C...
Page 6: ...5 A C O O TP 080 V C A O 7m 3 5m 3 5m 2 5m 1 5m 2 5m C A O V...
Page 7: ...6 O Y Y...
Page 8: ...7 O O 11 O 2 O A O A A O O O...
Page 9: ...8 O 5m 6m...
Page 10: ...9...
Page 11: ...10...
Page 12: ...11 60 Y I Y I PU UV UV...
Page 13: ...12 A PU PU A...
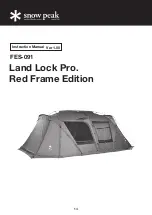
Page 15: ...14 Instruction Manual Ver 1 00 Land Lock Pro Red Frame Edition FES 091...

