background image

3

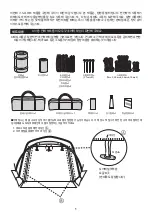
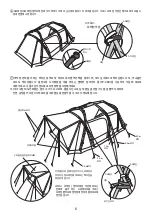
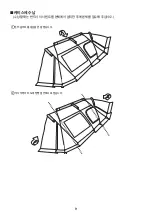
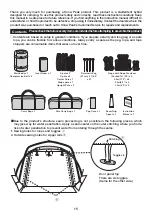
릿지폴

A프레임

분리한 상태로

릿지폴을 세트함

분리한 상태로

릿지폴을 세트함

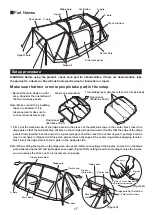
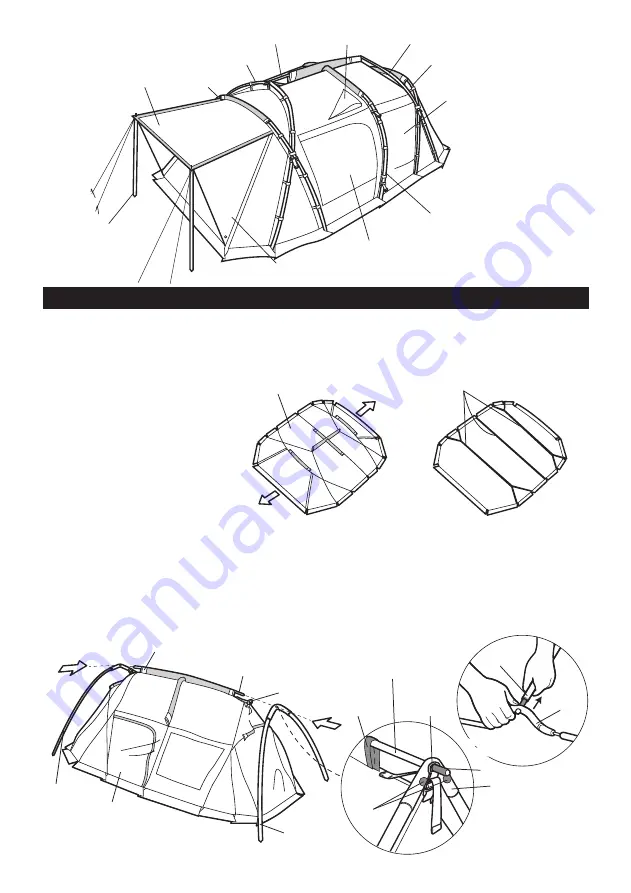
■각 부분의 명칭

①본체를 설영하고자 하는 장소에 

펼칩니다. 이 때 2개인  출입구용 

도어패널의 방향을 고려해주세요.

주)빌딩테이프 3개가 모두 버클에 

연결 되어 있는지 확인해주세요. 

빠져있는 경우는 설영전에 모두 

연결해주세요.

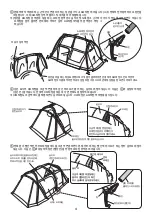
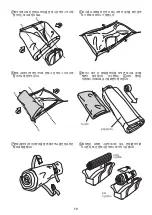
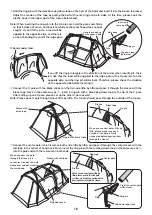
②처음에는 남색의 표식이 있는 A프레임 릿지폴을 정중앙의 남색 슬리브에 넣습니다. 그리고 A프레임 조인트 부분에 붙어있는 2

개의 남색씰이 바깥쪽을 향하도록 릿지폴을 끼웁니다. 릿지폴의 끝부분이 A프레임 조인트 부분의 끝부분까지 다 들어간 것을 
확인하고 센터링을 안쪽까지  끼워  겁니다. (그림A) 이 시점에서는 센터링의  테이프는 텐션을 걸지 않고 느슨하게 해둡니다. 
다음은 반대측의 A프레임에도 릿지폴을 끼웁니다.

주)A프레임을 릿지폴에 세트할 때는 A프레임을 모두 연결된 상태에서  끼우지말고,  좌우측 프레임마디를 분리하여 릿지폴을 

연결해주세요. (그림B) 세트하고나서 세우면 접합부분의 금속스트레스를 줄여 편하게 설영이 가능합니다.

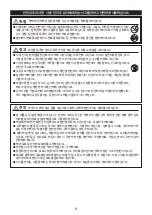
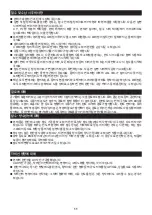
경고

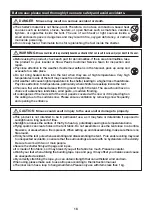
사용 전에 본 제품을 점검하고 각부에 이상이 없는지 확인해 주세요. 이상이 발견되었을 경우, 즉시 사용을 중지하고 구입하신 

판매점 또는 당사 유저서비스에 점검 또는 수리를 의뢰해 주십시오.

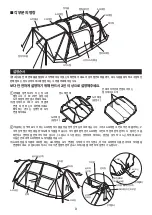
설영순서

보다 안전하게 설영하기 위해 반드시 2인 이상으로 설영해주세요.

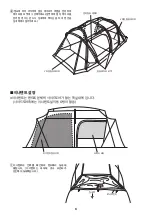
릿지폴

A프레임

A프레임

C프레임

C프레임

벤틸레이션

메쉬창

센터프레임

사이드도어패널

사이드월

도어패널

업라이트폴

랜드록 본체

도어패널

(출입구)

도어패널

(출입구)

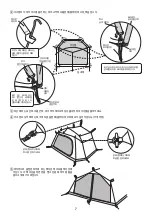
본체 바닥부분에 연결되어 있는

빌딩테이프 3개

릿지폴

릿지폴

A프레임

슬리브(남색)

슬리브

(남색)

남색

스티커

릿지폴 끝부분(남색)

본체

A프레임 조인트부분

A프레임

센터링

센터링

(그림A)

(그림B)

Summary of Contents for FES-091

Page 1: ...Ver 1 00 Pro RED FRAME EDITION FES 091...

Page 2: ...1 1 7m 2 3 5m 6 2 5m 4 1 5m 2 A 2 C 2 1 1 2 1 1 21cm 31 1 1 2 6 6 1 2 1 1...

Page 3: ...2 2 1kg...

Page 4: ...3 A 2 3 A A 2 A A A A A B 2 A A C C 3 A A A A B...

Page 5: ...4 C A 4 A A A A A C C C C A A A C...

Page 6: ...5 A C O O TP 080 V C A O 7m 3 5m 3 5m 2 5m 1 5m 2 5m C A O V...

Page 7: ...6 O Y Y...

Page 8: ...7 O O 11 O 2 O A O A A O O O...

Page 9: ...8 O 5m 6m...

Page 10: ...9...

Page 11: ...10...

Page 12: ...11 60 Y I Y I PU UV UV...

Page 13: ...12 A PU PU A...

Page 14: ...A 2 C 2 21cm 31 7m 2 3 5m 6 2 5m 4 1 5m 2 2 210D PU 3 000mm UV 210D PU 1 800mm UV 210D PU 68D 210D PU 1 800mm A6061 19mm 22mm 77 35 37cm 73 20 23cm 28 5kg 6 2 507 17 602 TEL 1661 1958 FAX 02 6203 1959...

Page 15: ...14 Instruction Manual Ver 1 00 Land Lock Pro Red Frame Edition FES 091...

Page 16: ...er penetration to prevent water from entering through the seams 1 Sewing holes for loops and toggles 2 Outside sewing holes for zipper rails Door panel top There are six toggles Same for the other sid...

Page 17: ...nside the tent Choose a flat well drained area with firm ground to pitch the tent The area should have no chance of avalanches landslides wind gusts or sudden flooding It is dangerous if the mud skirt...

Page 18: ...le into the A pole on the opposite side Note When setting the A pole on the ridge pole do not set it after connecting all the A poles and set it on the ridge pole while leaving the left and right uppe...

Page 19: ...he same way as insert a ring pin with a black peg down loop to the tip of the C pole After setting up one C pole please set up the other C pole as well Note Please pass C pole through sleeve little by...

Page 20: ...ough the loop attached to the ring pin on the hem and peg down all the loops inside the room Peg down the rope firmly Use the provided upright pole and a forked end rope to lift the entrance exit door...

Page 21: ...f the Land Lock For the inner tent the side with the logo print at the bottom is the indoor side Please hang the inner tent in the room on the side of the Land Lock without the side door Since there i...

Page 22: ...nt to the O rings and pegs on the main body fly The peg down tape at the rear two places should be hooked to the pegs that hold the main body fly Hook the red tape with the hook attached to the bottom...

Page 23: ...iately Do not put your weight on the safety ring otherwise it may be damaged Connect the other end of the rope to the O ring with the center pole Finally adjust the rope tensioner so that the tension...

Page 24: ...er in the carry bag When storing be sure to remove the inner tent from the main body before removing the main body Fold the main body in half with the center sleeve as centered on top Fold the sides i...

Page 25: ...inner tent toward the zipper opened in step 4 to let the air out Put the main body fly inner tent and roof sheet together and compress all by tightening the two compression belts provided Put the pole...

Page 26: ...es are connected before taking them down this will make it easier to peg down the next time you set up Fold the pole from the center to the edges If folded from the edge the cord can be overstretched...

Page 27: ...t in a well ventilated area away from heat and moisture Using the zipper when it is covered with mud sand or dust may cause wear or damage Clean the zipper with a brush before use Apply small amounts...

Page 28: ...Rip Stop Shield pigment PU coating Waterproof rating 3 000mm minimum Teflon water repellent finish UV protection treatment Wall 210D Polyester Rip Stop PU coating Waterproof rating 1 800mm minimum Te...

Reviews: