background image

14

●本製品はポリエステル生地を組み合わせて使用しています。生地の特性を考慮し、できる限り色移りし難い加工

と配色パターンを採用していますが、保管状態などにより、色移りが発生する場合があります。ご了承ください。ま

た、濡れたままの保管は避けてください。

●濡れたまま保管すると、カビや悪臭、生地の色移り、生地の劣化などのトラブルの原因になりますので、使用後は

風通しの良い日陰で十分に乾燥し、柔らかいブラシなどで泥汚れを落としてから保管してください。

●フレームを通した状態のままで逆さまにしないでください。フレーム折損や生地損傷の原因になります。
●フレームは表面の汚れを落とし、十分に乾燥させてから保管してください。濡れたまま保管すると腐食、強度が低

下します。ジョイント部分は常に清潔にし、少量のシリコン系潤滑剤を薄く塗布してください。塗布し過ぎると生地

に油ジミができますのでご注意ください。また、

フレーム内部のショックコードは不必要に引っ張らないでください。

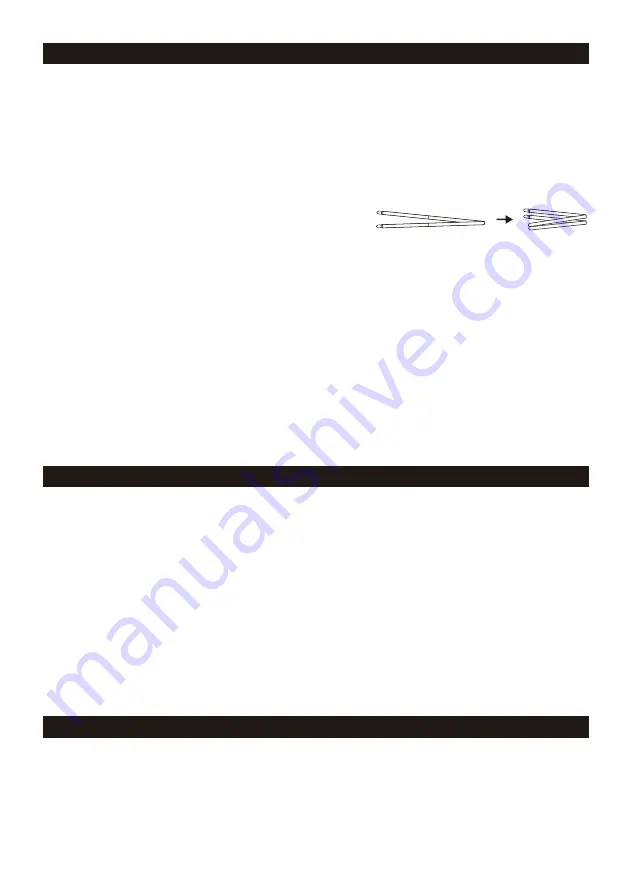
●フレームを収納する際は、中央を意識しながら折り畳んでください。

●高温多湿を避け、直射日光の当たらない風通しのよい場所に保管してください。
●ファスナーに泥や砂、ホコリなどが付着したまま使用すると摩耗し破損の原因になりますので、ブラシなどを使い

常に清潔にしてください。また、スライダーの動きを滑らかにするために、少量のシリコン系樹脂剤を定期的に塗
布してください。塗布し過ぎると生地に油ジミができますのでご注意ください。

●小さな生地の破損は市販のリペアテープで補修できます。補修の際はリペアテープの説明書をよくお読みください。
●ご使用により広範囲にわたり素材が劣化し、耐久度合を超えたものは修理できない場合があります。
●次回の使用に備え、張り綱などの付属品も含め、十分に保守、点検をしてください。
●シームテープはPUコーティングが痛まない程度の温度設定で圧着されていますが、使用を重ねるにしたがい剥

離してしまう場合があります。剥離が確認された場合は、アイロンを低温に設定し、剥離箇所のみを再度圧着して

ください。熱を掛け過ぎた場合生地が変色したり劣化が促進されますのでご注意ください。シームテープは無理や

り剥離させないでください。PUコーティングが一緒に剥離された場合、修理できなくなる可能性があります。

●樹液が付着してしまうときれいに除去することはできません。樹液が垂れそうな木の下を避けて設営してください。
 溶剤などにより無理に除去すると生地やコーティングを傷めます。
●使用する際にフレームが折れてしまった場合は、応急処置として速やかに添え木をあて、ビニールテープなどで

固定するか、撤収をしてください。

メンテナンス・保管

●本格的な修理が必要な場合は、お買い求めになった販売店または弊社ユーザーサービス係までお問い合わせください。

●修理を依頼される場合は、必ず十分に乾燥させ、汚れをきれいに落としてください。

●修理品には修理箇所がはっきりと解るように、必ずメモまたは荷札を付けてください。また破損時の状況をできる

だけ詳しく書いたメモを添えてください。

●修理品の運賃並びに修理費については以下のように規定させていただきます。

1.保証対象の場合 : 往復運賃並びに修理費は弊社にて負担いたします。

2.保証対象以外の場合 : 往復運賃並びに修理費は、お客様のご負担とさせていただきます。

修理について

お買い求めいただきました製品は万全を期してますが万一不備な点がございましたら、お買い求めの販売店または弊

社までご連絡ください。製造上の欠陥が原因の場合は無償で修理または交換させていただきます。その他の場合は
適正な価格で修理させていただきます。修理・交換の判断は弊社の裁量によるものとさせていただきます。また、以下
の場合は保証、修理できない場合もありますので、あらかじめご了承ください。

品質保証について

   1. 取扱説明書に従わなかったと判断した場合。
   2. 素材の経年劣化による製品の寿命。
   3. 改造及び粗雑な扱いによる製品の故障。
   4. 不測の事故による製品の故障。
   5. その他製造上の欠陥以外による製品の故障。
   6. ゴミやサビによる故障。
   7. 分解したことによる不具合の発生または破損。
   8. 落下やその他の衝撃による部品の変形や破損による不具合。
   9. 消耗品の劣化、破損、故障及び付随する不具合。

  10. 他社製品との組合せによる故障。

Summary of Contents for FES-195

Page 1: ...Ver 1 00 M FES 195...

Page 2: ...1...

Page 3: ...2 1 6 1 1 1 1 1 3 5m 6 2 5m 4 1 5m 2 1 1 1 27...

Page 4: ...3 1 C C A B...

Page 5: ...4 C A C...

Page 6: ...5 C A O 7m V 3 5m 3 5m 2 5m 1 5m 2 5m C A O...

Page 7: ...6 Y Y...

Page 8: ...7 O 2 O O O O...

Page 9: ...8 O...

Page 10: ...9 C A A...

Page 11: ...10 2 C A 2 C C C A C...

Page 12: ...11 I I...

Page 13: ...12...

Page 14: ...13 60 PU PU...

Page 15: ...14 1 2 1 2 3 4 5 6 7 8 9 10...

Page 16: ...5 220cm 76 75 7 h cm 210D PU 1 800mm 280 215 210cm 76 32 36cm 72 17 22cm 23kg 3kg 1kg 150D PU 1 800mm UV 150D PU 1 800mm UV cm 590 350 205 H 180 H MADE IN CHINA 9 00 17 00 0120 010 660 Email userservi...

Page 17: ...Product Manual Ver 1 00 Land Lock M Ivory Option Set FES 195 16...

Page 18: ...atures inside of the tent may cause fire or heatstroke Hot weather will cause high temperatures in the shelter leading to a higher risk of heatstroke Pay close attention to temperatures particularly w...

Page 19: ...ct Contents are based on setup in general conditions If you prepare a sturdy and long peg or a spare rope you can be flexible for various conditions Always carry a spare as the peg rope and rope stopp...

Page 20: ...o the end of the A pole joint part and then insert the center ring as if pushing it all the way in and hook it Figure A At this point please loosen the tape of the center ring without applying tension...

Page 21: ...ame way as insert a ring pin with a black peg down loop to the tip of the C pole After setting up one C pole please set up the other C pole as well Note Please pass C pole through sleeve little by lit...

Page 22: ...s remain Note When it rains the door panel tends to fill with water so either tilt the pole and make a gradient or use a short pole and pull down the center of the front with a large V shaped rope so...

Page 23: ...f the Land Lock For the inner tent the side with the logo print at the bottom is the indoor side Please hang the inner tent in the room on the side of the Land Lock without the side door Since there i...

Page 24: ...body fly The peg down tape at the rear two places should be hooked to the pegs that hold the main body fly Hook the red tape with the hook attached to the bottom entrance corner on the center pole O...

Page 25: ...iately Do not put your weight on the safety ring otherwise it may be damaged Connect the other end of the rope to the O ring with the center pole Finally adjust the rope tensioner so that the tension...

Page 26: ...hook at the top of the C Pole 25 The figure shows hooking on one side only Connection hook Connection hook Roof sheet Roof sheet connection hook Rope with Rope Tensioner Hook the Roof sheet connection...

Page 27: ...Lock main body and adjust the tension Hook the Roof sheet connection hook and the Rope with Rope Tensioner to the tape connection part of the upper hooks on the C Pole A Pole and Center Pole on one s...

Page 28: ...until it straightens When removing the pole from the sleeve push it out If the pole is pulled out then it may become disconnected inside the sleeve The disconnection of the pole inside the sleeve may...

Page 29: ...inner tent toward the zipper opened in step 4 to let the air out Put the main body fly inner tent and roof sheet together and compress all by tightening the two compression belts provided Put the pole...

Page 30: ...ly Materials with high waterproof capacity are used in this product However if the materials are in contact with pools of water on the ground for long periods the material may begin to absorb water Th...

Page 31: ...y the peeling sections Be aware that excessive heat will discolor or accelerate the deterioration of the fabric If the PU coating is completely peeled off it may be impossible to repair Sap cannot be...

Page 32: ...treatment Teflon water repellent finish Pole A6061 dia 19mm 0 7 dia 16mm 0 6 Peg Duralumin Inner Tent Wall 68D Polyester Taffeta Bottom 210D Polyester Oxford PU coating Waterproof rating 1 800mm minim...

Reviews: