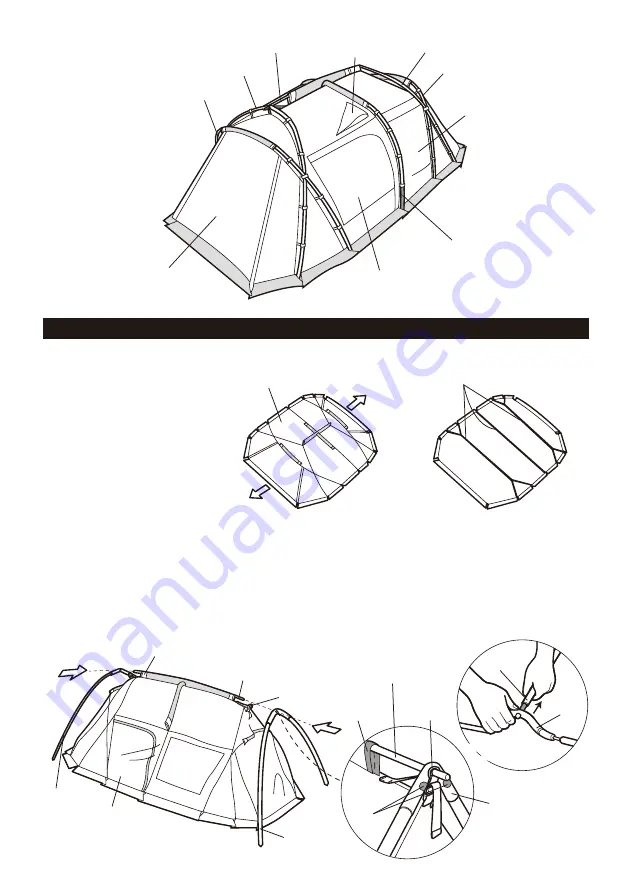
background image

A pole Ridge pole

A pole

A pole

C pole

C pole

ベンチレーション

Mesh window

Center Pole

Side door panel

Door panel

Part Names

Setup procedure

Ridge pole 

A pole

Set A pole on the Ridge pole

in a disassembled state

Set A pole on the Ridge pole

in a disassembled state

Spread the main body on a flat 

area. Consider the orientation of 

the two doorway panels.

Note: Make sure all three building 

tapes are buckled. If it is 

disconnected, make sure to 

connect them before setup.

 First, put the dark blue tip of the ridge pole into the sleeve of the dark blue tape in the center. Next, insert the ridge 

pole so that the two dark blue stickers on the A ridge joint part outward. Confirm that the edge of the ridge pole is 

firmly inserted into the end of the A pole joint part, and then insert the center ring as if pushing it all the way in and 

hook it. (Figure A) At this point, please loosen the tape of the center ring without applying tension. Next, insert the 

ridge pole into the A pole on the opposite side.

Note: When setting the A pole on the ridge pole, do not set it after connecting all the A poles, and set it on the ridge pole 

while leaving the left and right upper ones apart. (Figure B) By setting it and then starting to raise the A pole, you can 

reduce the stress on the joint and set it up easily.

Make sure that two or more people take part in the setup.

Land Lock main body

Door panel

(Entrance / Exit)

Door panel

(Entrance / Exit)

Three building tapes attached to the hem of the main body

Ridge pole

Ridge pole

A pole

Sleeve (dark blue)

Sleeve

(dark blue)

Dark blue

seal

Main body

A: Pole joint section

A pole

Center ring

Center ring

(Figure A)

(Figure B)

19

Summary of Contents for FES-195

Page 1: ...Ver 1 00 M FES 195...

Page 2: ...1...

Page 3: ...2 1 6 1 1 1 1 1 3 5m 6 2 5m 4 1 5m 2 1 1 1 27...

Page 4: ...3 1 C C A B...

Page 5: ...4 C A C...

Page 6: ...5 C A O 7m V 3 5m 3 5m 2 5m 1 5m 2 5m C A O...

Page 7: ...6 Y Y...

Page 8: ...7 O 2 O O O O...

Page 9: ...8 O...

Page 10: ...9 C A A...

Page 11: ...10 2 C A 2 C C C A C...

Page 12: ...11 I I...

Page 13: ...12...

Page 14: ...13 60 PU PU...

Page 15: ...14 1 2 1 2 3 4 5 6 7 8 9 10...

Page 16: ...5 220cm 76 75 7 h cm 210D PU 1 800mm 280 215 210cm 76 32 36cm 72 17 22cm 23kg 3kg 1kg 150D PU 1 800mm UV 150D PU 1 800mm UV cm 590 350 205 H 180 H MADE IN CHINA 9 00 17 00 0120 010 660 Email userservi...

Page 17: ...Product Manual Ver 1 00 Land Lock M Ivory Option Set FES 195 16...

Page 18: ...atures inside of the tent may cause fire or heatstroke Hot weather will cause high temperatures in the shelter leading to a higher risk of heatstroke Pay close attention to temperatures particularly w...

Page 19: ...ct Contents are based on setup in general conditions If you prepare a sturdy and long peg or a spare rope you can be flexible for various conditions Always carry a spare as the peg rope and rope stopp...

Page 20: ...o the end of the A pole joint part and then insert the center ring as if pushing it all the way in and hook it Figure A At this point please loosen the tape of the center ring without applying tension...

Page 21: ...ame way as insert a ring pin with a black peg down loop to the tip of the C pole After setting up one C pole please set up the other C pole as well Note Please pass C pole through sleeve little by lit...

Page 22: ...s remain Note When it rains the door panel tends to fill with water so either tilt the pole and make a gradient or use a short pole and pull down the center of the front with a large V shaped rope so...

Page 23: ...f the Land Lock For the inner tent the side with the logo print at the bottom is the indoor side Please hang the inner tent in the room on the side of the Land Lock without the side door Since there i...

Page 24: ...body fly The peg down tape at the rear two places should be hooked to the pegs that hold the main body fly Hook the red tape with the hook attached to the bottom entrance corner on the center pole O...

Page 25: ...iately Do not put your weight on the safety ring otherwise it may be damaged Connect the other end of the rope to the O ring with the center pole Finally adjust the rope tensioner so that the tension...

Page 26: ...hook at the top of the C Pole 25 The figure shows hooking on one side only Connection hook Connection hook Roof sheet Roof sheet connection hook Rope with Rope Tensioner Hook the Roof sheet connection...

Page 27: ...Lock main body and adjust the tension Hook the Roof sheet connection hook and the Rope with Rope Tensioner to the tape connection part of the upper hooks on the C Pole A Pole and Center Pole on one s...

Page 28: ...until it straightens When removing the pole from the sleeve push it out If the pole is pulled out then it may become disconnected inside the sleeve The disconnection of the pole inside the sleeve may...

Page 29: ...inner tent toward the zipper opened in step 4 to let the air out Put the main body fly inner tent and roof sheet together and compress all by tightening the two compression belts provided Put the pole...

Page 30: ...ly Materials with high waterproof capacity are used in this product However if the materials are in contact with pools of water on the ground for long periods the material may begin to absorb water Th...

Page 31: ...y the peeling sections Be aware that excessive heat will discolor or accelerate the deterioration of the fabric If the PU coating is completely peeled off it may be impossible to repair Sap cannot be...

Page 32: ...treatment Teflon water repellent finish Pole A6061 dia 19mm 0 7 dia 16mm 0 6 Peg Duralumin Inner Tent Wall 68D Polyester Taffeta Bottom 210D Polyester Oxford PU coating Waterproof rating 1 800mm minim...

Reviews: