background image

C pole with black sticker

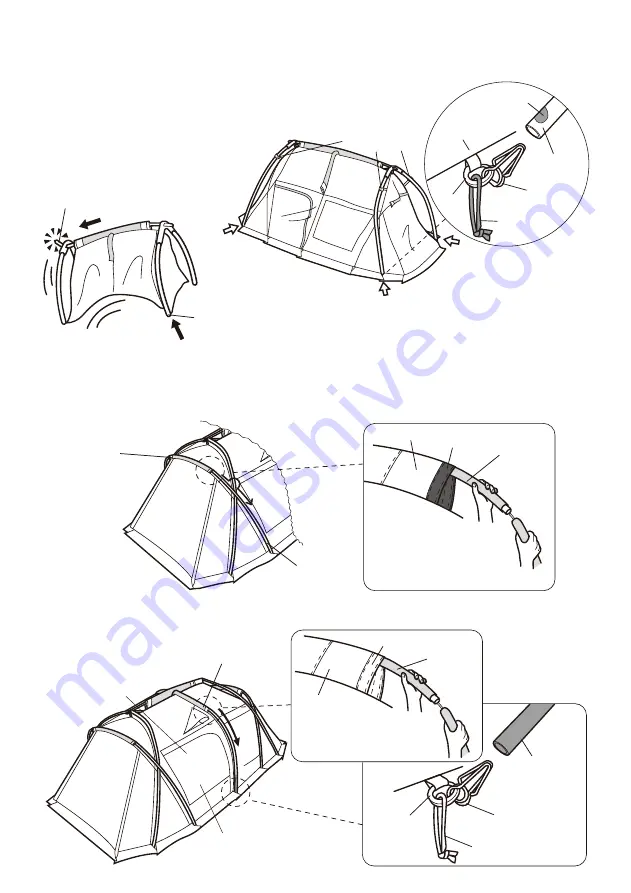
Hold the ring pin with the dark blue peg down loop on the hem of the body and insert it into the A pole. (4 places) 

Adjust the tension of the tape by pulling the belt with center rings on both sides. At this time, please hook the plastic 

hook in the upper part of the A pole beforehand.

Note: When inserting the ring pin into the A pole end, hold the pole ends firmly so 

that it does not move, and insert carefully so that your finger does not get caught. 

If you lift the pole, a load will be applied to 

the opposite side, and there is a risk of 

bending the end of the ridge pole.

If you lift the ring pin largely in the direction of the arrow when inserting it, there is a 

risk that the load will be applied to the ridge pole of the A pole joint on the opposite 

side, and the ring pin will be bent. Therefore, please check the situation on the 

opposite side before inserting it.

Connect the C pole with the black sticker on the tip node little by little and pass it through the sleeve with the black 

tape. Next, in the same way as 

, insert a ring pin with a black peg down loop to the tip of the C pole. After setting 

up one C pole, please set up the other C pole as well.

Note: Please pass C pole through sleeve little by little. The C pole should pass through the outside of the A pole.

Connect the center pole, which is red on both ends, little by little, and pass it through the center sleeve with the red 

tape in the center of Land Lock. Next, insert the ring pin with the red peg down loop in the same way as 

 into the 

pole end with the red seal on both ends.

When you pass the pole 
through the sleeve, it is 
convenient to open the side 
door panel and get closer to 
the main body.

When you connect poles little by 

little, please ensure that the pole 

sections are firmly connected before 

passing them through the sleeve.

Ring

Dark blue

seal

Main body

Ring pin

Peg down loop

(dark blue)

A pole

Hang the hook only

on the upper A pole

It bends under load.

C pole

Black tape

Sleeve

Sleeve with

black tape 

When you connect poles little by 

little, please make sure each 

section of the pole is firmly 

connected before passing them 

through the sleeve.

Center pole

Tip of the center (red)

Red tape

Sleeve

Sleeve with red tape

Side door panel

Ring pin

Peg down loop (red)

Ring

20

Summary of Contents for FES-195

Page 1: ...Ver 1 00 M FES 195...

Page 2: ...1...

Page 3: ...2 1 6 1 1 1 1 1 3 5m 6 2 5m 4 1 5m 2 1 1 1 27...

Page 4: ...3 1 C C A B...

Page 5: ...4 C A C...

Page 6: ...5 C A O 7m V 3 5m 3 5m 2 5m 1 5m 2 5m C A O...

Page 7: ...6 Y Y...

Page 8: ...7 O 2 O O O O...

Page 9: ...8 O...

Page 10: ...9 C A A...

Page 11: ...10 2 C A 2 C C C A C...

Page 12: ...11 I I...

Page 13: ...12...

Page 14: ...13 60 PU PU...

Page 15: ...14 1 2 1 2 3 4 5 6 7 8 9 10...

Page 16: ...5 220cm 76 75 7 h cm 210D PU 1 800mm 280 215 210cm 76 32 36cm 72 17 22cm 23kg 3kg 1kg 150D PU 1 800mm UV 150D PU 1 800mm UV cm 590 350 205 H 180 H MADE IN CHINA 9 00 17 00 0120 010 660 Email userservi...

Page 17: ...Product Manual Ver 1 00 Land Lock M Ivory Option Set FES 195 16...

Page 18: ...atures inside of the tent may cause fire or heatstroke Hot weather will cause high temperatures in the shelter leading to a higher risk of heatstroke Pay close attention to temperatures particularly w...

Page 19: ...ct Contents are based on setup in general conditions If you prepare a sturdy and long peg or a spare rope you can be flexible for various conditions Always carry a spare as the peg rope and rope stopp...

Page 20: ...o the end of the A pole joint part and then insert the center ring as if pushing it all the way in and hook it Figure A At this point please loosen the tape of the center ring without applying tension...

Page 21: ...ame way as insert a ring pin with a black peg down loop to the tip of the C pole After setting up one C pole please set up the other C pole as well Note Please pass C pole through sleeve little by lit...

Page 22: ...s remain Note When it rains the door panel tends to fill with water so either tilt the pole and make a gradient or use a short pole and pull down the center of the front with a large V shaped rope so...

Page 23: ...f the Land Lock For the inner tent the side with the logo print at the bottom is the indoor side Please hang the inner tent in the room on the side of the Land Lock without the side door Since there i...

Page 24: ...body fly The peg down tape at the rear two places should be hooked to the pegs that hold the main body fly Hook the red tape with the hook attached to the bottom entrance corner on the center pole O...

Page 25: ...iately Do not put your weight on the safety ring otherwise it may be damaged Connect the other end of the rope to the O ring with the center pole Finally adjust the rope tensioner so that the tension...

Page 26: ...hook at the top of the C Pole 25 The figure shows hooking on one side only Connection hook Connection hook Roof sheet Roof sheet connection hook Rope with Rope Tensioner Hook the Roof sheet connection...

Page 27: ...Lock main body and adjust the tension Hook the Roof sheet connection hook and the Rope with Rope Tensioner to the tape connection part of the upper hooks on the C Pole A Pole and Center Pole on one s...

Page 28: ...until it straightens When removing the pole from the sleeve push it out If the pole is pulled out then it may become disconnected inside the sleeve The disconnection of the pole inside the sleeve may...

Page 29: ...inner tent toward the zipper opened in step 4 to let the air out Put the main body fly inner tent and roof sheet together and compress all by tightening the two compression belts provided Put the pole...

Page 30: ...ly Materials with high waterproof capacity are used in this product However if the materials are in contact with pools of water on the ground for long periods the material may begin to absorb water Th...

Page 31: ...y the peeling sections Be aware that excessive heat will discolor or accelerate the deterioration of the fabric If the PU coating is completely peeled off it may be impossible to repair Sap cannot be...

Page 32: ...treatment Teflon water repellent finish Pole A6061 dia 19mm 0 7 dia 16mm 0 6 Peg Duralumin Inner Tent Wall 68D Polyester Taffeta Bottom 210D Polyester Oxford PU coating Waterproof rating 1 800mm minim...

Reviews: