Lit. No. 70451, Rev. 06
14
November 1, 2018
INSTALLING & REMOVING THE SPINNER ASSEMBLY
INSTALL SPINNER ASSEMBLY TO
HOPPER
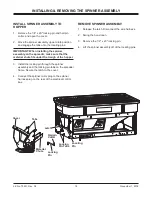
1. Remove the 1/4" x 20" locking pin and hairpin
cotter, and open the cover.
2. Move the spinner assembly upward into position
and engage the tabs onto the locating pins.
IMPORTANT: When installing the spinner
assembly on the spreader, make sure that the
material chute
fi
ts under the trough of the hopper.
3. Install the locking pin through the spinner
assembly and the locking pin tabs on the spreader
frame. Secure the latch to the cover.
4. Connect the spinner motor plug to the spinner
harness plug on the rear of the electrical control
box.
REMOVE SPINNER ASSEMBLY
1. Release the latch. Disconnect the wire harness.
2. Swing the hood open.
3. Remove the 1/2" x 20" locking pin.
4. Lift the spinner assembly off of the locating pins.
Latch
Tabs
Cover
Locating
Pin
Locking
Pin Tabs
Locking
Pin
Hairpin
Cotter
Material
Chute


