background image

9

Charging the Battery

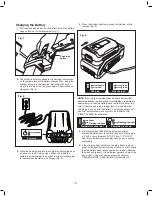
1.  Pull the push lock button on the battery to pull the battery 

pack up and out of the equipment (Fig. 7).

2.  Check that the mains voltage is the same as that marked 

on the rating plate of the battery charger. Then, insert the 

charger's plug into the electrical wall outlet. When you 

plug in the charger, the top green light will illuminate and 

stay green (Fig. 8).

3.  Place the battery pack into the charger by sliding the pack 

as shown to lock it into position. When you insert the 

battery into the charger, the bottom red light will 

illuminate 

to indicate that the battery is charging

 (Fig. 9).

4. 

When the bottom light turns green, the battery is fully 

charged (Fig. 9)

.

NOTE: If the top light remains green while the bottom light 

alternately flashes red and green, this indicates a temperature 

abnormality (i.e. that the battery pack is either too hot or too 

cold). If there is only a red blinking light, this indicates that 

something is wrong with the battery. Contact the Snow Joe

®

 + 

Sun Joe

®

 customer service center at 1-866-SNOW-JOE 


(1-866-766-9563) for assistance.

5.  A fully discharged iBAT40XR battery pack with an 

internal temperature in the normal range will fully charge 

in 3 to 3.5 hours (between 32ºF/0ºC and 113ºF/45ºC). 

Heavily cycled battery packs may take longer to charge 

completely.

6.  If the charging light indicator alternately blinks red and 

green or the light indicator does not come on at all, check 

that the battery pack is fully seated into the bay. Remove 

the pack and reinsert. If the problem persists, contact the 

Snow Joe

®

 + Sun Joe

®

 customer service center at  

1-866-SNOWJOE (1-866-766-9563) for assistance.

Fig. 7

Push lock

button

Fig. 8

green

Power on

Fig. 9

green

green

Fully charged

green

red

Charging

Green

Flashing red/green

Temperature abnormal

Flashing red only

Something is wrong

Summary of Contents for iON21SB-PRO

Page 1: ...tch and disconnect the battery before making any adjustments inspecting servicing changing accessories cleaning the snow blower or when any other dangerous conditions present Any such operation should...

Page 2: ...ediately Do not use an extension cord unless it is absolutely necessary Using the wrong damaged or improperly wired extension cord poses a risk of fire and electric shock If an extension cord must be...

Page 3: ...ked on the rating plate Never connect it to a different mains voltage 2 Protect the battery charger and its cord from damage Keep the charger and its cord away from heat oil and sharp edges Have damag...

Page 4: ...the snow blower accidentally strikes an object first stop the snow blower and remove the battery next inspect for damage finally repair or replace any damaged part before restarting and operating the...

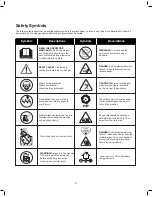
Page 5: ...eep dry CAUTION Beware of stones and other foreign objects that could be thrown from the appliance DANGER Cutting dismemberment hazard Keep hands away from the rotating auger Do not use hands to unclo...

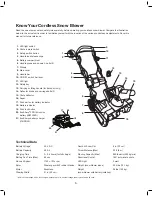
Page 6: ...g min Directional Control 180 auto rotate chute LED Light 3 watt Weight snow blower alone 33 4 lbs 15 1 kg Weight snow blower with battery installed 36 lbs 16 3 kg Initial no load voltage when fully c...

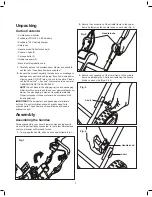
Page 7: ...new cordless snow blower The packaging is made of recyclable materials Properly dispose of these materials in accordance with local regulations IMPORTANT The equipment and packaging material are not t...

Page 8: ...vel button does not appear to be working place the battery pack on the charger and charge as needed NOTE Immediately after using the battery pack the charge level button may display a lower charge tha...

Page 9: ...abnormality i e that the battery pack is either too hot or too cold If there is only a red blinking light this indicates that something is wrong with the battery Contact the Snow Joe Sun Joe customer...

Page 10: ...e covered by snow and are easy to overlook so be sure to conduct a thorough inspection of the area before beginning work NOTE Before using this machine make sure that the snow blower s auger and rubbe...

Page 11: ...people 3 When moving the snow blower use the wheels as the pivot point Slightly tilt the snow blower on this pivot point to move it forward or backward 4 Start your clearing path outward throwing sno...

Page 12: ...e the chute deflector too far forward as this can cause an opening to appear between the deflector and discharge chute Do not overtighten the knobs on the chute deflector Fig 19 Maintenance To order g...

Page 13: ...household detergents containing ammonia Never use flammable or combustible solvents around battery packs battery chargers or tools 4 The EcoSharp iCHRG40 lithium ion battery charger has no serviceable...

Page 14: ...n their charge during storage longer than other battery pack types As a general practice it is best to unplug the battery charger and remove the battery pack when they are not in use Recharge the batt...

Page 15: ...blower The use of any other attachment or accessory can be dangerous and could cause injury or mechanical damage NOTE Accessories are subject to change without any obligation on the part of Snow Joe S...

Page 16: ...16 NOTES...

Page 17: ...17 NOTES...

Page 18: ...18 NOTES...

Page 19: ...Snow Joe LLC is not liable for indirect incidental or consequential damages in connection with the use or misuse of the Snow Joe Sun Joe products covered by this warranty This warranty does not cover...

Page 20: ...snowjoe com...

Reviews: