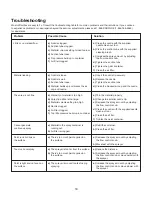
background image

18

Troubleshooting 

Most difficulties are easy to fix. Consult the troubleshooting table for common problems and their solutions. If you continue 


to experience problems or need repairs beyond these minor adjustments, please call 1-866-SNOWJOE (1-866-766-9563) 


for assistance.

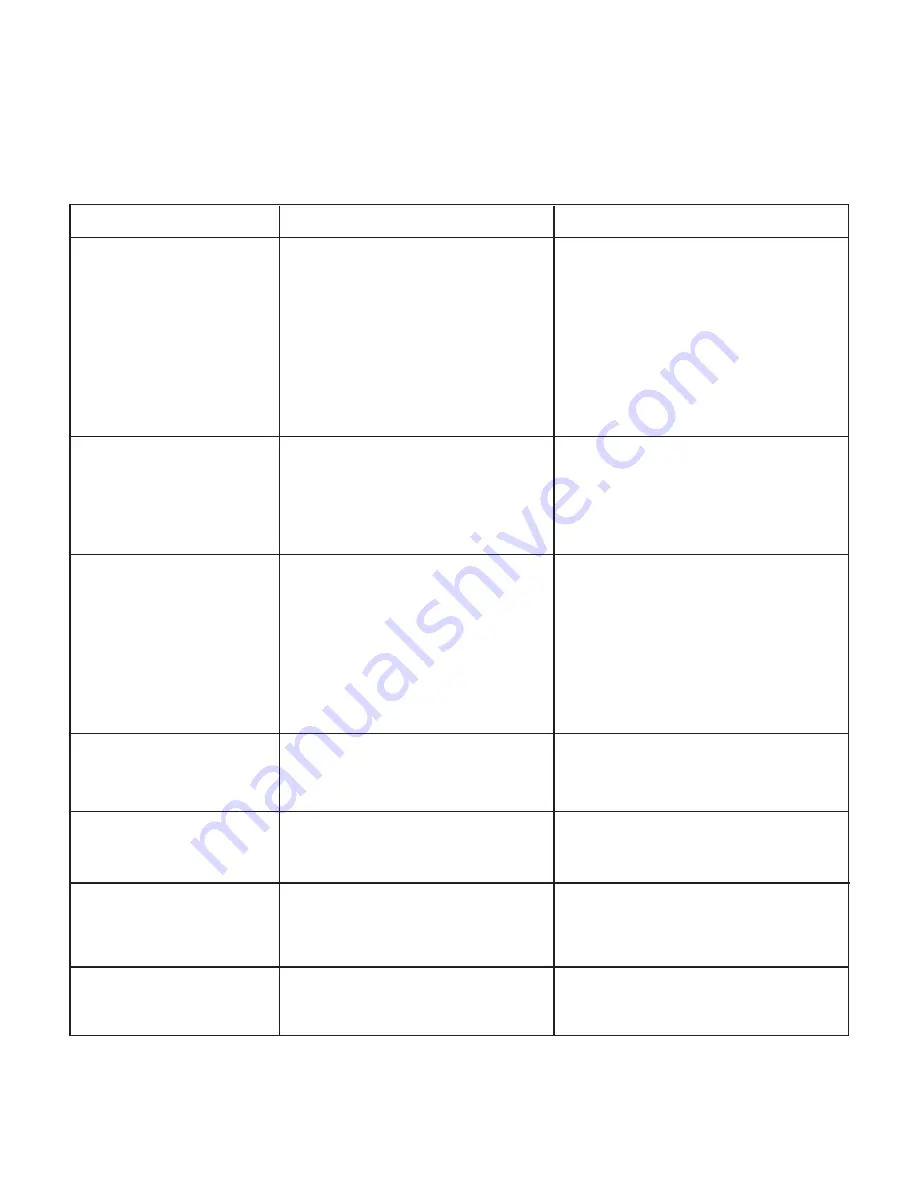
Little or no material flow

a)

  Nozzle clogged.

b)  Suction tube clogged.
c)  Material volume setting turned too low.
d)  Suction tube loose.
e)

  No pressure build up in container.

f)

  Air filter clogged.

a)

  Clean the nozzle with the supplied 

needle clean-out tool.

b)  Clean the suction tube with the supplied 

cleaning brush. 

c)  Increase the spray amount by adjusting 

the flow control knob. 

d)

  Tighten the suction tube. 

e) 

Tighten the 

paint container. 

f) 

Clean the air filter.

Problem

Possible Cause

Solution

Material leaking

a)

  Nozzle is loose.

b)

  Nozzle is worn.

c)  Suction tube loose.
d)  Material builds up and blocks the air 

cap and nozzle.

a)

  Insert the nozzle tip securely. 

b)

  Replace the nozzle.  

c)

  Tighten the suction tube.

d)

  Clean the blocked air cap and the nozzle. 

The spray is not fine

a)

  Viscosity of material is too high.

b)

  Spray tip orifice is too large.

c)  Material volume setting too high.
d)

  Nozzle clogged.

e)

  Air filter clogged.

f)

  Too little pressure build-up in container.

a)

  Thin the material properly.  

b)

  Change to a smaller nozzle tip.  

c)  Decrease the spray amount by adjusting 

the flow control knob.

d)

  Clean the nozzle with the supplied needle 

clean-out tool.

e)

  Clean the air filter. 

f) 

Tighten the 

paint container.

Cannot generate 

continuous spray

a)  Material in the spray container is 

running out.

b)

  Air filter is clogged.

a)

  Refill the container.  

b)

  Clean the air filter.

Paint runs or drips on 

the surface

a)

  There's too much paint applied on 


the surface.

a)  Decrease the spray amount by adjusting 

the flow control knob.

b)  Move fast with the sprayer.  

Too much overspray

a)

  The sprayer is too far from the surface.

b)

  There's too much paint applied on 


the surface.

a)  Reduce the distance.
b)  Decrease the spray amount by adjusting 

the flow control knob or move quickly with 

the sprayer.

Paint is light and not even on 

the surface

a)

  The sprayer is moved too fast during 

spraying. 

a)  Increase the spray amount by adjusting 

the flow control knob or move slower with 

the sprayer.

Summary of Contents for POWERJOE 24V-PS1-RM

Page 1: ...of Snow Joe LLC Model 24V PS1 RM Form No SJ 24V PS1 RM 880E M V1 OPERATOR S MANUAL 2021 by Snow Joe LLC All rights reserved Original instructions SAVE THESE INSTRUCTIONS 1 CORDLESS PAINT SPRAYER 24 VOLT MAX 4 0 Ah ...

Page 2: ...ve equipment such as dust mask non skid safety shoes hard hat or hearing protection used for appropriate conditions will reduce personal injuries 6 Remove accessories or attachments before turning paint sprayer on 7 If devices are provided for the connection of dust extraction and collection facilities ensure these are connected and properly used Use of dust collection can reduce dust related haza...

Page 3: ...h batteries that are safe durable and have a high energy density The battery cells have a wide range of safety devices Each individual cell is initially formatted and its electrical characteristic curves are recorded This data is then used exclusively to be able to assemble the best possible battery packs Despite all the safety precautions caution must always be exercised when handling batteries T...

Page 4: ...etal object makes a connection between the positive and negative contacts on the battery pack Do not place a battery pack near anything that may cause a short circuit such as paper clips coins keys screws nails and other metallic objects A short circuited battery pack poses a risk of fire and severe personal injury Store your battery pack and charger in a cool dry place Do not store the battery pa...

Page 5: ...exposed to heat during the charging process as the battery cells may have suffered dangerous damage 11 Do not use batteries that have suffered curvature or deformation during the charging process or those that exhibit other atypical symptoms gassing hissing cracking etc 12 Never fully discharge the battery pack maximum recommended depth of discharge is 80 A complete discharge of the battery pack w...

Page 6: ... For protection against injury wear safety goggles WARNING Do not expose the unit to rain or wet conditions Keep dry Symbols Symbols Descriptions Descriptions Indoor use only Only use battery charger indoors Respirators protective clothing and gloves will reduce the possibility of personal injuries WARNING Risk of Explosion Do not spray flammable liquids DISPOSAL Waste produced by electrical machi...

Page 7: ...tube inside 7 1 5 mm nozzle tip White 8 Battery compartment 9 1 8 mm nozzle tip Black 10 2 2 mm nozzle tip Red 11 Push lock button 12 Push button for battery indicator 13 Battery indicators 14 Handle 15 On Off switch 16 Flow control knob 17 Switch trigger lever 18 Quick release knob 19 Air Vent 20 Turbine 21 iON 24V lithium ion charger 24VCHRG AC 22 Charger plug 23 Charge socket 24 Viscosity cup 2...

Page 8: ...you are ready to use your new cordless paint sprayer The packaging is made of recyclable materials Properly dispose of these materials in accordance with local regulations IMPORTANT The equipment and packaging material are not toys Do not let children play with plastic bags foils or small parts These items can be swallowed and pose a suffocation risk Assembly mWARNING Do not insert the battery unt...

Page 9: ...se the battery charge indicator lights to determine when to charge your iON 24VBAT lithium ion battery pack You can top off your battery pack s charge before starting a big job or after a long day of use Charging the Battery 1 Press the push lock buttons on the battery to pull the battery pack out of the equipment Fig 3 2 Check that the mains voltage is the same as that marked on the rating plate ...

Page 10: ... This is the Runout Time Fig 6 3 For proper runout time of specific material refer the thinning table below THINNING TABLE Material Reference Runout Time Oil enamel 25 40 seconds Oil based primer 30 45 seconds Latex No thinning required Oil stain No thinning required Clear sealer No thinning required Polyurethane No thinning required Varnish 20 50 seconds mWARNING Do not spray material that has a ...

Page 11: ...d container and attach the lid securely to the top of the container Tighten securely Check the lid to make sure it s threaded on squarely and securely before picking up the sprayer Fig 9 Align the Suction Tube Before reattaching the paint container adjust the direction of the suction tube based on the direction of the painting project Fig 10 A properly directed suction tube will use the paint mate...

Page 12: ...ialized To change the nozzle tip follow the instructions below 1 Make sure the tool is switched off and the battery is removed from the compartment 2 Unscrew and remove the tip collar slowly be careful that the small parts may fall out and remove the nozzle tip inside Fig 13 3 Assemble the desired nozzle tip by aligning the 4 tabs on the tip with the notches on the sprayer and inserting the middle...

Page 13: ...pray on scrap cardboard and similar material first Begin with largest flow setting If less flow is desired adjust the flow control knob slowly until the appropriate flow amount is achieved Basic Spray Process mWARNING DO NOT insert the battery until all settings are done and you are ready to use the paint sprayer Do not squeeze the On Off switch until you are ready to spray mWARNING Always do a te...

Page 14: ... Ensure the surface to be sprayed is free of dust dirt and grease Ensure spray area is clean and free of dust that could be blown onto the newly sprayed surface Cover area that not intended to be sprayed Keep the nozzle at a minimum of 2 inch 5 cm and a maximum of 12 inch 30 cm away from the surface Fig 20 To get an even spray distribution keep your arm at the same distance and avoid moving the wr...

Page 15: ... and properly dispose of the cleaning solution Refill the container with new cleaning solution 4 Reattached the container on the sprayer Insert the battery and spray the solution through the gun in a safe area Refill and repeat spray process until the solvent being sprayed is clean and clear 5 Stop the sprayer and remove the battery Press the On Off switch so that the material inside the spray gun...

Page 16: ...rosion of terminals may occur As with other battery pack types permanent capacity loss can result if the pack is stored for long periods of time at high temperatures over 120ºF 49ºC 3 iON 24VBAT lithium ion battery packs maintain their charge during storage longer than other battery pack types As a general practice it is best to unplug the battery charger and remove the battery pack when they are ...

Page 17: ... of the FCC Rules These limits are designed to provide reasonable protection against harmful interference in a residential installation This equipment generates uses and can radiate radio frequency energy and if not installed and used in accordance with the instructions may cause harmful interference to radio communications However there is no guarantee that interference will not occur in a partic...

Page 18: ... nozzle The spray is not fine a Viscosity of material is too high b Spray tip orifice is too large c Material volume setting too high d Nozzle clogged e Air filter clogged f Too little pressure build up in container a Thin the material properly b Change to a smaller nozzle tip c Decrease the spray amount by adjusting the flow control knob d Clean the nozzle with the supplied needle clean out tool ...

Page 19: ...5 Ah Lithium Ion Battery Charge times vary by charger See website for details Battery Runtime Max 7 5 min 24VBAT LTX iON 24V 2 0 Ah Lithium Ion Battery Charge times vary by charger See website for details Battery Runtime Max 10 min 24VBAT LTE iON 24V 2 5 Ah Lithium Ion Battery Charge times vary by charger See website for details Battery Runtime Max 12 5 min 24VBAT LT iON 24V 4 0 Ah Lithium Ion Bat...

Page 20: ...20 NOTES ...

Page 21: ...21 NOTES ...

Page 22: ...22 NOTES ...

Page 23: ...hall be construed as obligating Snow Joe Sun Joe to incorporate such design changes into previously manufactured products nor shall such changes be construed as an admission that previous designs were defective This warranty is intended to cover product defects only Snow Joe LLC is not liable for indirect incidental or consequential damages in connection with the use or misuse of the Snow Joe Sun ...

Page 24: ...sunjoe com ...

Reviews: