background image

10

Unpacking

Carton Contents

• 

Cordless hedge trimmer head

• 

Rear handle with telescoping pole

• 

Blade cover

• 

Shoulder strap

•  20 V 2.0 Ah EcoSharp

®

 LITE battery

•  EcoSharp

®

 battery charger

•  Manuals with registration card

1.  Carefully remove the cordless pole hedge trimmer and 

check to see that all of the above items are supplied.

2.  Inspect the product carefully to make sure no breakage or 

damage occurred during shipping. If you find damaged or 

missing parts, DO NOT return the unit to the store. Please 

call the Snow Joe

®

 + Sun Joe

®

 customer service center at 

1-866-SNOWJOE (1-866-766-9563).

  NOTE: Do not discard the shipping carton and packaging 

material until you are ready to use the cordless pole hedge 

trimmer. The packaging is made of recyclable materials. 

Properly dispose of these materials in accordance with 

local regulations or save the packaging for long-term 

product storage.

IMPORTANT! The equipment and packaging material are  

not toys. Do not let children play with plastic bags, foils, 

or small parts. These items can be swallowed and pose a 

suffocation risk!

Assembly

m

WARNING!

 The pole hedge trimmer must be fully 

assembled before operation! Do not use a pole hedge trimmer 

that is only partly assembled or assembled with damaged 

parts!
Follow the assembly instructions step-by-step and use the 

figures provided as a visual guide to easily assemble the pole 

hedge trimmer.
Do not connect the pole hedge trimmer to the power supply 

before it is completely assembled.
NOTE: Take care of small parts that are removed during 

assembly or when making adjustments. Keep them secure to 

avoid loss.

Assembling the Tool

The telescoping pole and trimmer head come unassembled. 

Ensure that the pole hedge trimmer is assembled properly 

before using.

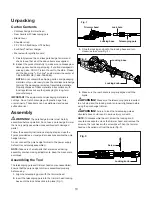
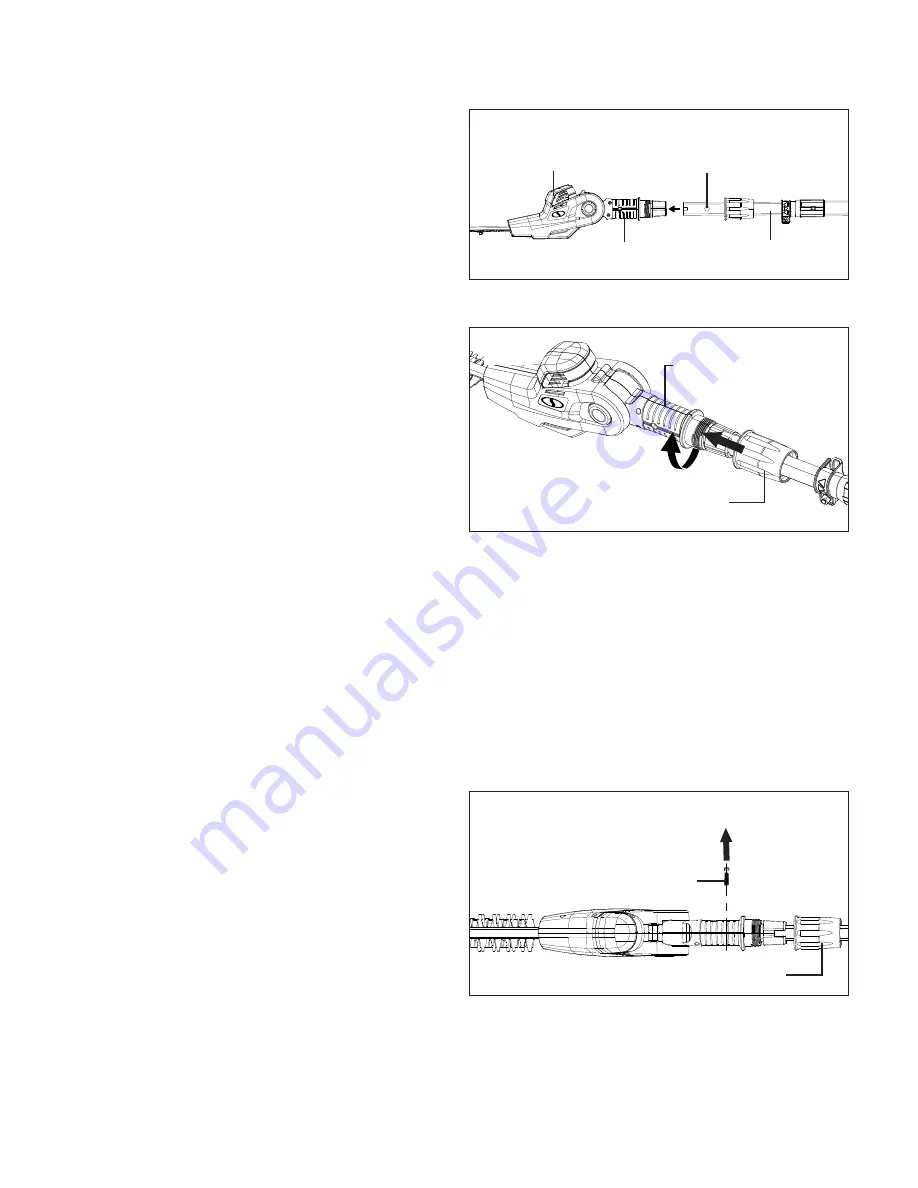
1.  Align the telescoping pole with the trimmer head. 
2.  Insert the telescoping pole into the trimmer head locking 

base until the lock holes click into place (Fig. 1).

3.  Slide the locking knob onto the locking base and turn 

clockwise to secure (Fig. 2).

4.

  Make sure the rear handle is properly aligned with the 

blade.

m

WARNING!

 Make sure the telescoping pole is inserted 

to a full stop and the locking knob is properly tightened before 

using the pole hedge trimmer.

m

WARNING!

 Failure to lock the telescoping pole as 

directed above could result in serious injury or death.
NOTE: To disassemble the unit, screw the locking knob 

counterclockwise to unlock the trimmer head, and remove the 

screw on the lock base with a screwdriver. Then the trimmer 

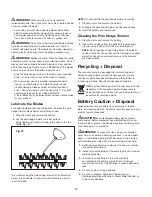
head can be pulled out from the pole (Fig. 3). 

Locking base

Lock hole

Trimmer head

Telescoping pole

Fig. 1

Fig. 2

Locking base

Locking knob

Fig. 3

Screw

Locking knob

Summary of Contents for Sunjoe 20ViONLTE-PHT17-RM

Page 1: ...ts reserved Original instructions SAVE THESE INSTRUCTIONS 1 A Division of Snow Joe LLC OPERATOR S MANUAL Model 20ViONLTE PHT17 RM Form No SJ 20ViONLTE PHT17 RM 880E M V1 R CORDLESS POLE HEDGE TRIMMER 20 VOLT MAX RECHARGEABLE 17 INCH ...

Page 2: ... which it was intended 6 Avoid accidental starting Do not carry the pole hedge trimmer with your finger on the switch Make sure the switch is off before inserting the battery mCAUTION Moving parts will continue to run for several seconds after turning off the machine 7 Moving parts Keep hands and feet away from moving parts Keep guards in place and in proper working order 8 Do not force the tool I...

Page 3: ... tool that cannot be controlled with the switch is dangerous and must be repaired 12 Use the pole hedge trimmer and accessories in accordance with these instructions taking into account the working conditions and the work to be performed Use of the power tool for operations different from intended use could lead to a hazardous situation Training 1 Read the instructions carefully Be familiar with t...

Page 4: ...intended by its design and these instructions 2 Ensure that the product is in good condition and well maintained 3 Use correct attachments for the product and ensure they are in good condition 4 Keep tight grip on the handles grip surface 5 Maintain this product in accordance with these instructions and keep it well lubricated where appropriate 6 Plan your work schedule to spread any high vibratio...

Page 5: ...amage or stress when the charger is in use Do not use the charger with a damaged cord or plug Replace a damaged charger immediately Do not use an extension cord unless it is absolutely necessary Using the wrong damaged or improperly wired extension cord poses a risk of fire and electric shock If an extension cord must be used plug the charger into a properly wired 16 gauge or larger extension cord...

Page 6: ...itch any more if the protective cut off has been activated This may damage the battery pack 11 Use only original battery packs The use of other batteries poses a fire risk and may result in injuries or an explosion Information about the charger and the charging process 1 Please check the data marked on the rating plate of the battery charger Be sure to connect the battery charger to a power supply...

Page 7: ...sure to direct sunlight will result in overheating and cell damage Never charge or work with batteries that have been overheated replace them immediately if possible 7 Store the charger and your cordless tool only in dry locations with an ambient temperature of 50 F 104 F 10 C 40 C Store your lithium ion battery pack in a cool dry place at a temperature of 50 F 68 F 10 C 20 C Protect the battery p...

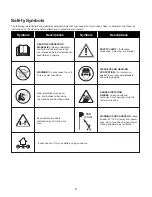
Page 8: ...empting to assemble and operate WARNING Do not expose the unit to rain or wet conditions WEAR EYE AND HEARING PROTECTION For protection against injury wear ear defenders and safety goggles Wear protective gloves and non slip footwear when using the machine and handling debris DANGER ROTATING BLADES Keep hands and feet away from openings while the trimmer is running Keep bystanders a safe distance ...

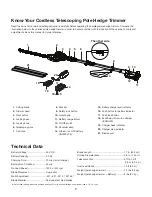
Page 9: ... 16 Push button for battery indicator 17 Push lock button 18 EcoSharp lithium ion charger iCHRG20 19 Charger base indicator 20 Charger plug indicator 21 Blade cover Technical Data Battery Voltage 20 V D C Battery Capacity 2 0 Ah Charging Time 70 min for full charge Battery Run Time Max 45 min No Load Speed 1200 10 rpm Blade Movement Dual action Multi Angle Head 90º 60º 30º 0º 30º 60º Blade Materia...

Page 10: ...led with damaged parts Follow the assembly instructions step by step and use the figures provided as a visual guide to easily assemble the pole hedge trimmer Do not connect the pole hedge trimmer to the power supply before it is completely assembled NOTE Take care of small parts that are removed during assembly or when making adjustments Keep them secure to avoid loss Assembling the Tool The teles...

Page 11: ...um 3 level monitoring LEDs are lit Battery charge level is high 2 level monitoring LEDs are lit Battery charge level is decreasing Stop work as soon as possible 1 level monitoring LED is lit Battery is flat Stop work IMMEDIATELY and charge the battery Otherwise the battery s service life will be greatly shortened NOTE If the charge level button does not appear to be working place the battery pack ...

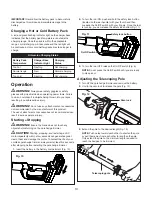
Page 12: ...te that the battery is charging Fig 8 4 When the charger base light turns green the battery is fully charged Fig 8 NOTE If the charger plug light remains green while the charger base light alternately flashes red and green this indicates a temperature abnormality i e that the battery pack is either too hot or too cold 5 A fully discharged pack with an internal temperature in the normal range will ...

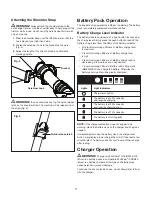
Page 13: ...ds can generate a great deal of heat and damage the motor To protect the life of your cordless pole hedge trimmer always wait at least five seconds after stopping before restarting the pole hedge trimmer 1 Insert the battery in the battery compartment Fig 10 2 To turn the tool ON push and hold the safety lock button located on the rear handle with your thumb and then squeeze the On Off switch with...

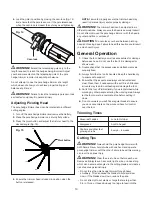
Page 14: ...neral Operation 1 Check the tool battery as well as accessories for damage before each use Do not use the tool if it is damaged or shows wear 2 Double check that the accessories and attachments are properly fixed 3 Always hold the tool on its handles Keep the handles dry to ensure safe support 4 Ensure that the air vents are always unobstructed and clear Clean them if necessary with a soft brush B...

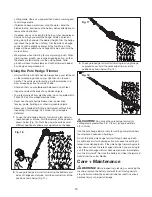
Page 15: ...lines fencing posts buildings or other immovable objects Never use a blade after hitting a hard object without first inspecting it for damage Do not use if any damage is detected 1 To use the pole hedge trimmer for trimming tall hard to reach hedges or shrubs hold the trimmer at the position shown below Fig 16 Pivot the power head to several different positions to shape or sculpt shrubs or hedges ...

Page 16: ...d remove the battery 2 Lubricate the pole hedge trimmer as described above 3 Insert the battery and resume use Cleaning the Pole Hedge Trimmer 1 Stop the motor and remove the battery 2 Clean dirt and debris from the body of the pole hedge trimmer using a damp cloth with a mild detergent NOTE Do not use any strong detergents on the plastic housing or the handle as they can be damaged by certain aro...

Page 17: ...y these numbers into the space provided below iCHRG20 Federal Communications Commission FCC mWARNING Any changes or modifications to this unit not expressly approved by the party responsible for compliance could void the user s authority to operate the equipment Class B device NOTE This equipment has been tested and found to comply with the limits for a Class B digital device pursuant to part 15 o...

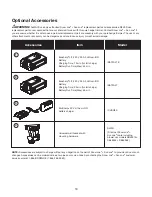
Page 18: ...coSharp 20 V Lithium iON battery charger iCHRG20 3 4 Ecosharp LITE 20 V 2 0 Ah Lithium iON Battery Charging Time 70 min for full charge Battery Run Time Max 45 min iBAT20 LT Ecosharp LITE 20 V 2 5 Ah Lithium iON Battery Charging Time 90 min for full charge Battery Run Time Max 55 min Universal wall bracket with mounting hardware SJWB Fits most Snow Joe Sun Joe tools including blower vac models SBJ...

Page 19: ...hall be construed as obligating Snow Joe Sun Joe to incorporate such design changes into previously manufactured products nor shall such changes be construed as an admission that previous designs were defective This warranty is intended to cover product defects only Snow Joe LLC is not liable for indirect incidental or consequential damages in connection with the use or misuse of the Snow Joe Sun ...

Page 20: ...sunjoe com ...
Reviews: