background image

11

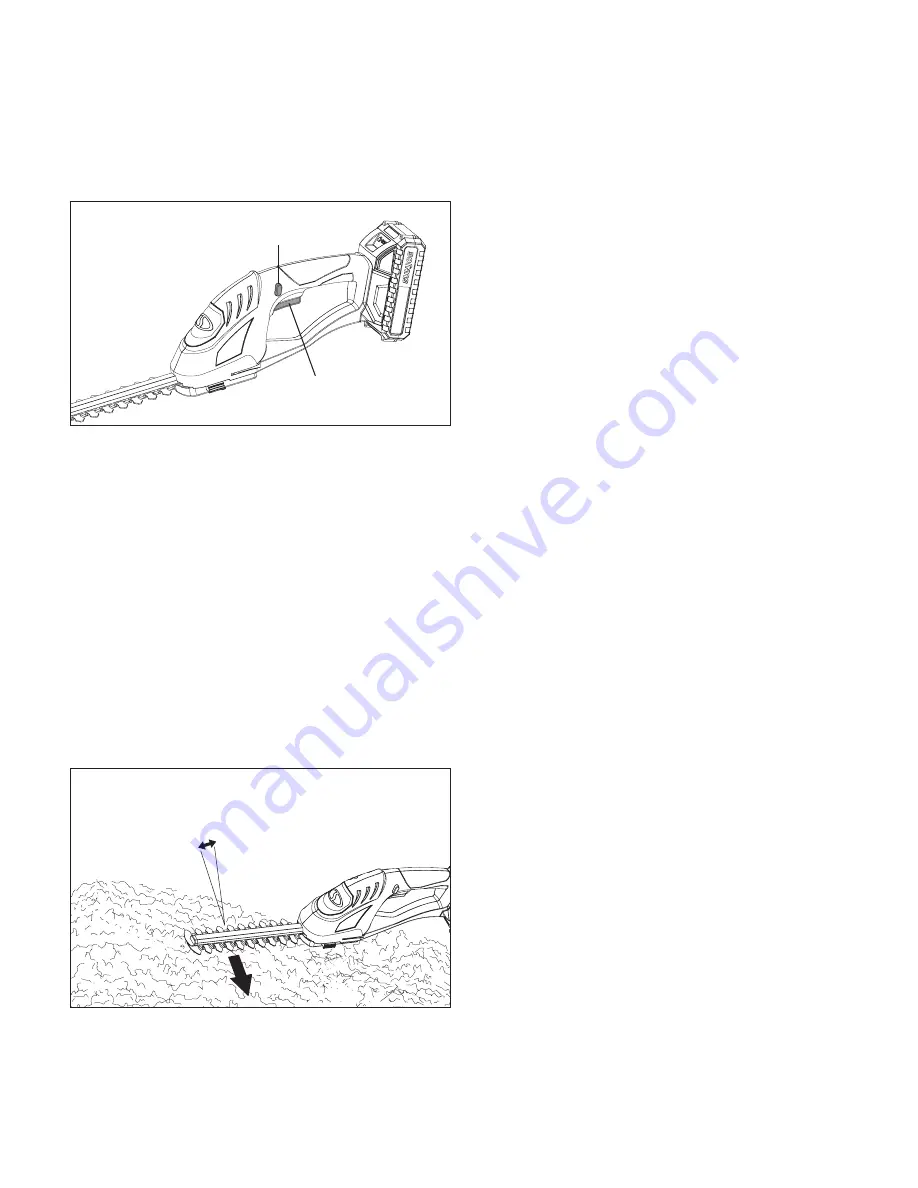
2.  To power ON, push and hold the safety lock button with 

your thumb, while pressing the ON/OFF trigger switch 

with your forefinger. Once the trigger switch engages, 

you can release the safety lock button and proceed with 

operation (Fig. 9).

NOTE: The safety lock button reduces the risk of accidental 

starting. 

3.  To power OFF, simply release the ON/OFF trigger switch 

(Fig. 9).

m

CAUTION!

 Do not force the blades through dense 

growth. If the blades slow down, then reduce your cutting 

pace. Should the blades jam, release the trigger immediately. 

Do not use your fingers to free up jammed blades. 


Jammed blades can release suddenly causing serious injury.

m

CAUTION! 

Always ensure proper footing and balance 

in a clean and clear work environment before switching on the 

cordless hedge trimmer.

Trimming Tips

NOTE: Try to keep the cutting device angled at approximately 

15° to the cutting surface (Fig. 10).

1. 

Shaping –

 A hedge should be trimmed to achieve a 

trapezoidal form; it should widen toward the bottom on 

both sides. Shaping a hedge in this manner improves the 

penetration of light to the lower extremities. A general 

guideline is to slant the hedge approximately 4 in. (10 cm) 

for each 39 in. (1 m) of hedge height.

2. 

Cutting Sequence – 

First cut both sides; start at the 

bottom and work towards the top. This prevents cuttings 

from falling into an area that you have yet to trim.

3. 

Trimming the Top – Where the branches have grown 

extremely long, cut back the hedge in several stages.  

The shorter cuttings obtained are best suited for 

composting.

4. 

Pruning Thick Branches – When older hedges are to be 

cut a substantial amount, use pruning shears or some 

other device to trim thicker branches (greater than 0.3 in. 

[8 mm] in diameter) to the desired length before starting 

work with the hedge trimmer.

  To shape precisely, run a taught line between the extreme 

edges of the hedge and then trim along the length of the 

line.

  Ensure that the blade does not come into contact with 

any object made of hard material that could damage it, 

such as fencing wire or metallic plant supports.

Maintenance

m

WARNING! 

Always switch the product off and let the 

product cool down before performing inspection, maintenance 

and cleaning work. 

1.  Keep the ventilation vents of the tool clean at all times.  

If possible, prevent foreign matter from entering the vents.

2.  If the enclosure of the trimmer requires cleaning, do not 

use solvents to clean it. Only use a moistened soft cloth. 

Never let any liquid get inside the tool; and never immerse 

any part of the tool into a liquid. 

3.  The blade rail should be cleaned and treated with light 

machine oil or spray lubricant (such as WD40, CRC 5.56 

or RP7) after each use. When a job lasts for a long period 

of time, it is recommended that the blade rail also be 

treated with spray lubricant at regular intervals during 

operation. 

4.  Inspect the product before each use for worn and 

damaged parts. Do not operate it if you find broken and 

worn parts. 

Fig. 9

ON/OFF 

trigger switch

Safety lock button

Fig. 10

15°

Summary of Contents for Sunjoe 24V-SSEG-LTE

Page 1: ...tool Distractions can cause you to lose control Electrical Safety 1 Power tool plugs must match the outlet Never modify the plug in any way Do not use any adapter plugs with earthed grounded power tools Unmodified plugs and matching outlets will reduce risk of electric shock 2 Avoid body contact with earthed or grounded surfaces such as pipes radiators ranges and refrigerators There is an increase...

Page 2: ...p and clean Properly maintained cutting blades with sharp edges are less likely to bind and are easier to control 7 Use the power tool accessories and tool bits etc in accordance with these instructions taking into account the working conditions and the work to be performed Use of the power tool for operations different from those intended could result in a hazardous situation Battery Tool Use and...

Page 3: ... charge it at room temperature Maintain charger cord When unplugging the charger pull the plug not the cord from the receptacle to reduce the risk of damage to the electrical plug and cord Never carry the charger by its cord or yank it by the cord to disconnect it from the receptacle Keep the cord away from heat oil and sharp edges Make sure the cord will not be stepped on tripped over or subjecte...

Page 4: ...ry disposal 10 If the battery pack suffers overloading and overheating the integrated protective cutoff will switch off the equipment for safety reasons IMPORTANT Do not press the ON OFF switch any more if the protective cut off has been activated This may damage the battery pack 11 Recharge only with the charger specified by the manufacturer A charger that is suitable for one type of battery pack...

Page 5: ...l and the battery charger from moisture and rain Moisture and rain can cause dangerous cell damage 3 Do not use the cordless tool or the battery charger near vapors and flammable liquids 4 Use the battery charger and cordless tools only in dry conditions and at an ambient temperature of 41ºF 105 F 5 C 40 5 C 5 Do not keep the battery charger in places where the temperature is liable to reach over ...

Page 6: ...icates a precaution a warning or a danger WARNING Do not expose the unit to rain or wet conditions Keep dry Symbols Symbols Descriptions Descriptions Wear protective gloves and non slip footwear when using the machine and handling debris Thrown objects and rotating blade can cause severe injury Only use battery charger indoors Risk of Injury Use safety glasses hearing protection and dust mask DANG...

Page 7: ...6 V DC 450 mA Charge Time Max 5 hours Blade Length 7 in 18 cm Blade Material 65Mn steel blades Cutting Diameter Max 0 3 in 7 8 mm No Load Speed 1150 rpm Weight with battery installed 3 1 lbs 1 4 kg Initial no load voltage when fully charged peaks at 24 volts nominal voltage under typical load is 21 6 volts 1 Hedge trimmer blades 2 Motor housing 3 Safety lock button 4 Hedge trimmer handle 5 ON OFF ...

Page 8: ...harge level is decreasing Stop work as soon as possible 1 level monitoring LED is lit Battery is flat Stop work IMMEDIATELY and charge the battery Otherwise the battery s service life will be greatly shortened NOTE If the charge level button does not appear to be working insert the charger and charge as needed NOTE Immediately after using the battery pack the charge level button may display a lowe...

Page 9: ... recharging of the battery will help prolong the battery s life You must recharge the battery pack when you notice a drop in the equipment s power IMPORTANT Never allow the battery pack to become fully discharged as this will cause irreversible damage to the battery Assembly mWARNING Always remove battery pack from the tool when you are assembling parts making adjustments cleaning or when not in u...

Page 10: ...JOE 1 866 766 9563 for assistance Operation IMPORTANT The product is intended for light duty trimming of shrubs for residential properties mWARNING The blades continue to move for a few seconds after the tool is switched OFF Turn OFF the tool and wait until the blades come to a complete stop before adjusting or cleaning mCAUTION Never touch the blade or blade rail while the tool is in operation an...

Page 11: ...es have grown extremely long cut back the hedge in several stages The shorter cuttings obtained are best suited for composting 4 Pruning Thick Branches When older hedges are to be cut a substantial amount use pruning shears or some other device to trim thicker branches greater than 0 3 in 8 mm in diameter to the desired length before starting work with the hedge trimmer To shape precisely run a ta...

Page 12: ...ld cause a fire or explosion mWARNING To reduce the risk of injury or explosion never burn or incinerate a battery pack even if it is damaged dead or completely discharged When burned toxic fumes and materials are emitted into the surrounding atmosphere 1 Batteries vary according to device Consult your manual for specific information 2 Install only new batteries of the same type in your product wh...

Page 13: ...e the model and serial numbers of your product These are found on the decal affixed to the housing or handle of your cordless hedge trimmer Copy these numbers into the space provided below Record the following numbers from the housing or handle of your new product Model Serial 2 4 V S S E G L T E ...

Page 14: ... Snow Joe Sun Joe customer service center at 1 866 SNOWJOE 1 866 766 9563 iON 24V 2 0 Ah Lithium Ion Battery Battery Charge Time Max Charge times vary by charger See website for details Battery Runtime Max 1 hr 15 min iON 24V 2 5 Ah Lithium Ion Battery Battery Charge Time Max Charge times vary by charger See website for details Battery Runtime Max 1 hr 30 min iON 24V 4 0 Ah Lithium Ion Battery Bat...

Page 15: ... the owner s manual Snow Joe Sun Joe will not be responsible for the cost of any unauthorized warranty repairs This warranty does not cover any cost or expense incurred by the purchaser in providing substitute equipment or service during reasonable periods of malfunction or non use of this product while waiting for a replacement part or unit under this warranty Wearing parts like belts augers chai...

Page 16: ...sunjoe com ...

Reviews: