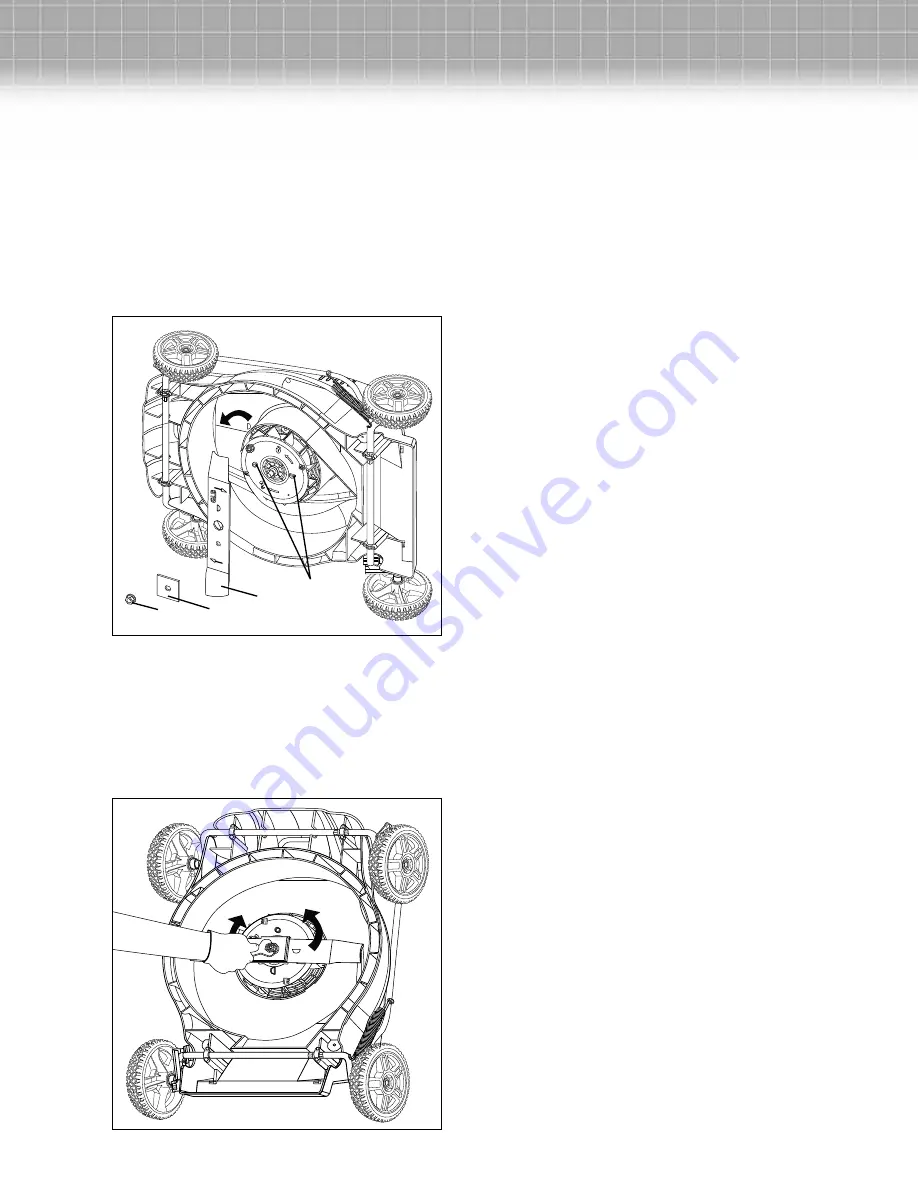
2.
While wearing leather padded gloves, wedge a block
of wood between the blade and the mower deck in
order to prevent the blade from turning when the nut
is being removed.
3.
Using a 15-mm wrench or socket, loosen the blade
nut (1) “COUNTERCLOCKWISE” to loosen it and
“CLOCKWISE” to tighten it.
4.
Remove the blade nut (1), the square washer (2), and
the blade (3).
5.
To re-install the blade, position the blade with the
cutting edges toward the ground and align the blade
on the alignment tabs (one round and one semi-round).
NOTE:
The blade can only be placed one way for a
proper and correct fit. Assemble the blade, the square
washer and the blade nut as shown in the following.
Using a 15-mm wrench or socket, turn the blade nut
“CLOCKWISE” to secure the blade.
NOTE:
Be sure to replace the parts in the exact order in which
they were removed. When installing the cutting blade, verify
that it is installed with the curved ends pointing toward the
mower deck.
Cleaning the Mower
m
WARNING:
To reduce the risk of electric shock, do not
expose the mower to water.
The underside of mower deck should be cleaned after each
use as grass clippings, leaves, dirt and other debris will
accumulate causing rust and corrosion.
Remove any buildup of grass and leaves on or around the
motor cover (do not use water). Wipe the mower clean with a
dry cloth occasionally.
• If debris build up on the underside of the unit while using,
stop the motor and disconnect it from the power supply.
Tilt the mower forward, or on its side, and scrape it clean
with an appropriate tool.
Storage
The following steps should be taken to prepare the lawn
mower for storage.
• Make certain the power cord is disconnected.
• Clean mower as instructed in previous section.
• Inspect and replace or sharpen blade. Refer to the
Maintenance section.
• Store mower in a dry, clean area. Do not store next to
corrosive materials, such as fertilizer or rock salt.
• Store mower indoors, in a cool, dry place, out of reach
of children. Do not cover lawn mower with a solid plastic
sheet. Plastic coverings trap moisture around the mower
causing corrosion.
• The handle may be folded away completely for storage.
• Loosen the handle knobs on the sides of the handles, and
fold the upper handle down.
• Loosen the handle knobs, pull outwards on each side of
the lower handle, and lift the sides of the lower handle
past the edges of the handle mounting brackets. Fold the
lower handle forward. Make sure not to bend or kink the
power cord.
9
Tighten
Loosen
Fig. 11
Fig. 10
3
Alignment
tabs
2
1
Summary of Contents for SUNJOE MJ409C
Page 11: ...NOTES 11 ...


