background image

9

m

WARNING!

 Damaged cords pose a severe risk of injury.

Replace damaged cords immediately.

1.

Place the unit on a level lawn surface.

2.

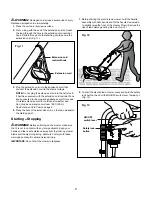
Form a loop with the end of the extension cord and push

the loop through the hole in the extension cord restraint

hook. Slide the loop onto the retaining clip to secure the

extension cord (Fig. 11).

3.

Plug the extension cord into the appliance cord, then

connect the extension cord to the mains voltage.

NOTE: 

Do not plug the extension cord into the outlet until

it had been secured with the extension cord restraint hook

and connected to the mower's appliance cord. Only use a

UL-rated extension cord for outdoor, all-weather use.

Do not use an extension cord over 100 ft (30 m).

See Extension Cord Chart on page 2.

4.

Place the bulk of the extension cord on the lawn closest to

the starting point.

St Stopping

m

WARNING!

 Before switching on the mower, make sure

that it is not in contact with any foreign objects. Keep your 

hands and feet a safe distance away from the rotating mower 

blade and the ejector opening. Failure to comply with these 

warnings can result in severe personal injury.

IMPORTANT: 

Do not start the mower in tall grass.

1.

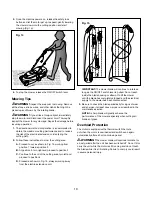
Before starting the electric lawn mower, hold the handle

assembly with both hands and tilt the handle downwards

to slightly raise the front of the mower. This will reduce the

risk of lawn damage during start-up (Fig. 12).

2.

To start the electric lawn mower, press and hold the safety

lock button, then pull the ON/OFF switch lever toward you

(Fig. 13).

Fig. 11

Extension cord 

restraint hook

Extension cord

Fig. 12

STAR

T

STOP

Fig. 13

ON/OFF 

switch lever

Safety lock 

button

Summary of Contents for SUNJOE MOW JOE MJ401E-PRO

Page 1: ...he plug still does not fit obtain a correct polarized extension cord A polarized extension cord will require the use of a polarized wall outlet There is only one way the plug will fit into a polarized wall outlet If the plug does not fit fully into the wall outlet reverse the plug If the plug still does not fit contact a qualified electrician to install the proper wall outlet Do not change the equ...

Page 2: ... fit fully into the extension cord reverse the plug If the plug still does not fit obtain a correct polarized extension cord A polarized extension cord will require the use of a polarized wall outlet The extension cord plug will fit into the polarized wall outlet only one way If the plug does not fit fully into the wall outlet reverse the plug If the plug still does not fit contact a qualified ele...

Page 3: ...air any damage before restarting and operating the lawn mower Only use identical replacement blades Slope Operation Slopes are major factors related to slip and fall accidents which can result in severe injury Operation on all slopes requires extra caution If you feel uneasy on a slope do not mow it Mow across the face of slopes never mow slopes following an up and down traverse Exercise extreme c...

Page 4: ...azard Use extra caution when mowing on slopes to prevent slip and fall accidents Double Insulation Severing of toes or fingers by rotary mower blade Thrown objects and rotating blade can cause severe injury Wear eye and hearing protection For protection against injury wear ear defenders and safety goggles Keep bystanders and children a safe distance away CPSC Danger label Symbols Symbols Descripti...

Page 5: ...lever 2 Safety lock button 3 Overload circuit reset button 4 Extension cord restraint hook 5 Cable clip 6 Top cover 7 Upper handle 8 Appliance cord 9 Upper handle knob and bolt 10 Lower handle 11 Ejector flap 12 Grass bag 13 Mower deck 14 Wheel 15 Side discharge chute Technical Data Rated Voltage 120 V 60 Hz Power 13 A No Load Speed 3 500 rpm Rotor 14 in 35 6 cm steel blade Cutting Width 14 in 35 ...

Page 6: ...packaging material are not toys Do not let children play with plastic bags foils or small parts These items can be swallowed and pose a suffocation risk Assembly NOTE Before using the mower follow these instructions to assemble the handle the grass bag and the side discharge chute Handle Assembly 1 Fit the lower handle into the two holes in the machine body and fasten the handle on both sides with...

Page 7: ...e ejector flap to secure the grass bag in position Fig 7 Side discharge Chute Assembly Fitting The side discharge chute sweeps grass clippings swiftly from the cutting chamber enabling you to cut taller grass without clogging the mower deck m CAUTION m The grass bag and the side discharge chute cannot be used together Fig 4 Support rod Plastic cover Protective plastic strap Fig 5 Support rod Prote...

Page 8: ...ONS LISTED PREVIOUSLY IN THIS MANUAL 1 Power off and unplug the lawn mower 2 Remove and empty the grass bag 3 Place the lawn mower on its side 4 The rod axles can be placed into 3 different cutting heights low will cut grass the shortest medium and high Fig 10 3 Position Height Adjustment 1 Low 1 18 in 30 mm 2 Medium 1 93 in 49 mm 3 High 2 52 in 64 mm The cutting height tolerance is 0 2 in 5 mm 5 ...

Page 9: ...ension Cord Chart on page 2 4 Place the bulk of the extension cord on the lawn closest to the starting point Starting Stopping mWARNING Before switching on the mower make sure that it is not in contact with any foreign objects Keep your hands and feet a safe distance away from the rotating mower blade and the ejector opening Failure to comply with these warnings can result in severe personal injur...

Page 10: ...tinue to the end of the cutting area turn left and proceed to position 4 D Proceed as shown in Fig 15 always working away from the electric extension cord IMPORTANT The mower blade will continue to rotate as long as the ON OFF switch lever is pulled Do not reach inside the blade housing or attempt to lift the mower until the blade has completely stopped and the electrical supply to the mower has b...

Page 11: ...tenance IMPORTANT The mower blade is sharp and can cause severe personal injury if handled incorrectly Wrap the blade or wear protective gloves and use extra caution when handling The steel blade is designed to provide a fine cut in long or tough grass Deterioration in the quality of cut indicates blade wear or damage Follow these steps to determine if the blade needs to be resharpened or replaced...

Page 12: ...reign substances such as oil or stains Replace the extension cord immediately if it is cut or damaged in any way 6 Wind the cord in a series of equal loops to prevent it from tangling 7 Do not cover the lawn mower with a solid plastic sheet Plastic coverings trap moisture around the mower which can damage the unit 8 The handle on your lawn mower can be folded for compact storage Start by loosening...

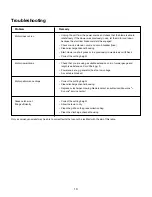
Page 13: ... extension cord and circuit breaker fuse Clean discharge channel housing Start mower on short grass or in a previously mowed area and tilt back Correct the cutting height Check that you are using a suitable extension cord of proper gauge and length see Extension Cord Chart pg 2 Power source e g generator has too low voltage Air vents are blocked Correct the cutting height Clean discharge channel h...

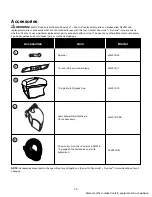
Page 14: ... attachment or accessory can be dangerous and could cause injury or mechanical damage NOTE Accessories are subject to change without any obligation on the part of Snow Joe Sun Joe to provide notice of such changes Spanner 14 inch 35 6 cm mower blade 10 6 gallon 40 l grass bag MJ401E 44 MJ401E 11 MJ401E 10 Model Accessories Item 1 2 3 4 Lawn Mower Side Discharge Chute Accessory MJ401E DCA 5 Snow Jo...

Reviews: