background image

16

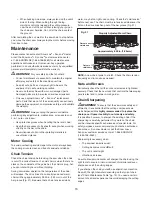
  When bucking on a slope, always stand on the uphill  


side of the log. When cutting through the log,  


maintain control by releasing the cutting pressure  


near the end of the cut without relaxing your grip on  


the chain saw handles. Do not let the chain contact  

 the ground.

After completing the cut, wait for the saw chain to stop before 

you move the chain saw. Always stop the motor before moving 

from tree to tree.

Maintenance

Please contact an authorized Snow Joe

®

 + Sun Joe

®

 dealer 

or call the Snow Joe

®

 + Sun Joe

®

 customer service center 

at 1-866-SNOWJOE (1-866-766-9563) for all maintenance 

operations not foreseen in this manual. Any operation 

performed in an unauthorized service center or by unqualified 

personnel will completely invalidate the warranty.

m

WARNING!


For your safety and that of others:

• 

Correct maintenance is essential to maintain the original 

efficiency and safety of the machine over time.

• 

Keep all nuts, bolts, and screws tight to be sure the 

equipment is in safe working condition.

• 

Never use the machine with worn or damaged parts. 

Damaged parts are to be replaced and never repaired.

• 

Only use original Snow Joe

®

 + Sun Joe

®

 replacement 

parts. Parts that are not of the same quality can seriously 

damage the equipment, compromise safety, and invalidate 

the warranty.

m

WARNING! 

Always unplug the power cord before 

performing any adjustments, maintenance, or repairs to your 

2-in-1 pole + chain saw.

• 

Use protective gloves when handling the bar and chain.

•  Keep the bar encased in its sheath, except when working 

directly on the bar or the chain.

• 

Never dispose of oils or other polluting materials in 

unauthorized places.

Motor Cooling

To avoid overheating and damage to the motor, always keep 

the cooling air vents clean and free of sawdust and debris.

Chain Tension

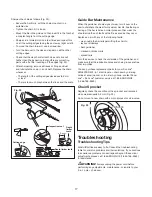
Check the chain tension before using the saw when the chain 

is cold. The correct tension of a cold chain is when there is no 

slack on the underside of the guide bar; the chain is snug, but 

you can rotate it by hand without binding. 
During normal saw operation, the temperature of the chain 

will increase. The drive links of a correctly tensioned warm 

chain will hang approximately 0.050 in. (1.25 mm) out of the 

bar groove (Fig. 31). Be aware that a chain tensioned while 

warm, may be too tight upon cooling. Check the “cold tension” 

before next use. The chain must be re-tensioned whenever the 

flats on the drive links hang out of the bar groove (Fig. 31).

NOTE:

 A new chain tends to stretch. Check the chain tension 

frequently and re-tension as needed.

Nuts and Screws

Periodically check that all the nuts and screws are tightened 

securely. Check that the cam-lock that controls the telescoping 

pole is intact and in proper working order.

Chain Sharpening

m

WARNING! 

To ensure that the saw works safely and 

efficiently, it is essential that the cutting components are 

well-sharpened. 

It is highly recommended to replace the 

chain once it loses its ability to cut cleanly and safely.


It is possible, however, to sharpen the existing chain if the 

sharpening is carefully performed. Any work on the chain  

and bar requires specific experience and special tools. For 

safety purposes, we recommend you contact an authorized 

Snow Joe

®

 + Sun Joe

®

 dealer or call the Snow Joe

®

 +  

Sun Joe

®

 customer service center at 1-866-SNOWJOE  

(1-866-766-9563).
Sharpening is necessary when:

•  The sawdust looks like dust;
• 

Cutting

 becomes more difficult

;

• 

The cut is not straight;

• 

Vibrations increase.

An authorized service center will sharpen the chain using the 

right tools to ensure minimum removal of material and even 

sharpness on all the cutting edges.
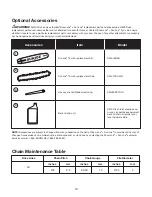
If you sharpen the chain yourself, use special round-section 

files with the right diameter depending on the type of chain 

(see “Chain Maintenance Table” pg. 19). You need a certain 

amount of skill and experience to avoid damaging the cutting 

edges.

Fig. 31

Properly Adjusted Warm Chain

Approximately .050 in. (1.25 mm)

Flats are  

visible here

Flats are not 

visible here

Chain Needs Tensioning

Summary of Contents for SUNJOE SWJ807E-RM

Page 1: ...o make sure you get the most out of your product be sure to register online at to enjoy full product support PASTE UPC LABEL HERE A Division of Snow Joe LLC Model SWJ807E RM Form No SJ SWJ807E RM 880E V1 R OPERATOR S MANUAL 2 IN 1 ELECTRIC POLE CHAIN SAW 10 INCH 8 AMP ...

Page 2: ...gloves substantial non skid footwear and close fitting clothing is recommended when working outdoors with power tools 10 Wear protective hair coverings to contain long hair 11 Always wear safety glasses and ear defenders to provide eye and ear protection Everyday eyeglasses only have impact resistant lenses and do not provide the same protection as safety glasses 12 Wear face or dust masks If the ...

Page 3: ...t oil and sharp edges Specific Safety Rules mWARNING SHOCK HAZARD To protect yourself from electrocution do not operate the 2 in 1 pole chain saw within 50 ft 15 m of overhead wires Failure to follow this instruction could result in severe personal injury Operating Tips for Pole Chain Saws Note the extension cord s location relative to the tool While operating the pole chain saw be careful not to ...

Page 4: ... storing the chain saw always fit the guide bar cover Proper handling of the chain saw will reduce the likelihood of accidental contact with the moving saw chain Follow instructions for lubricating chain tensioning and changing accessories An improperly tensioned or poorly lubricated chain may either break or increase the chance for kickback Keep handles dry clean and free from oil and grease Grea...

Page 5: ...iques Ensure safe carrying of the unit Whenever the machine is to be handled or transported you must Switch off the motor and wait for the chain to come to a complete stop Mount the guide bar cover Hold the machine using the hand grips and position the bar in the opposite direction to that used during operation When using a vehicle to transport the machine fasten the tool firmly and position it so...

Page 6: ...ION Avoid contacting the guide bar tip with any object Tip contact may cause the guide bar to move suddenly upward and backwards which may cause serious injury to the user WEAR EYE AND HEARING PROTECTION For protection against injury wear ear defenders and safety goggles WARNING SHOCK HAZARD Keep at least 50 ft 15 m away from power lines Do not overreach Keep proper footing and balance at all time...

Page 7: ...t to 8 8 ft 2 m to 2 7 m Overhead Reach Max 15 ft 4 6 m Oil Tank Capacity 2 fl oz 60 ml Weight pole chain saw 8 4 lbs 3 8 kg Weight chain saw 5 5 lbs 2 5 kg 1 10 in cutting chain 2 10 in guide bar 3 End cover nut 4 Front hand guard 5 Chain sprocket end cover 6 Front hand grip 7 Removable cutting head 8 Cutting head lock 9 Cam lock for telescoping pole 10 Oil tank cap 11 Oil level indicator window ...

Page 8: ...nd efficiency of the machine If in doubt contact an authorized Snow Joe Sun Joe dealer or call the Snow Joe Sun Joe customer service center at 1 866 SNOWJOE 1 866 766 9563 mWARNING Unpacking and assembly should be completed on a flat and stable surface with adequate space for moving the machine and its packaging mDANGER Never start the motor before installing the guide bar chain and chain cover Wi...

Page 9: ...ll not cut 6 Hold the chain in position on the bar and place the loop around the sprocket Fit the bar flush against the mounting surface so that the bar studs are in the long slot of the bar and the adjusting pin is in the chain tension pin hole Fig 7 7 Adjust the chain tension as needed by adjusting the chain tensioner screw with the supplied flat tip blade screwdriver Make sure to align the chai...

Page 10: ... required Pole Chain Saw Assembly The machine comes in the chain saw mode To convert it to a pole chain saw follow the instructions below 1 Pull the handle lock toward you Fig 10 2 While pulling the handle lock use the other hand to grasp the front hand grip and slide the removable cutting head up to remove it Fig 11 3 Connect the removable cutting head and the telescoping pole by aligning the the...

Page 11: ...ing and restarting an electric motor repeatedly within a few seconds can generate a great deal of heat and damage the motor To protect the life of your 2 in 1 electric pole chain saw always wait at least five seconds after stopping before restarting the saw mWARNING Be sure that the chain is not in contact with any object when you start the motor mWARNING Keep hands away from chain Keep hands on h...

Page 12: ... the chain is lightly lubricated this wiell prevent rust on the chain and bar sprocket mWARNING Be aware of the cord while operating the saw Keep the cord away from the chain Be careful not to trip over the extension cord 1 Prior to each cutting session run through the daily checklist see pg 18 2 Connect the 2 in 1 electric pole chain saw to a working 120 V outlet using a heavy duty outdoor extens...

Page 13: ...ng pole in place To tighten the bolt unclip the cam lock Using the hex key wrench tighten the cam lock nut then close the cam lock Ensure that the pole is secure The wrench may be required to loosen the cam lock nut if you need to adjust the pole to a different height Fig 23 Cutting Tips for Pole Chain Saw Proper Cutting Stance Balance your weight with both feet on solid ground Your body should al...

Page 14: ...gh for your first cut Your second cut should over cut to drop the branch off Fig 25 Be prepared to balance the weight of the pole chain saw when the limb falls Now make your finishing cut from the topside of the branch smoothly and neatly against the main member so the bark will grow back to seal the wound Release the trigger ON OFF switch as soon as the cut is completed Failure to follow proper c...

Page 15: ...d The escape path should extend back and diagonally to the rear of the expected line of fall as illustrated Fig 27 Before felling is started consider the natural lean of the tree the location of larger branches and the wind direction to help you judge which way the tree will fall Remove dirt stones loose bark nails staples and wire from the tree Notching undercut Make the notch 1 3 the diameter of...

Page 16: ...s Follow these simple directions for easy cutting When the log is supported along its entire length as illustrated Fig 30A cut from the top overbuck When the log is supported on one end Fig 30B cut 1 3 the diameter from the underside underbuck Then make the finishing cut by overbucking to meet the first cut When the log is supported on both ends Fig 30C cut 1 3 the diameter from the top overbuck T...

Page 17: ...hen there is no slack on the underside of the guide bar the chain is snug but you can rotate it by hand without binding During normal saw operation the temperature of the chain will increase The drive links of a correctly tensioned warm chain will hang approximately 0 050 in 1 25 mm out of the bar groove Fig 31 Be aware that a chain tensioned while warm may be too tight upon cooling Check the cold...

Page 18: ...ear You should smooth such faults with a file as soon as they occur Replace a bar with any of the following faults wear inside the bar rails permitting the chain to lay over sideways bent guide bar cracked or broken rails spread rails Turn the saw over check the underside of the guide bar and make sure that the lubrication holes and chain groove are free from impurities You can purchase replacemen...

Page 19: ...VER immerse any part of the saw housing in liquid Storage Ensure that the guide bar cover is in place when storing Do not store the 2 in 1 pole chain saw near chemicals such as fertilizers or other harsh solvents Do not expose the plastic parts of the unit to brake fluids gasoline petroleum based products penetrating oils or the like These products are often highly corrosive and may cause permanen...

Page 20: ...nd chain oil SWJ802E TOOL SWJ OIL sold at snowjoe com or you can purchase equivalent bar and chain oil sold at your local hardware store Model Accessories Item 3 4 1 R Sun Joe 10 inch replacement bar SWJ 10BAR 2 Sun Joe 10 inch replacement chain SWJ 10CHAIN NOTE Accessories are subject to change without any obligation on the part of Snow Joe Sun Joe to provide notice of such changes Accessories ca...

Page 21: ...in this warranty shall be construed as obligating Snow Joe Sun Joe to incorporate such design changes into previously manufactured products nor shall such changes be construed as an admission that previous designs were defective This warranty is intended to cover product defects only Snow Joe LLC is not liable for indirect incidental or consequential damages in connection with the use or misuse of...

Page 22: ...snowjoe com ...

Reviews: