background image

22

23

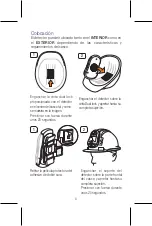
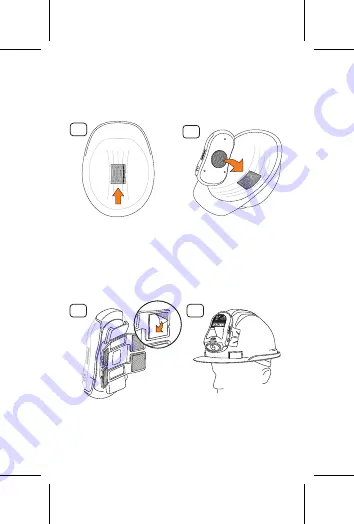
Placement 

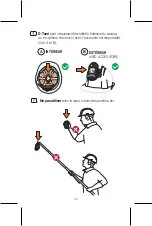
The detector can be placed both 

INSIDE

 and 

OUTSIDE

depending on the characteristics and requirements of the 

helmet.

Fasten the Dual Lock tape 

provided with the detector to 

the centre of the helmet, as 

shown in the picture, and press 

down hard for approximately 

20 seconds.

1

Fasten the detector on the Dual 

Lock tape and press until it is 

completely secured.

2

Remove the protective film from 

the double-sided adhesive.

1

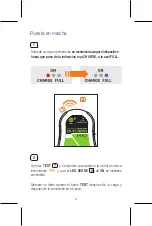
Start-up

Fasten the detector on the Dual 

Lock tape and press until it is 

completely secured. Press down 

hard for approximately 20 

seconds.

2

Summary of Contents for D-TUERI PRO

Page 1: ...CASTELLANO Tel 34 938 087 980 info sofamel es www sofamel com DETECTOR PERSONAL DE CAMPO ELÉCTRICO OMNIDIRECCIONAL ...

Page 2: ...n marche 10 Entrada en funcionamiento del detector 24 Starting up the detector 38 Démarrage du détecteur 10 Entrada en funcionamiento de la linterna 24 Starting up the flashlight 38 Démarrage de la lampe de poche 11 Funcionalidad básica 25 Basic functionality 39 Fonctionnalité élémentaire 12 Indicación de alarma 26 Alarm indication 40 Indication d alarme 14 Características técnicas 28 Technical sp...

Page 3: ...IÓN ENCLAVAMIENTO O BLOQUEO DE LOS APARATOS DE CORTE ATENCIÓN Este dispositivo no es un sustitutivo de ningún procedimiento y o elemento de seguridad ya existente se trata de un complemento adicional de seguridad ANTES DE UTILIZAR ESTE APARATO LEER ATENTAMENTE LAS PRESENTES INSTRUCCIONES 3 ásica y mentaire arma e écnicas ations 1 2 4 5 3 ...

Page 4: ...D Tueri únicamente puede ser utilizado dentro del casco o fuera con su accesorio correspondiente Ver A y B 4 No utilizar con la mano ni pértigas etc INTERIOR A EXTERIOR CON ACCESORIO B ...

Page 5: ...sco A y B Las distancias de alarma pueden verse alteradas por estructuras conductoras y especialmente las conectadas a tierra configuración de la instalación y con movimientos oscilantes barquillas 5 d d d d ...

Page 6: ...as discontinuas cuando los niveles son elevados NO funciona con señales eléctricas DC detrás de estructuras conductoras tales como el cuerpo humano elementos metálicos conectados a tierra árboles y setos cables blindados cables subterráneos etc Ante obstáculos En DC Estructuras metálicas conectadas a tierra ...

Page 7: ... ww w s ofa me l co m DE TE CT OR PE RS ON AL DE CA MP O EL ÉC TR ICO OM NID IRE CC ION AL Detector Sujeción exterior casco Velcro Instrucciones de uso y certificado 7 ctricidad ontinuas etrás de humano y setos Cargador y cable USB Bolsa de transporte ...

Page 8: ...l centro del casco tal y como se muestra en la imagen Presionar con fuerza durante unos 20 segundos 1 Enganchar el detector sobre la cinta Dual lock y apretar hasta su completa sujeción 2 Retirar la película protectora del adhesivo de doble cara 1 Puesta 8 Enganchar el soporte del detector sobre la parte frontal del casco y apretar hasta su completa sujeción Presionar con fuerza durante unos 20 se...

Page 9: ...e la indicación roja CHARGE a la azul FULL Puesta en marcha 2 A T Apretar TEST y comprobar que aparece la señal acústica intermitente y que el LED VERDE de ON se mantiene encendido Siempre se debe apretar el botón TEST después de la carga y después de la colocación en el casco A T 9 orte del rte frontal hasta su a durante ...

Page 10: ... en movimiento Pasará automáticamente a modo reposo cuando no exista campo eléctrico ni movimiento Entrada en funcionamiento DE LA LINTERNA Estando el detector en modo ON se puede encender la linterna manteniendo pulsado el botón de Test durante 3 segundos el detector emitirá 3 pitidos y se encenderá Para apagar repetir la misma operación de encendido NOTA el uso continuado de la linterna puede re...

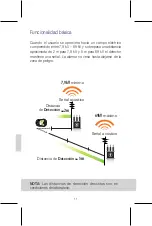
Page 11: ...para 69 kV el detector mantiene una señal La alarma no cesa hasta alejarse de la zona de peligro NOTA Las distancias de detección descritas son en condiciones de laboratorio Distancia de Detección Distancia de Detección 2m 7 9kV mínimo 5m 69kV máximo Señal acústico Señal acústico arga se enda El enos 30 ncuentre reposo linterna undos el ar repetir l tiempo o por lo 11 ...

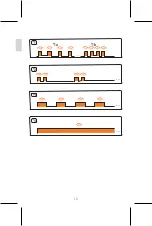
Page 12: ...nuo durante 5 segundos se apagará automáticamente y no se encenderá por auto encendido En modo alerta con alarma por proximidad a un campo eléctrico cuando el nivel de batería es bajo avisa de manera acústica con intermitencias lentas Si no se carga en un intervalo breve de tiempo el detector emitirá un pitido continuo durante 5 segundos se apagará automáticamente y no se encenderá por auto encend...

Page 13: ... 2 3 4 1 1a 1b 13 ueo de ncuentra sonido camente atería es guidos y detector apagará dido campo manera detector apagará dido léctrico ando su unto en ón más l punto 4 4 ...

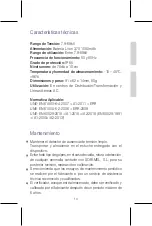
Page 14: ...9 2018 A1 2018 A2 2018 EN 60529 1991 A1 2000 A2 2013 Mantenimiento Mantener el detector de ausencia de tensión limpio Transportar y almacenar en el estuche entregado con el dispositivo Evitar todo tipo de golpes en el caso de caída rotura o detección de cualquier anomalía contacte con SOFAMEL S L para su posterior revisión reparación o calibración Se recomienda que los ensayos de mantenimiento per...

Page 15: ...on el Servicio de asistencia técnica de SOFAMEL o con nuestro distribuidor más cercano Tel 34 93 808 79 80 Nota No manipular el dispositivo en caso de mal funcionamiento ponerse en contacto conSOFAMEL S L Toda manipulación comporta la pérdida de la garantía de fábrica Este dispositivo no es un sustitutivo de ningún procedimiento y o elemento de seguridad ya existente se trata de un complemento adi...

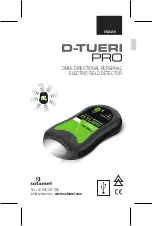
Page 16: ...ENGLISH Tel 34 938 087 980 info sofamel es www sofamel com OMNI DIRECTIONAL PERSONAL ELECTRIC FIELD DETECTOR ...

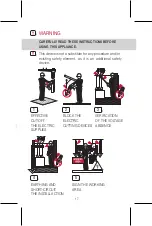
Page 17: ...N THE WORKING AREA VERIFICATION OF THE VOLTAGE ABSENCE BLOCK THE ELECTRIC CUTTING DEVICES WARNING This device is not a substitute for any procedure and or existing safety element as it is an additional safety device CAREFULLY READ THESE INSTRUCTIONS BEFORE USING THIS APPLIANCE 17 1 2 4 5 3 ...

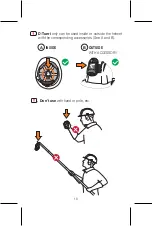
Page 18: ...18 D Tueri only can be used inside or outside the helmet with the corresponding accessories See A and B Don t use with hand or pole etc INSIDE A OUTSIDE WITH ACCESSORY B ...

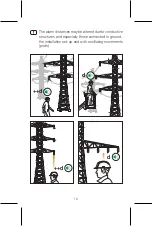
Page 19: ...19 e helmet d B The alarm distances may be altered due to conductive structures and especially those connected to ground the installation set up and with oscillating movements pods d d d d ...

Page 20: ...discontinuous alarm signals when levels are high It does NOT work with DC electrical signals nor behind conductive structures such as the human body metallic elements that are grounded trees and hedges shielded cables underground cables etc Faced with obstacles In DC Metallic structures grounded ...

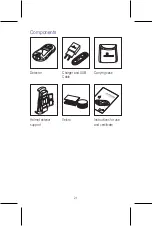
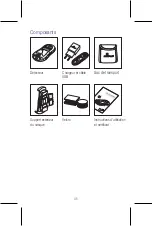
Page 21: ... w s ofa me l co m DE TE CT OR PE RS ON AL DE CA MP O EL ÉC TR ICO OM NID IRE CC ION AL Detector Helmet exterior support Velcro Instructions for use and certificate 21 icity and als when or behind y metallic shielded Charger and USB Cable Carrying case ...

Page 22: ...o the centre of the helmet as shown in the picture and press down hard for approximately 20 seconds 1 Fasten the detector on the Dual Lock tape and press until it is completely secured 2 Remove the protective film from the double sided adhesive 1 Start u Fasten the detector on the Dual Lock tape and press until it is completely secured Pressdown hard for approximately 20 seconds 2 ...

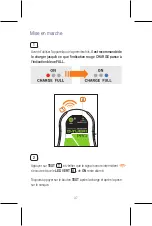
Page 23: ...til it passes from the red CHARGE display to the blue FULL display Start up 2 A T Press TEST and check that the intermittent acoustic signal sounds and that the GREEN LED for ON remains lit up Always press the TEST button after charging and after placement in the helmet A T n the Dual until it is Pressdown ately 20 ...

Page 24: ...g It will automatically go into sleep mode when there is no electric field or movement Starting up THE FLASHLIGHT When the detector is in ON mode the flashlight can be turned on by pressing the Test button for 3 seconds the detector will sound 3 beeps and will light up To turn off repeat the same operation as for turning on NOTE continued use of the flashlight can reduce the operating time of the ...

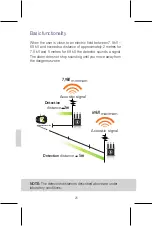
Page 25: ...between 7 9 kV 69 kV and exceeds a distance of approximately 2 metres for 7 9 kV and 5 metres for 69 kV the detector sounds a signal The alarm does not stop sounding until you move away from the dangerous zone NOTE The detection distances described above are under laboratory conditions t button east 30 ng It will electric e turned ector will he same perating shlight is ...

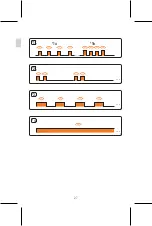
Page 26: ...onds will turn off automatically and will not turn on through auto power on In alert mode with alarm for proximity to an electric field when the battery level is low an alarm sounds at slow intervals If it is not charged within a short interval of time the detector will beep continuously for 5 seconds will turn off automatically and will not turn on through auto power on When the detector is near ...

Page 27: ...27 2 3 4 1 1a 1b system arly low ds and through ery level every 5 ector will matically ic field at slow etector matically will beep ding on west the source ...

Page 28: ...2 2006 ERR 2009 UNE EN 60529 2018 A1 2018 A2 2018 EN 60529 1991 A1 2000 A2 2013 Maintenance Keep the voltage detector clean Carry and store in the carrying case provided with the device Prevent any blow in case of fall break or detection of any anomaly contact SOFAMEL S L for its inspection repair or calibration It is recommended that periodic maintenance tests be carried out by the manufacturer o...

Page 29: ...ou need any assistance please contact our technical services or your SOFAMEL nearest distributor Tel 34 93 808 79 80 WARNING This device is not a substitute for any procedure and or existing safety element as it is an additional safety device Note Do not manipulate the device In the event of malfunction contact SOFAMEL S L Any manipulation entails the loss of the factory warranty ...

Page 30: ...FRANÇAIS Tel 34 938 087 980 info sofamel es www sofamel com DÉTECTEUR PERSONNEL DE CHAMP ÉLECTRIQUE OMNIDIRECTIONNEL ...

Page 31: ...SURER DE L ABSENCE DE TENSION VERROUILLAGE OU BLOCAGE DES APPAREILS DE COUPE ATTENTION Cet appareil ne remplace en aucun cas les procédures pour votre de sécurités déjà existant Il s agit d un complément de d information sécurité AVANT D UTILISER CET APPAREIL VEUILLEZ LIRE ATTENTIVEMENT LES INSTRUCTIONS SUIVANTES 1 2 4 5 3 ...

Page 32: ...t uniquement être utilisé à l intérieur du casque ou en dehors de celui ci avec l accesoire correspondant Voir A et B Ne pas utiliser avec la main ni avec des perches etc INTÉRIEUR A EXTÉRIEUR AVEC ACCESSOIRE B 32 ...

Page 33: ... Les distances d alarme peuvent être altérées par des structures conductrices et notamment celles connectées à la terre selon la configuration de l installation et avec des mouvements oscillants nacelles d d d d 33 ...

Page 34: ...scontinues lorsque les niveaux sont élevés NE fonctionne PAS avec des signaux électriques DC derrière des structures conductrices telles que le corps humain des éléments métalliques connectés à la terre arbres et haies câbles blindés câbles souterrains etc Face aux obstacles En DC Structures métalliques mises à la terre ...

Page 35: ...ofa me l co m DE TE CT OR PE RS ON AL DE CA MP O EL ÉC TR ICO OM NID IRE CC ION AL Détecteur Support extérieur du casque Velcro Instructions d utilisation et certificat statique ontinues ques DC le corps à la terre ns etc Chargeur et câble USB Sac de transport ...

Page 36: ...c le détecteur au centre du casque tel que indiqué sur l image Faire pression pendant environ 20 secondes 1 Accrocher le détecteur au ruban Dual Lock et faire pression jusqu à sa totale fixation 2 Retirez le film protecteur de l adhésif double face 1 Mise e Accrocher le détecteur au ruban Dual Lock et faire pression jusqu à sa totale fixation Faire pression pendant environ 20 secondes 2 ...

Page 37: ... jusqu à ce que l indication rouge CHARGE passe à l indication bleue FULL Mise en marche 2 A T Appuyer sur TEST et vérifier que le signal sonore intermittent s écoute et que le LED VERT de ON reste allumé Toujours appuyer sur le bouton TEST après la charge et après la pose sur le casque A T au ruban pression on nt environ ...

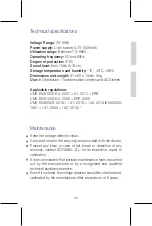
Page 38: ...vement Il passe automatiquement en mode veille lorsqu il n y a pas de champ électrique ou de mouvement Démarrage de la LAMPE DE POCHE Le détecteur étant en mode ON appuyer durant 3 secondes sur le bouton de test pour allumer la lampe de poche le détecteur émet 3 bips et elle s allume Pour l éteindre répéter la même opération que pour l allumer REMARQUE l utilisation continue de la lampe de poche p...

Page 39: ...cteur émet un signal continu L alarme ne s arrête pas tant que l on ne s éloigne pas de la zone de danger REMARQUE Les distances de détection décrites sont les conditions de laboratoire après la allume condes soit en de veille vement econdes oche le répéter he peut urquoi il e façon Distance de détection Distance de détection 2m 7 9kV minimum 5m 69kV maximum Signal acoustique Signal acoustique ...

Page 40: ...t 5 secondes il s éteint automatique ment et ne démarre pas automatiquement En mode alerte avec l alarme de proximité d un champ électrique lorsque le niveau de la batterie est faible il prévient de façon sonore et avec des clignotements lents Si l appareil n est pas rapidement chargé le détecteur émet un bip continu pendant 5 secondes il s éteint automatique ment et ne démarre pas automatiquement...

Page 41: ...atterie erie est durant démarre atterie sécutifs eur émet matique champ révient eur émet matique trique il nfonction point de 1a plus e 1b 41 2 3 4 1 1a 1b ...

Page 42: ...006 ERR 2009 UNE EN 60529 2018 A1 2018 A2 2018 EN 60529 1991 A1 2000 A2 2013 Entretien Maintenir le détecteur d absence de tension propre Transporter et stocker l appareil dans son étui Éviter tout type de chocs en cas de chute de casse ou de détection de toute anomalie veuillez contacter SOFAMEL S L pour son ultérieure révision réparation ou calibrage Il est recommandé que des tests de maintenanc...

Page 43: ...service d assistance technique de SOFAMEL ou notre distributeur le plus proche Tél 34 93 808 79 80 ATTENTION Cet appareil ne remplace aucune procédure et ou élément de sécurité existant déjà Il s agit d un complément de sécurité Remarque Ne pas manipuler l appareil En cas de mauvais fonctionnement veuillez contacter SOFAMEL S L Toute manipulation inadéquate de l appareil entraîne la perte de la ga...

Page 44: ...Tel 34 938 087 980 info sofamel es www sofamel com X 645660 R2 05 11 20 ...

Reviews: