


7
-14
7
C
a
me
r
a
Adv
a
nced Fe
a
tures
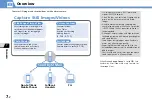
Durin
g
Shootin
g
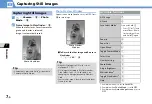
St
a
rt Here
【
Photo Viewfinder
】
............................... P. 7-6
【
Video Viewfinder
】
............................... P. 7-8
After Shootin
g
St
a
rt Here
【
Photo Preview
】
window ...................... P. 7-6
【
Video Preview
】
window ...................... P. 7-8
【
Thumbnail Preview
】
window ............ P. 7-10
【
Framed Image Preview
】
window ...... P. 7-11
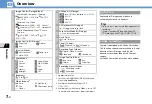
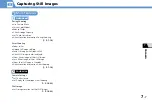
Use Camera Menu
【
Photo Viewfin
d
er
】
/
【
Vi
d
eo Viewfin
d
er
】
o
Select an item
d
Set Image Quality
【
Vi
d
eo Viewfin
d
er
】
u
Quality
Setting
d
Select an item
d
Switch Color Modes
【
Photo Viewfin
d
er
】
/
【
Vi
d
eo Viewfin
d
er
】
u
Camera Settings
d
Effect
d
Full Color
,
Sepia
or
Monochrome
d
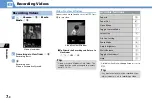
Reduce Flicker
【
Photo Viewfin
d
er
】
/
【
Vi
d
eo Viewfin
d
er
】
u
Camera Settings
d
Flicker
d
Auto
,
Mode 1 (50Hz)
or
Mode 2
(60Hz)
d
Check Storage Capacity
【
Photo Viewfin
d
er
】
/
【
Vi
d
eo Viewfin
d
er
】
u
Memory Info
d
Change Video Type
【
Vi
d
eo Viewfin
d
er
】
u
Movie Type
Set
d
Normal
,
Video
or
Voice
d
Set Shake Correction
【
Photo Viewfin
d
er
】
/
【
Vi
d
eo Viewfin
d
er
】
u
Shake Correction
d
Auto
or
OFF
d
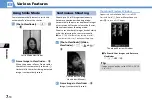
Attach Location Information During
Shooting
【
Photo Viewfin
d
er
】
u
Attach
Location
d
From Position Loc.
,
From
Loc. History
,
From Phonebook
or
From
Owner Details
d
(
Enter Security
Co
d
e
d
) (
Select location information
d
)
To check the attached Location Information,
select
Loc. Info Detail
and press
d
.
To delete the attached Location Information,
select
Delete Loc. Info
and press
d
.
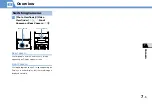
Zoom In/Out
【
Photo Preview
】
win
d
ow
p
o
or
p
to zoom in or out.
Press
u
to return to original size.
Upload Still Image/Video to Blog
【
Photo Preview
】
win
d
ow/
【
Vi
d
eo Preview
】
win
d
ow
o
Blog
Cont
. or
Blog
Contribution
d
(
Attach Mail
,
QVGA
Scale Down
or
VGA Scale Down
d
)
Create S
!
o
Specify a blog upload destination beforehand
with Blog/Mail Member (P. 5-4).
You may not be able to upload depending on
video image size.


