Understanding WireXpert
© Copyright 2018 Softing IT Networks
13
Understanding WireXpert
3.1
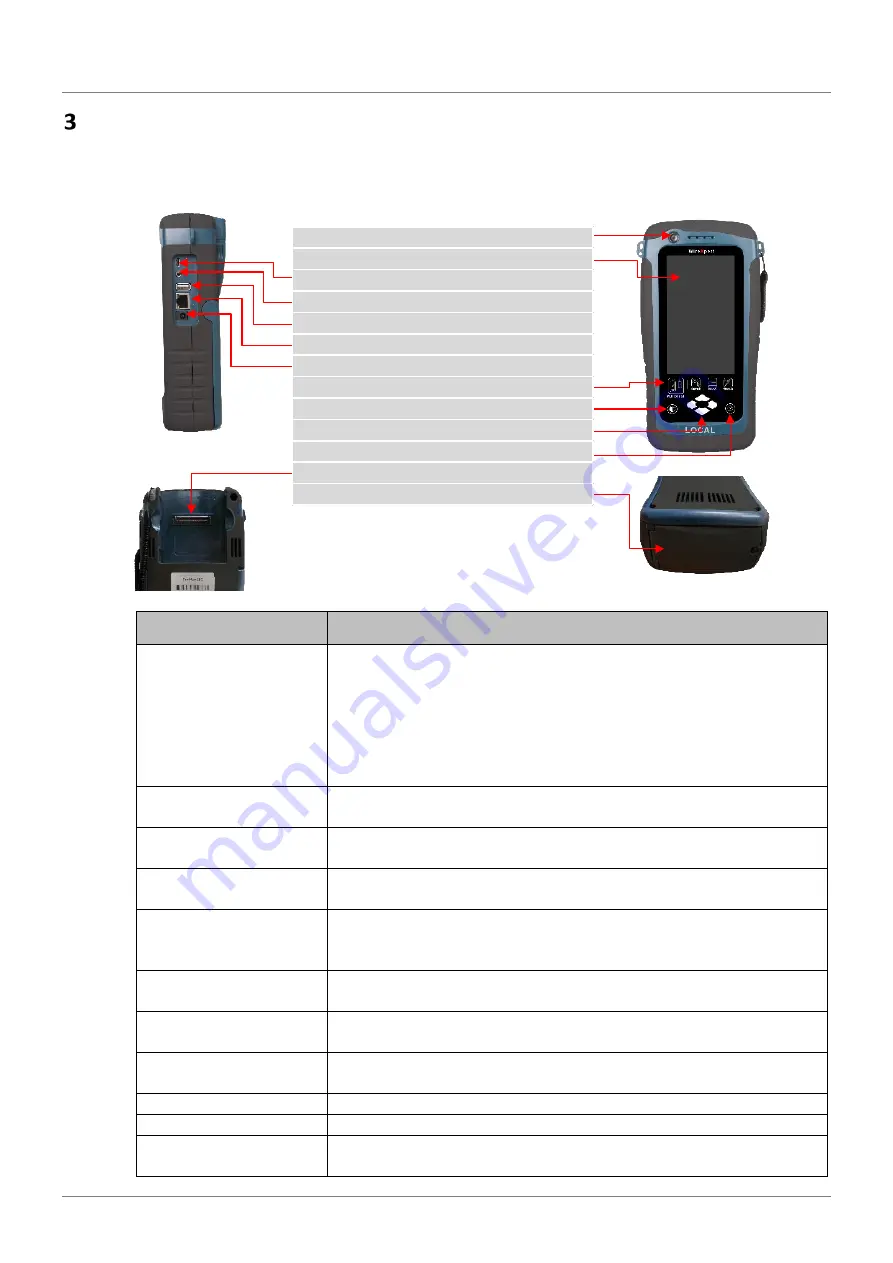
WireXpert Overview
Power ON/OFF button
Touch sensitive color LCD screen
USB device port
Audio port
USB host connector for flash drive
RJ-45 Ethernet port for remote control
Power supply port (12V)
One-Touch access buttons
Brightness control button
Navigation scroll buttons
Context sensitive Help button
Probe interface connector
Battery compartment
Part
Functionality
Power ON/OFF Button
To turn on the device, press the power button for 5 seconds.
To turn off the device, press the power button, and select OK on the
power off dialog box. Alternately, press and hold the power button for
10 seconds (not recommended). The LED in the power button turns
green if the unit is turned on.
The LED on the power button turns red when the device is charging in
stand-by mode, orange if it’s turned on.
Touch Sensitive LCD
screen
Performs test executions and viewing of results.
USB device port
Enables remote connection to the PC for remote control update and
exporting saved results.
Audio port
Enables vocal communication between LOCAL and REMOTE units when
connected to talk set headphones (WX_AC_TALKSET).
USB Host port
Enables results to be exported and firmware upgrade via USB flash
drive.
Enables loading of custom limits and labels for list-based testing.
RJ-45 Ethernet port
Enables communication between two sets of WireXpert for Alien
Crosstalk testing.
Power Supply port
Performs charging of device when connected to power adapter shipped
with WireXpert. (WX_AC_PWRAD)
One-touch access buttons Main functional buttons AUTOTEST, SETUP, DATA and TOOLS for
WireXpert. Enables quick AUTOTEST and results viewing in a single click.
Brightness Control
Adjusts the brightness level of the LCD display.
Navigation scroll buttons Performs navigation in long lists.
Context sensitive help
Provides simple explanation relevant to the functionality on the current
screen (available in future version).


