background image

47

CALIBRATION

FIRMWARE AND 

SOFTWARE 

UPDATE

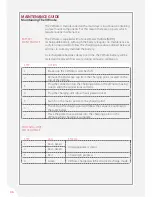
Each VWnote is calibrated before it is shipped. To meet your calibration 

needs, we offer re-calibration services at our facilities. If you intend 

shipping the VWnote back to our factory. please contact Soil 

Instruments or our distributors for more information.

From time to time, Soil Instruments may issue updates to the firmware 

and the VWnote Configuration Tool for additional features or bug fixes. 

Details of how to update these will be provided as the situation arises.

Follow the charging procedure outlined in this manual at all times 

to properly maintain the battery.

WARNING

Battery life: 

Battery life is a function of a combination of the             

following factors;

• 

Battery type

• 

Sensor type

• 

How often the VWnote is used to take reading

• 

How often the data are offloaded

• 

How often the backlight is switched on

• 

Ambient temperature.

In designing the VWnote system, Soil Instruments have produced 

firmware routines to maximise the battery life. As a rule of thumb, the 

VWnote can achieve battery life of up to 30 hours without backlight and 

15 hours with the backlight switched on.

To maximise battery life, the VWnote has an inbuilt off timer. When the 

VWnote has been inactive for six minutes it will automatically turn off. 

Battery voltage: 

The VWnote saves its battery voltage with every 

reading to enable batteries to be monitored and recharged in a timely 

manner. The battery voltage in the VWnote should be above 5.0 volts 

for the VWnote reading circuitry to work. If the voltage goes below 3.6 

volts, the VWnote will shut off.

Summary of Contents for RO-1 VW Note

Page 1: ...1 VWnote User Manual Soil Instruments Limited has an ongoing policy of design review and reserves the right to amend these specifications without notice Man230 VWnote MN1114 Rev1 2 0 Man 230 ...

Page 2: ...s manual tells you about the VWnote and how to use it to take readings from VW sensors Who does this apply to Installers field engineers and technicians who need to acquire readings from VW sensors and to maintain the VWnote system ...

Page 3: ...from Vibrating Wire VW sensors and stores them on an internal memory for retrieval later via a USB flash drive The VWnote can read almost all commercially available vibrating wire sensors Built with state of the art electronic components and the latest firmware technology each VWnote comes with many powerful built in functions These functions will allow you to customise how readings from each sens...

Page 4: ...ou Go to Site 10 When You Are In The Field 10 Back In The Office 11 DETAILED VWNOTE USER GUIDE 12 Charging the VWnote 12 Charging Unit LED Sequence 12 Connecting Sensors to The VWnote 13 VW Sensor With Built In Temperature Sensor 13 VW Sensor Without Built In Temperature Sensor 13 How to Use The Keypad 14 Menu Structure 16 Main Menu 16 The READ Menu 18 List Of Sites 18 List Of Sensors 18 Sensor Re...

Page 5: ...ature Unit 35 Display Resolution 35 Raw Data Unit 35 Engineering Unit Name 35 Calibration Factors 35 Building a Sensor Configuration File 36 Building With VWnote Configuration Tool 36 Installing The VWnote Configuration Tool 36 Running The VWnote Configuration Tool 36 Finding And Interpreting Data Files 43 Locating Data Files 43 Interpreting The Data Files 45 Data Storage And Handling 45 MAINTENAN...

Page 6: ... and this instruction manual without notice Refer to our terms and conditions of sale for warranty information The batteries are a consumable item and are excluded from the warranty Products marked with the symbol are subject to the following disposal rules in European countries This product is designated for separate collection at an appropriate collection point Do not dispose of as household was...

Page 7: ... package makes it easy to carry and operate in all site conditions Easy to follow menu makes taking readings on site simple fast and error free The optional 15 VDC excitation which provides higher energy excitation than the default excitation of 5 VDC ensures quality readings for sensors with long cables A site ID and a sensor name are assigned to each sensor This facilitates management of a large...

Page 8: ... you can also use it for data off loading from the VWnote as well as importing the configuration file to and exporting it from the VWnote Distributed on the USB flash drive with every VWnote is the VWnote Configuration Tool This is a Windows based software that you will use to create and edit the sensor configuration file which will contain information on how readings from each sensor will be read...

Page 9: ...e wires in the signal cable of a sensor with matching colours The VWnote is supplied with a padded carry case with shoulder strap and pockets for the sensor connecting lead and the USB flash drive We recommend that you carry and store the VWnote in the carry case whenever it is not being used The VWnote contains a Nickel Metal Hydride NiMH rechargeable battery and is supplied with a trickle charge...

Page 10: ...Maintenance Quide Firmware And Software Update section of this manual 5 Test the reading function as follows Connect a VW sensor to the VWnote using the sensor lead Go to READ in the main menu and select DEFAULT on the top of the site list and DEFAULT_VW from the top of the sensor list Press to start reading Check the VW reading and the temperature reading 6 If you have a pre prepared configuratio...

Page 11: ...ce to go to the site list to select another site Disconnect the sensor cable from the crocodile clips 3 Repeat the procedures in Step 2 for any other sensors you wish to read taking care to ensure that the sensor you are reading matches with the unique site and sensor ID in the VWnote 4 After you have finished taking readings for the current site you can transfer the data straightaway to a flash d...

Page 12: ...to the charging point on the VWnote when charging is complete Follow the charging procedure outlined in this manual at all times to properly maintain the battery Do not overtighten the connector when charging the unit to avoid damaging the socket WARNING STEP LED STATUS 1 Red Green Analysing battery status 2 Red Green 3 Red Charging in progress 4 Green VWnote charged switched to trickle charge mod...

Page 13: ...which is located under a cap on the top of the VWnote see figure below Consult the sensor user manual for the sensor connections If you are still unsure please contact Soil Instruments Please ensure that the bare parts of the clips do not touch each other and cause shorts among the four wires VWnote is only compatible with the 3K ohm thermistor temperature sensors It will not work with the RTD bas...

Page 14: ...t will toggle the LCD displays backlight between on and off Up The key acts as an up instruction in the situations below 1 It moves the cursor up in the currently displayed list such as the main menu list of sites list of sensors current readings quality indices and various reading and display parameters 2 It increases the value of the current field when updating date time 3 It moves upward throug...

Page 15: ...the next screen or stage of the menu functions For example when pressed while READ is selected this key takes you to the list of sites when a sensor is selected this key will take you to the sensor reading screen 2 When VWnote asks you to enter a site name a sensor name a frequency this key will take you to the next character position 3 When VWnote asks you to change date time this key will take y...

Page 16: ...ATE TIME DATE TIME CFG EXPORT CFG EXPORT CFG IMPORT CFG IMPORT FIRMWARE UPDATE FIRMWARE UPDATE INFO INFO OFF OFF READ Normal Mode Menu Advanced Mode Menu SETUP SETUP DATA TO USB DATA TO USB DATE TIME DATE TIME CFG EXPORT CFG EXPORT CFG IMPORT CFG IMPORT INFO INFO OFF OFF READ ...

Page 17: ...s used to copy a new sensor configuration file from a USB flash drive to the VWnote overwriting the existing sensor configuration in the VWnote This option is only available in the Advanced Mode You only need to perform a firmware update when instructed to do so by our support department Instructions on how to access the Advanced Mode and how to perform firmware update will be provided To avoid ac...

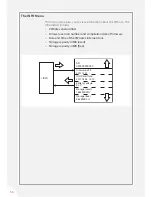
Page 18: ...nd sorted alphabetically Use and to navigate up and down the list 2 The top of the list is always DEFAULT which is hard coded in the VWnote and cannot be changed by the user 1 The list of sensors you specified in the site you selected will be displayed on the LCD screen two sensors per screen and sorted alphabetically Use and to navigate up and down the list 2 If you select the DEFAULT site the to...

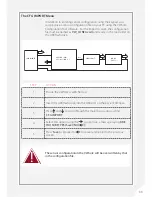
Page 19: ...3 5 C PER 376 76 uS TEMP 23 5 C Sensor DEFAULT_VW uses the following default parameters of reading and displaying Site name DEFAULT Sensor name DEFAULT_VW Sweep frequency 1400 3500 Hz Excitation V 5V Display Resolution 0 1 Unit raw Hz2 1K Unit eng Hz2 1K R0 0 G 1 Calibration linear Unit temp o C In most cases the DEFAULT_VW sensor will allow you to take readings from most type of VW sensors before...

Page 20: ...ings will be automatically refreshed every two seconds 1 Pressing the Save key while you are on the sensor reading screen will send the current VW readings and temperature reading with time stamp to the VWnote internal memory VWnote will display READING SAVED PRESS to acknowledge the readings have been saved successfully 2 Pressing will take you back to the sensor reading From there you can save a...

Page 21: ...21 ...

Page 22: ...n this screen press to go to the next character position press and to go through the valid letters A Z 0 9 and _ After you have entered the site name press Save to enter the site name into VWnote 1 The list of sensors in the site you selected will be displayed on the LCD screen two sensors per screen and sorted alphabetically Use and to navigate up and down the list 2 The top of the list is always...

Page 23: ...sensor parameters After you have selected an existing sensor from the sensor list from the selected site press once to view and revise the value of the sensor configuration parameters stored in the VWnote Pressing during entry or edit will not move the cursor one character to the left It will cancel the entry or edit and take you back to the previous menu WARNING TIP The sensor name is limited to ...

Page 24: ...1400 3500 HZ EXCITATION VOLTAGE 5V or 15V TEMPERATURE UNIT C or F SETTINGS SAVED PRESS Save DEFAULT 1400 3500 Hz CUSTOM PRESS TO SPECIFY DISPL RESOL 1 or 0 1 RAW DATA UNIT Hz2 1000 or Hz ENG UNIT NAME kPa user input CAL FACTORS PRESS LINEAR G and R0 PRESS POLYNOMIAL ABC PRESS List sorted by SITE name New SITE Existing SITE ...

Page 25: ...ADING R0 4561 02 CAL FACTORS SAVED PRESS A 0 3286405E 8 B 0 1450402E 2 Cor R0 C PRESS Save Save Save List of Sensors in one SITE New SENSOR Existing SENSOR List sorted by SENSOR name ADD A SENSOR EXTENSOMETER_1 EXTENSOMETER_2 PIEZOMETER_1 PIEZOMETER_2 PIEZOMETER_3 SITE XXXXXXXXXXXX SENSOR XXXXXXXXXXXX C 7 3120702 R0 4985 1 ...

Page 26: ...ng and If you select the custom range and press you will be presented with another screen where you can enter the start and end frequencies When entering a sweep frequency use to move the cursor to the next character position and use and to move through 0 9 Press the Save key to confirm the edit or to cancel the change and return back to the previous screen Pressing during entry or edit will not m...

Page 27: ...change to VWnote or to cancel the change you have just made The display resolution for each sensor reading in raw or engineering units can be set to match your needs The default value for this parameter is 0 1 1 digit after the decimal point You can select from 1 0 1 equivalent to 0 1 digit after decimal point Press until the one you wish to use is displayed for this sensor Press Save to commit th...

Page 28: ...OMIAL ABC If you select LINEAR pressing will take you to the two screens where you can review enter or edit G and R0 This is the name of the engineering unit that you would like to use when the reading of this sensor is displayed and saved such as kPa psi and mH2O It is a text string with up to eight characters Except comma all other alphanumeric characters and symbols such as etc are allowed The ...

Page 29: ...ineering unit When entering a numeric value use to move the cursor to the next character position and use and to move through 0 9 and and E where E is for entering numeric values with exponent for example 1 234E 8 for 1 234 x 10 8 When you are making an edit press Save to commit your entry to VWnote or to cancel the change you have just made TIP The value for R0 is in raw data units such as Hz or ...

Page 30: ...roll between the two options using and choose your option and press the Save button 4 Note choosing ERASE INTERNAL DATA will erase the data after the transfer to the USB choosing DO NOT ERASE INTERNAL DATA will keep whatever data is in the VWnote internal memory intact 5 The screen will say DATA SAVED TO USB PRESS Pressing will take you back to the menu 6 Remove the USB flash drive from the VWnote...

Page 31: ...ds of month day hour minute second and back to year and so on While in each field use and to increase or decrease the value of that field Press Save to commit the changes to VWnote internal clock This menu only needs to be executed occasionally DATE TIME DATE TIME SAVED PRESS Save hh mm ss Press to move from field to field and press UP to increase and DOWN to decrease digit value yyyy mm dd ...

Page 32: ...nd return to the previous screen The sensor configuration in the VWnote will be saved in the root folder on the USB flash drive with the file name VW_CONF0 vwn It will overwrite any file with the same name in the root folder The CFG EXPORT Menu If you have added new sensors to the VWnote or made changes to the sensor configuration in the VWnote using the keypad you can back up the sensor configura...

Page 33: ...ive CFG IMPORT PLEASE WAIT DONE PRESS Save YES Save NO ARE YOU SURE STEP ACTION 1 Ensure the VWnote is switched on 2 Insert the USB flash drive into the USB port on the base of VWnote 3 Press and to scroll through the main menu until you find CFG IMPORT 4 Select this option using the you will see a message saying ARE YOU SURE YES Save NO 5 Press Save to proceed or to cancel and return to the previ...

Page 34: ...ial number Firmware version number and compilation date of firmware Data and time of the VWnote s internal clock Storage capacity in MB used Storage capacity in MB free INFO S N XXXXXXXXXXXX Firmware V1 9 2011 12 01 Unit Date Time 2011 03 28 15 12 Battery Voltage 5 0 V Storage used 1885 MB 99 Storage free 0 625 MB 0 ...

Page 35: ...ISPLAY RESOLUTION The display resolution for each sensor reading in raw or engineering units can be set to match your needs The default value for this parameter is 0 1 1 digit after the decimal point You can select from 1 0 1 equivalent to 0 1 digit after decimal point 5 RAW DATA UNIT This defines the raw reading in Hz or Hz2 1000 that is saved and used for conversion into reading in engineering u...

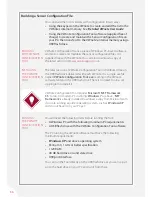
Page 36: ...exe file named VWnote Configuration Tool exe residing in the VWnote software folder on the USB flash drive There is no need to run a set up program to install it INSTALLING THE VWNOTE CONFIGURATION TOOL You will need the following items before running the Tool A Windows PC with the following minimum PC requirements A USB flash drive with the VWnote Configuration Tool software The PC running the VW...

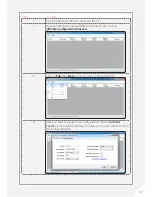
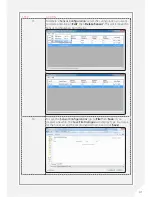
Page 37: ...tware folder on the flash drive and run VWnote Configuration Tool exe 3 Click on File then New to create a new configuration file 4 After you elect to create a new configuration file the Add New Sensor window will be displayed to allow you to add a new sensor to the configuration file ...

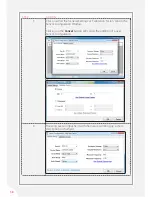
Page 38: ...ettings or Calibration Factors tab on the Sensor Configuration Window Clicking on the Cancel button will cancel the addition of a new Sensor Configuration 6 Hovering over an input field with the mouse will bring up a short description of that field ...

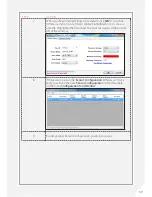
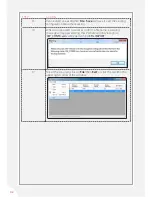
Page 39: ...ghlighted in red mouse over the highlighted field to show the error message on the bottom left of the window 8 If there was no error the Sensor Configuration Window will close and you will see the new Sensor Configuration in the data table on the main Configuration Tool Window 9 To add another Sensor Configuration go back to step 4 ...

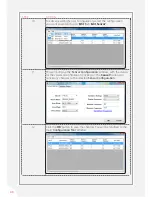
Page 40: ...it then Edit Sensor 11 This will bring up the Sensor Configuration window with the details for the selected configuration Clicking on the Cancel button will cancel any changes to the selected Sensor Configuration 12 Click the OK button to save the changes You will be returned to the main Configuration Tool Window ...

Page 41: ...lete and click on Edit then Delete Sensor This will remove the Sensor Configuration from the list 14 To save the Sensor Configurations go to File then Save If you created a new file the Save File Dialogue will display Type in a name for the file or accept the recommended name and click Save ...

Page 42: ...ration file without asking 16 When you are asked to enter or confirm a file name a warning message will appear alerting that VWnote will only recognise VW_CONF0 vwn while performing CFG IMPORT 17 To exit the program click on File then Exit or click the red X in the upper right corner of the window ...

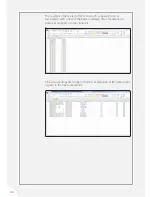
Page 43: ...compatible CSV files Each file is named by the date of the readings taken in the format YYYYMMDD for example 20130321 csv is a file of the readings taken on 21 March 2013 Only one file per day is created Finding And Interpreting Data Files LOCATING DATA FILES If you downloaded the data when older readings had not been erased from the internal memory on the previous download each set of readings wi...

Page 44: ...vents such as powering on or low battery with a note of the battery voltage this is for diagnostic purposes only and you may ignore it Click on a readings file to open it further explanation of the data shown is given in the next subsection ...

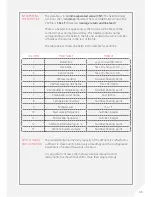
Page 45: ...ion sets of readings and the configuration parameters of several thousands of sensors It is possible to increase the memory size but research at Soil Instruments has shown that 2GB is more than ample storage INTERPRETING THE DATA FILE DATA STORAGE AND HANDLING COLUMN FIELD NAME FORMAT 1 Date Time yyyy mm dd hh mm ss 2 Site name Text 10 chrs A Z 0 9 _ 3 Sensor name Text 15 chrs A Z 0 9 _ 4 VW raw r...

Page 46: ...ctor into the charging point on the VWnote making sure to align the connections correctly 4 Plug the charging unit into a mains power socket 5 Switch on the mains power to the charging unit 6 The LED on the charging unit will follow the sequence outlined in the table below 7 Place the protective cap back into the charging point on the VWnote when charging is complete STEP LED STATUS 1 Red Green An...

Page 47: ...n of the following factors Battery type Sensor type How often the VWnote is used to take reading How often the data are offloaded How often the backlight is switched on Ambient temperature In designing the VWnote system Soil Instruments have produced firmware routines to maximise the battery life As a rule of thumb the VWnote can achieve battery life of up to 30 hours without backlight and 15 hour...

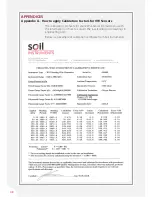
Page 48: ...for VW Sensors The calibration certificate for your VW sensor will provide you with the information on how to convert the raw readings into readings in engineering units Below is an example of calibration certificate from Soil Instruments APPENDICES ...

Page 49: ...n Hz2 1000 taken at the time of installation R1 is the current reading in Hz2 1000 The polynomial formula for all Soil Instruments VW sensors is E A x R12 B x R1 C where E is the resultant value in Engineering units A B and C are the polynomial factors from the calibration sheet R1 is the current reading in Hz2 1000 It should be noted that C is an offset value derived from a base reading in the fa...

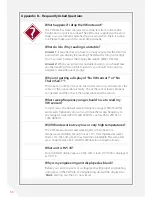
Page 50: ...or is connected or the sensor or the signal cable is faulty Check the sensor lead is properly connected and then check the signal cable and the sensors Will VWnote work at very low or very high temperatures The VWnote was tested and working after it had been in a temperature chamber for an hour at 10 C At temperatures lower than 10 C the LCD screen may become unreadable The same test was conducted...

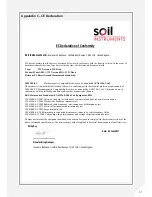
Page 51: ...with the following standards and or other normative documents EMC Harmonized Standards EN 61326 1 2006 Lab Equipment EMC IEC61000 6 3 2007 Emission standard for residential commercial and light industrial environments IEC61000 4 2 2008 Electrostatic discharge immunity test IEC61000 4 3 2006 Radiated radio frequency electromagnetic field immunity test IEC61000 4 4 2012 Electrical fast transient bur...

Page 52: ...mber 07960087 Registered Office 3rd Floor Ashley Road Altrincham Cheshire WA14 2DT 44 0 1825 765044 t info soilinstruments com Bell Lane Uckfield East Sussex TN22 1QL United Kingdom w www soilinstruments com e SUPPORT www soilsupport com 44 0 1825 765044 ...

Reviews: