background image

32

  |  5.0 Communication

5.2.1 Configuration Program

Accessing the Configuration Program via USB is a new feature of the S4K2UC. For most users, the factory default settings 

will be adequate. This section illustrates the features available for modification, as well as the factory default settings.
The USB configuration program allows these features of the S4K2UC to be changed:


Enable/Disable Auto-Restart


Select frequency converter operation with a fixed output frequency of 50 Hz or 60 Hz, bypass disabled


Set the Low Battery Warning alarm time from 2 to 30 minutes


Enable/Disable the Auto-Battery test


Enable/Disable Auto-Restart after removing Remote Shutdown


Set the wiring mode of Remote Shutdown


Set the Auto-Enable output


Set the Auto-Battery test to 7, 14, 21 or 28 days


Select the number of external battery cabinets connected to the UPS to adjust the remaining run time calculated by 

software products


Select one of multiple output voltages to match various voltages (see Table 7)

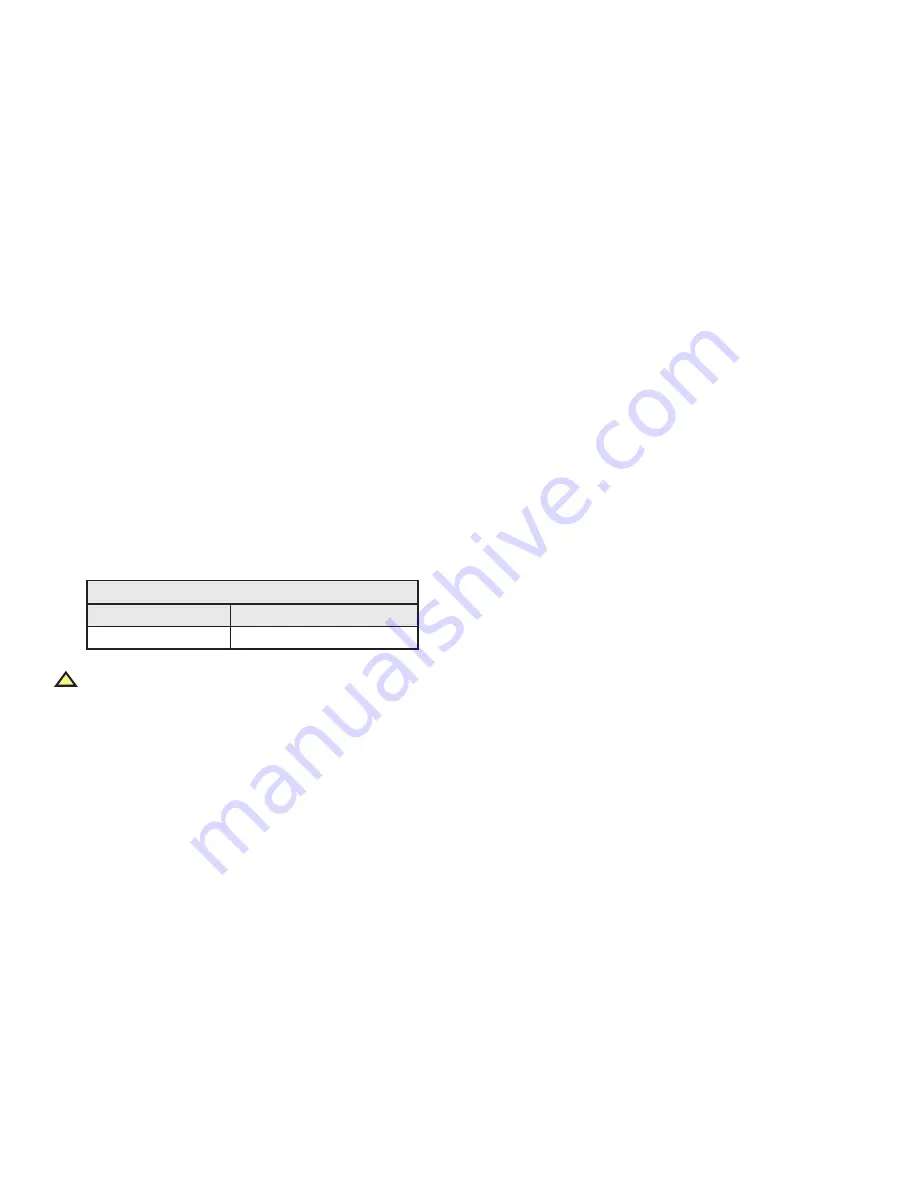
Table 7:  Output Voltage Option, All Models

Factory Default, V ac

Output Voltage Option, V ac

120

110, 115, 120, 127

!

 WARNING

The output voltage settings cannot be changed while the UPS is on and powering connected loads.
NOTES:

For all 120 V models, when the output voltage is programmed for 110 V ac, the UPS will be automatically derated as follows 

(refer to “9.0 Specifications” for VA and Watt ratings): 


700 VA–1000 VA: Derated to 95% of both the VA and Watt ratings


1500 VA–3000 VA: Derated to 90% of both the VA and Watt ratings

NOTES:


The configuration program is compatible with UPS models S4K2UXXXXC, as in S4K2U3000C. It is not compatible 

with earlier versions of the S4K2U UPS.


A computer running Windows 2000®, XP® or Vista® is required to set up and run the configuration program.

Summary of Contents for S4K2U1000C

Page 1: ...S4K2UC Industrial On line UPS 120 V 700 VA 3000 VA User Manual ...

Page 2: ...l liability for damages resulting from use of this information or for any errors or omissions The SolaHD and Emerson logos are registered in the U S Patent and Trademark Office All other product or service names are the property of their registered owners 2010 EGS Electrical Group LLC All rights reserved Specifications are subject to change without notice ...

Page 3: ... Appearance Components 10 1 3 1 Front Panel Controls 10 1 3 2 Rear Panel Features 10 1 4 Major Components 12 1 4 1 Surge Protection Device SPD EMI RFI Filters 12 1 4 2 Rectifier Power Factor Correction PFC Circuit 12 1 4 3 Inverter 13 1 4 4 Battery Charger 13 1 4 5 Dc to Dc Converter 13 1 4 6 Battery 13 1 4 7 Dynamic Bypass 13 1 5 Operating Modes 13 1 5 1 Utility V ac Mode 13 1 5 2 Manual Bypass M...

Page 4: ... 2 6 Connecting Communication Cables 25 2 6 1 Connecting USB Communication Cables 25 2 6 2 Installing the Optional IntelliSlot Card Communication Cables 25 3 0 Control Indicators 26 3 1 Control Buttons 26 3 1 1 On Alarm Silence Manual Battery Test Button 26 3 1 2 Standby Manual Bypass Button 27 3 2 Indicators 27 3 2 1 Battery Level Indicators 27 3 2 2 Load Level Indicators 28 3 2 3 UPS Status Indi...

Page 5: ...attery 34 5 3 4 Low Battery 34 6 0 Battery Cabinet 35 7 0 Maintenance 36 7 1 Replacing the Internal Battery Pack 36 7 1 1 Battery Replacement Procedures 36 7 2 Battery Charging 37 7 3 Precautions 38 7 4 Checking UPS Status 38 7 5 Checking UPS Functions 38 8 0 Troubleshooting 39 8 1 UPS Symptoms 39 8 1 1 Indicators 39 8 1 2 Audible Alarm 40 8 2 Troubleshooting 40 9 0 Specifications 42 10 0 Registra...

Page 6: ...he output receptacles of the UPS may carry live voltage even if the UPS is not connected to utility input power Before moving or rewiring this UPS disconnect utility input power and the battery and make sure that the UPS is completely shut down Otherwise the output terminal may carry live voltage presenting an electric shock hazard To ensure human safety and normal UPS operation the UPS must be pr...

Page 7: ...connecting battery terminals Determine if the battery is inadvertently grounded If it is inadvertently grounded remove the source of the ground Contact with any part of a grounded battery can result in electrical shock The likelihood of such shock will be reduced if grounds are removed during installation and maintenance applicable to a UPS and a remote battery supply not having a grounded supply ...

Page 8: ...n followed by important instructions Ac input Ac output Requests the user to consult the manual Indicates the unit contains a valve regulated lead acid battery Recycle Dc voltage Equipment grounding conductor Bonded to ground Ac voltage ON Alarm Silence Battery Test OFF Bypass WEEE i PbH2SO4 R ...

Page 9: ...ciples and operating mode 1 1 Features Intelligent battery management to extend the battery life Operation and display panel with LED for monitoring load percentage and battery capacity independently Flexible network management with MultiLink software Fan fault self inspection and automated diagnostic function Intelligent fan operation automatically changing rotation speed depending on system requ...

Page 10: ... Figure 1 The various rack tower models differ largely in the type of receptacles each has Operation and Display Panel Ventilation Slots Figure 1 S4K2UC rack tower models front view 1 3 2 Rear Panel Features The rear panel of the S4K2UC has these features see Figure 2 USB port Cooling fan Power output receptacles Input circuit breaker IntelliSlot port Communication terminal block Input power cable...

Page 11: ...r USB Port Input Circuit Breaker Output Receptacles 5 15 20R 2000 VA Model Input Power Plug and Cable L5 30P USB Port External Battery Connector Input Circuit Breaker Output Receptacles 5 15 20R Output Circuit Breakers 3000 VA Model IntelliSlot Port IntelliSlot Port IntelliSlot Port Terminal Block Communication Terminal Block Communication Output Receptacle L5 30R Cooling Fan Cooling Fan Cooling F...

Page 12: ...c interference EMI and radio frequency interference RFI These features can minimize any surges or interference present in the utility power The filters also prevent surges or interference generated by the UPS from adversely affecting devices connected on the same branch as the UPS 1 4 2 Rectifier Power Factor Correction PFC Circuit In normal operation the S4K2UC s rectifier power factor correction...

Page 13: ...e S4K2UC provides an alternate path for utility power to the connected loads in the unlikely event of a UPS malfunc tion Should the S4K2UC have an overload overtemperature or UPS failure condition the UPS automatically transfers the connected loads to bypass NOTE The bypass power path does not protect the connected loads from disturbances on the utility 1 5 Operating Modes The UPS operating modes ...

Page 14: ...uch as idle computers and monitors or add optional external battery cabinets CAUTION Turning off the S4K2UC while in Battery Mode will result in loss of output power If the UPS is turned off manually it must be manually restarted after utility power returns If the UPS is turned off by a communication signal or because the batteries are depleted it will operate as selected in the configuration prog...

Page 15: ... The S4K2UC external battery cabinet shipping package includes one battery cabinet two spacers for tower configu ration and one dc power cable 2 3 Preparation for Installation 2 3 1 Installation Environment Install the UPS indoors in a controlled environment where it cannot be accidentally turned off The installation environ ment should meet the specifications listed in 9 0 Specifications Place th...

Page 16: ...ake out support bases from the accessories see Figure 4 Support Bases Spacers Connectors Figure 4 Support bases 2 If optional external battery cabinets will be connected to the UPS take out the spacers shipped with the battery cabinet 3 Connect the spacers and the support bases as shown in Figure 4 Each S4K2UC needs two assembled support bases one in the front and one in the rear 4 Adjust the dire...

Page 17: ... Replace the front metal bezel cover on the S4K2UC At this point the UPS operation and display panel and logo have been rotated 90 degrees clockwise which provides upright viewing for users 5 Place the S4K2UC and any battery cabinets on the support bases Each S4K2UC needs two support assemblies as shown in Figure 7 Operation and Display Panel Rotated for Tower Operation Support Bases Support Bases...

Page 18: ...and rear members They are interchangeable between left hand or right hand Mounting hardware includes M4 screws and M5 screws 2 Remove inner member of each slide rail assembly by extending it to its outermost position depressing the retaining latch and then pulling inner member from bracket assembly see Figure 8 Inner member Bracket assembly Pull out Retaining latch Figure 8 Pulling inner member fr...

Page 19: ... assemblies are at the same mounting height on all four rack rails as shown in Figure 10 Rear Member Front Vertical Pole Front Member M5 Screw 4 pcs Slide Figure 10 Installing front member of each slide rail assembly 6 Fasten rear member and front member together using four M4 screws and four M4 nuts M4 nuts have been installed on the rear member before delivery per slide rail assembly as shown in...

Page 20: ...3 M4 screw 8 pcs Rack mount handles 2 pcs UPS Figure 13 Installing rack mount handles 9 Insert the UPS with inner members attached into the slide rail assemblies by inserting the top and bottom edges of the inner members into the top and bottom curved tracks of the front members Slide the UPS into the rack as shown in Figure 14 NOTE The ends of the inner members are tapered to allow the rear of th...

Page 21: ... Rear Panel Features for details The battery cables are supplied with the battery cabinet 2 5 1 Connecting Input Plug Loads NOTES Ensure that all the loads are turned off Prepare an input power supply that is properly protected by a circuit breaker in accordance with national and local elec trical codes The wall receptacle must be grounded The plug on the power supply cord is intended to serve as ...

Page 22: ...f the UPS and connected loads Conduit used alone without a grounding conductor wire is not an acceptable connection Size ground protective earth conductors equal to circuit conductors For wiring information please refer to Table 3 Table 3 Overcurrent Protection Wiring Specifications Model VA Input Current Rating Recommended External Overcurrent Protection Recommended Wire 105 C Copper Wire Maximum...

Page 23: ...Screw 6 pcs Figure 15 Removing the receptacle board 2 Take out the box assembly from the accessories and split it into cover box Base 1 and Base 2 as shown in Figure 16 Set the six screws aside for reassembly of the hardwire box Cover Box Base 2 Base 1 Screw 6 pcs Figure 16 Splitting the box assembly 3 Use two rear panel mounting screws to install Base 1 to the UPS rear panel as shown in Figure 17...

Page 24: ... O Cable placement Figure 19 UPS I O terminal block 6 Use two rear panel mounting screws to install Base 2 to the UPS rear panel as shown in Figure 20 Base 2 Screw 2 pcs Figure 20 Installing Base 2 7 Insert the input and output cables hardware into the slots on Base 2 and Base 1 Hand tighten the securing nuts to Base 2 and Base 1 8 Set the box onto the Base 1 and Base 2 cable hardware assemblies U...

Page 25: ...umber of external battery cabinets connected to the S4K2UC See Table 14 for approximate battery run times 2 6 Connecting Communication Cables Communication cable connection includes USB and option card cables 2 6 1 Connecting USB Communication Cables 1 Take the USB communication cables out of the accessories box 2 Insert one end of the USB communication cable into the USB port on the rear panel of...

Page 26: ...n Alarm Silence Manual Battery Test Button The On Alarm Silence Manual Battery Test button controls output power to connected load s and has three functions see Table 4 Table 4 Functions of the On Alarm Silence Manual Battery Test Button Function Operation Description On Press the button once for 3 seconds To start the UPS Alarm Silence1 Press the button for at least half a second To silence the a...

Page 27: ... shutdown procedures on connected loads before turning off the UPS 3 2 Indicators The operation and display panel has seven indicators see Figure 23 The indicators can be divided into two groups according to the applications level indicators and UPS status indicators 3 2 1 Battery Level Indicators The Battery Level indicator is composed of five sets of LED bars that illuminate and flash to indicat...

Page 28: ... the symbols and their meanings Table 6 UPS Status Indicators UPS Status Indicator Icon Color Description Fault indicator Red On if the UPS has detected a fault off if there is no fault Ac Input indicator Green On when the utility input power is normal off during utility failure flashing when utility power is outside the specifications Battery indicator Amber On when the battery is supplying power...

Page 29: ...nected loads 4 Check the status indicators to determine whether the S4K2UC is operating normally 5 Check the load level indicators to verify that the connected load does not exceed the UPS s rated capacity The UPS is now providing conditioned power to the load 4 3 Manual Battery Test To initiate a manual battery test press the On Alarm Silence Manual Battery Test button for at least half a second ...

Page 30: ...y pressing the Standby Manual Bypass button once If manual bypass is not avail able disregard the first step 2 Press the Standby Manual Bypass button twice within 4 seconds to shut down the UPS Power to the connected loads is now off 4 6 Disconnecting Input Power from the S4K2UC 1 Once the UPS has been shut down as detailed in 4 5 Shut Down the S4K2UC disconnect the input cable plug 2 Wait 30 seco...

Page 31: ...ivers support for built in shutdown for AS 400 systems Follow instructions provided with the IntelliSlot card to configure MultiLink the UPS or any additional ancillary product for the S4K2UC These instructions are also available at www solahd com multilink 5 1 1 MultiLink MultiLink monitors the UPS continuously and can shut down your computer or server in the event of an extended power failure Mu...

Page 32: ...elect the number of external battery cabinets connected to the UPS to adjust the remaining run time calculated by software products Select one of multiple output voltages to match various voltages see Table 7 Table 7 Output Voltage Option All Models Factory Default V ac Output Voltage Option V ac 120 110 115 120 127 WARNING The output voltage settings cannot be changed while the UPS is on and powe...

Page 33: ...tdown depending on the settings in the configuration program A current limited source 12 V dc 50 mA will be available from the UPS The connection to the UPS for remote connection will be via terminal block connector Any Mode Shutdown wiring must conform to all national regional and local wiring regulations WARNING When the Auto Enable output option is selected and the UPS output is disabled using ...

Page 34: ...er returns during this countdown the S4K2UC will still shut down and must remain shut down for 10 seconds Whether the UPS turns back on when the power is restored depends on the auto restart setting 5 3 3 On Battery On Battery signal is a Normally Open NO dry contact When the UPS is supplying output power from the battery this dry contact will be closed 5 3 4 Low Battery Low Battery signal is a No...

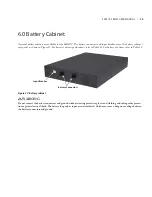
Page 35: ...binet specifications refer to Table 12 For battery run times refer to Table 14 Battery Connectors Input Breaker Figure 27 Battery cabinet WARNING Do not contact the battery connectors and ground without wearing protective gloves and clothing and taking other precau tions against electrical shock The battery loop and ac input are not insulated which may cause a dangerous voltage between the battery...

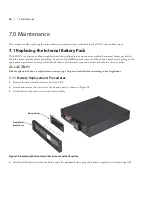
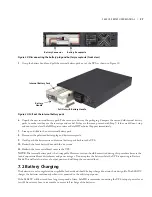
Page 36: ...t battery pack Replace batteries with the same type and number of batteries or battery packs CAUTION Risk of explosion if battery is replaced by an incorrect type Dispose of used batteries according to local regulations 7 1 1 Battery Replacement Procedures 1 Remove the front metal bezel cover from the UPS 2 Loosen and remove the six screws on the battery door as shown in Figure 28 3 Lay the batter...

Page 37: ...ery plug and battery receptacle 9 Gently push the battery wire and internal battery pack back into the UPS 10 Reattach the front battery door with the six screws 11 Reattach the front metal bezel cover to the UPS NOTE The internal battery pack is hot swappable However caution should be exercised during this procedure because the load is unprotected from disturbances and power outages Do not replac...

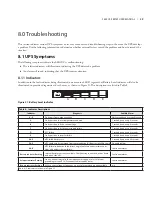
Page 38: ...n status every six months Check if the UPS is faulty Is the Fault Indicator on Is the UPS sounding an alarm Check if the UPS is operating in Bypass Mode Normally the UPS operates in Normal Mode if it is operating in Bypass Mode stop and contact your local SolaHD representative or SolaHD Technical Support Check if the battery is discharging When the utility input is normal the battery should not di...

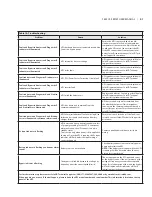
Page 39: ...d Half second beep every half second A On bypass due to overtemperature condition 1 second beep every 4 seconds B On bypass due to dc bus overvoltage 1 second beep every 4 seconds C On bypass due to dc dc power supply failure 1 second beep every 4 seconds D PFC failure 1 second beep every 4 seconds E On bypass due to inverter failure 1 second beep every 4 seconds A C UPS failed battery test 2 seco...

Page 40: ...loads and ensure nothing is lodged in the output recep tacles Ensure loads are not defective or shorted internally Battery indicator is illuminated UPS is not plugged in UPS is operating from Battery Mode Ensure UPS is securely plugged into the wall recep tacle UPS input protection breaker has opened UPS is operating from Battery Mode Save data and close applications Reset input breaker then resta...

Page 41: ...e communication port s UPS has received a signal or command from the attached computer If this was inadver tent ensure the communication cable used is correct for your system For assistance contact SolaHD Technical Support Fault indicator and Diagnostic A and B indica tors are illuminated continuous alarm sounds UPS failure includes dual fan failure single fan failure under certain conditions and ...

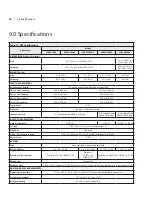
Page 42: ...r cord 10 ft attached with NEMA 5 15P plug 10 ft attached with NEMA 5 20P plug 10 ft attached with NEMA L5 30P plug output ac parameters Output receptacles 5 15R x 6 5 20R x 6 L5 30Rx1 5 20Rx6 Voltage 110 115 120 127 V ac user configurable 3 Waveform Sine wave Utility V ac Mode overload 200 for 2 seconds 150 for 50 seconds with transfer to bypass Power factor 0 90 battery Type Valve regulated non ...

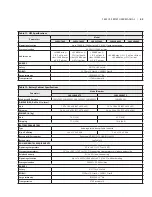
Page 43: ...S4K2U1500C S4K2U2000C S4K2U3000C dimensions d x w x h in mm Unit 19 7 x 16 9 x 3 4 497 x 430 x 85 23 7 x 16 9 x 3 4 602 x 430 x 85 Shipping 24 3 x 22 4 x 10 3 617 x 570 x 262 28 2 x 22 4 x 10 3 717 x 570 x 262 weight lb kg Unit 70 5 32 0 93 5 42 4 Shipping 77 2 35 0 101 4 46 0 Battery parameters Type Valve regulated non spillable lead acid Qty x V x Rating 2 x 4 x 12 V x 9 0 Ah 2 x 6 x 12 V x 9 0 ...

Page 44: ...00 1500 110 72 48 36 28 24 1350 2000 54 34 34 26 22 17 15 15 1800 3000 102 80 56 50 44 38 26 22 18 2700 Internal battery 2 external battery cabinets 700 264 122 88 82 630 1000 252 126 84 60 58 900 1500 208 132 94 74 54 48 1350 2000 120 82 60 52 44 36 29 29 1800 3000 124 114 106 92 74 66 62 46 44 2700 Internal battery 3 external battery cabinets 700 280 140 120 116 630 1000 320 148 118 80 78 900 15...

Page 45: ...rranty 10 1 Product Registration To register your product for updates and information on service and support visit our Web site at http www solahd com support registration htm 10 2 Warranty Information Please see the enclosed Terms Conditions of Sale ...

Page 46: ...SolaHD U S 800 377 4384 International 847 268 6000 www solahd com P N A272 212 Rev 1 01 29 10 ...

Reviews: