background image

ENGLISH


EN


ECO

• 

Select the ECO setting for optimal ironing per-

formance, only select it between the points •• 

and MAX.

• 

The ECO function uses less energy, but ensur-

ing sufficient steam

• 

to iron your clothes properly. Only activate this 

function when the boiler and iron temperatures 

are correct. The ECO function can be used 

with all types of fabrics. Nonetheless, for very 

thick or heavily creased fabrics we recommend 

that you use the maximum steam output func-

tion to ensure optimal results

ONCE YOU HAVE FINISHED USING THE AP-

PLIANCE:

• 

Select the minimum position (MIN) using the 

thermostat control.

• 

Turn the appliance off, using the on/off switch.

• 

Unplug the appliance from the mains.

• 

Put the cable back in the cable housing. . 

• 

Remove the water from the water tank.

• 

Clean the appliance.

CABLE COMPARTMENT

• 

This appliance has a cable compartment situ-

ated on its posterior. (E)

PRACTICAL RECOMMENDATIONS:

• 

Classify the garments into groups by ironing 

temperature. The appliance heats up more 

quickly than it cools down, therefore, to avoid 

accidents, minimise energy consumption and 

optimise time, it is advisable to start off ironing 

items that require lower temperatures and pro-

gress to those that need higher temperatures.

• 

Pure wool fabrics (100%) can be ironed with 

the iron set to steam. Select a high steam tem-

perature and place a cotton cloth between the 

iron’s metal surface and the garment.

SAFETY THERMAL PROTECTOR:

• 

The appliance has a safety device, which pro-

tects the appliance from overheating.

TRANSPORTATION

• 

Place the iron correctly into its transportation 

system and lock it, making sure it is seated 

correctly, and lift it upright by holding the iron 

handle..

 CLEANING

• 

Disconnect the appliance from the mains and 

allow it to cool before undertaking any cleaning 

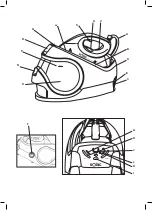
task (Fig.4).

• 

Clean the equipment with a damp cloth with a 

few drops of washing-up liquid and then dry.

• 

Do not use solvents, or products with an acid 

or base pH such as bleach, or abrasive prod-

ucts, for cleaning the appliance.

• 

Never submerge the appliance in water or any 

other liquid or place it under running water.

HOW TO DEAL WITH LIME SCALE INCRUS-

TATIONS:

• 

For the appliance to work correctly it should be 

kept free of limescale or magnesium incrusta-

tions caused by the use of hard water. 

• 

To avoid this kind of problem it is advisable to 

use distilled water.

• 

However, if it is not possible to use the kind of 

water recommended above, you should peri-

odically remove the limescale from the appli-

ance.

• 

A  specific  anti-lime  scale  product  should  be 

used on this kind of product.

• 

Homemade solutions are not recommended in 

the decaling of this appliance, such as the use 

of vinegar.

CLEANING THE BOILER

• 

Check that appliance has cooled down (wait 

at least 3 hours after disconnecting the appli-

ance).

• 

Empty the water tank and after the boiler (O).

• 

To empty the boiler, unscrew the cleaning cap 

(F) in an anti-clockwise direction 

• 

Empty the boiler and close it by screwing the 

cleaning cap by follow the previous procedure 

in reverse (Fig.5).

• 

Fill the water tank (O) with approximately 

500ml of water and add the selected anti-lime 

scale product.

• 

Connect the appliance (with the maximum se-

lected steam) and wait for 20 minutes approxi-

mately in order for the anti-scale product begin 

to take effect.

• 

Let all the steam out (in a suitable place, for 

example the sink) until the water tank is empty.

• 

Wait the appliance to cooled down, rinse the 

water tank and boiler with cold water.

ANOMALIES AND REPAIR

• 

Take the appliance to an authorised technical 

support service if product is damaged or other 

problems arise. Do not attempt to disassemble 

or repair the appliance yourself as this may be 

dangerous.

Summary of Contents for CPP6000

Page 1: ...SAGE MODE D EMPLOI B GELSTATION GEBRAUCHSANLEITUNG FERRO COM CALDEIRA INSTRU ES DE USO CENTRO DI STIRATURA ISTRUZIONI PER L USO STRIJKCENTRUM GEBRUIKSAANWIJZING PARN STANICE N VOD K POUZIT STANOWISKO...

Page 2: ...A B D C N P R Q w S U V O F G H I K L J E...

Page 3: ...Fig 1 Fig 3 Fig 2 Fig 4 Fig 5...

Page 4: ...o mentales reducidas o falta de experiencia y conocimiento si se les ha dado la supervisi n o instrucciones relativas al uso del aparato de una manera segura y comprenden los peli gros que implica La...

Page 5: ...a sustituirlos inmediatamente No poner el aparato en marcha sin agua No utilizar el aparato si alguno de los disposi tivos de puesta en marcha paro no funciona Hacer uso del asa s para coger o transp...

Page 6: ...te el cable antes de enchufar Enchufar el aparato a la red el ctrica Poner el aparato en marcha accionando el bo t n marcha paro El piloto luminoso J se iluminar Girar el mando termostato hasta situar...

Page 7: ...situarlo en el alojamiento cable Retirar el agua del dep sito Limpiar el aparato ALOJAMIENTO CABLE Este aparato dispone de un alojamiento para el cable de conexi n a la red situado en su par te trase...

Page 8: ...En caso de aver a llevar el aparato a un Ser vicio de Asistencia T cnica autorizado No intente desmontarlo o repararlo ya que puede existir peligro PARA LAS VERSIONES EU DEL PRODUC TO Y O EN EL CASO D...

Page 9: ...use of the appliance in a safe way and understand the hazards in volved Cleaning and user maintenan ce shall not be made by chil dren without supervision Keep the iron and its cord out of reach of ch...

Page 10: ...do not use metal or pointed utensils on it Respect the MAX level indicator Fig 2 Disconnect the appliance from the mains when not in use and before undertaking any cleaning task This appliance is for...

Page 11: ...that requires the lowest temperature For example select the temperature for polyester for an article made out of 60 polyester and 40 cotton Wait until the steam ready light J comes on If the red scale...

Page 12: ...to cool before undertaking any cleaning task Fig 4 Clean the equipment with a damp cloth with a few drops of washing up liquid and then dry Do not use solvents or products with an acid or base pH suc...

Page 13: ...red harm ful to the environment This symbol means that in case you wish to dispose of the product once its working life has ended take it to an authorised waste agent for the selective collection of W...

Page 14: ...ou psychique ou par toute personne non familiari s e avec l appareil mais l utili sant de mani re responsable et consciente des risques que suppose son utilisation sous la supervision d une autre per...

Page 15: ...chaque utilisation d rouler compl te ment le c ble d alimentation de l appareil Ne pas utiliser l appareil tant que les acces soires ou les consommables ne sont pas bien ajust s Ne pas utiliser l app...

Page 16: ...e pendant 2 heures dans une pi ce bien ventil e REMPLISSAGE D EAU Il est indispensable de remplir d eau le r ser voir avant de mettre en marche l appareil Retirer le r servoir d eau Remplir le r servo...

Page 17: ...e la temp rature de la chaudi re et de repassage est correcte La fonction ECO peut tre utilis e avec tout type de tissus Toutefois pour les tissus plus pais ou froiss s nous re commandons d utiliser l...

Page 18: ...son effet Laisser sortir toute la vapeur un endroit ap propri par exemple dans un vier jusqu liminer toute l eau du r servoir Attendre que l appareil refroidisse rincer le r servoir d eau et la chaudi...

Page 19: ...nkten k rper lichen sensorischen oder geistigen F higkeiten bzw ohne ausreichende Erfahrung und Kenntnisse benutzt wer den sofern die Verwendung unter Aufsicht oder der ents prechenden Anleitung eine...

Page 20: ...l der Ger teverkleidung besch digt sein ist die Stromzufuhr umgehend zu un terbrechen um einen m glichen elektrischen Schlag zu vermeiden Die erhitzten Teile des Ger tes nicht ber hren da sie schwere...

Page 21: ...e Q Blockierung f r den Transport R Entriegelungstaste des Transportsystems S Einf ll ffnung T Abzug f r die Dampf Aktivierung U Temperaturauswahlknopf V Anzeigelicht B geleisen bereit W Sohle BENUTZU...

Page 22: ...r Funktionen bet tigt hat Das Anzeigelicht der Selbstabschaltung M wird blinken um anzuzeigen dass diese Funk tion aktiviert war Gr ne Farbe Um zur normalen Funktion zur ckzukehren m ssen Sie lediglic...

Page 23: ...ung auf Fig 5 F llen Sie den Wassertank O mit ca 500 ml Wasser und f gen Sie das gew nschte En tkalkungsprodukt hinzu Schlie en Sie das Ger t an Einstellung auf maximale Dampfstufe und warten Sie etwa...

Page 24: ...om gua PORTUGU S PT Caro cliente Obrigado por ter adquirido um eletrodom stico da marca SOLAC A sua tecnologia design e funcionalidade alia dos s mais rigorosas normas de qualidade ga rantir lhe o uma...

Page 25: ...entarem defei tos Substitua os imediatamente N o coloque o aparelho em funcionamento sem gua N o utilize o aparelho se algum dos dispositi vos de ligar desligar n o funcionarem Utilize a s pega s para...

Page 26: ...parelho Encha o dep sito respeitando o n vel MAX P Fig 1 Fig 2 Volte a colocar o dep sito no respetivo aloja mento assegurando se de que fica devida mente encaixado Certifique se de que a tampa de lim...

Page 27: ...a teci dos muito grossos ou com vincos recomenda mos lhe que utilize a fun o de sa da de vapor m xima para garantir resultados timos UMA VEZ CONCLU DA A UTILIZA O DO APARELHO Selecione a posi o m nima...

Page 28: ...etamente o vapor num s tio apropriado por exemplo no lava loi as at que se acabe toda a gua do dep sito Espere que o aparelho arrefe a e enxag e o dep sito de gua e a caldeira com gua fria ANOMALIAS E...

Page 29: ...sensoriali o mentali compromesse solo in presen za di adeguata supervisione o se adeguatamente istruiti in merito all uso in condizioni di sicurezza e se in grado di comprendere i pericoli connes si a...

Page 30: ...sare l apparecchio se gli accessori o i materiali di consumo non sono correttamente inseriti Non utilizzare l apparecchio se gli accessori presentano dei difetti Sostituirli immediata mente Non utiliz...

Page 31: ...pparecchio Riempire il serbatoio rispettando il livello MAX P Fig 1 Fig 2 Ricollocare il serbatoio nel suo alloggio assi curandosi di incastrarlo correttamente Prima di collegare l apparecchio verific...

Page 32: ...ilizzare la funzione di uscita massima del vapore per garantire dei risultati ottimali UNA VOLTA CONCLUSO L UTILIZZO DE LL APPARECCHIO Selezionare la posizione di minimo MIN me diante il selettore di...

Page 33: ...cqua raccomandato in precedenza si dovr effettuare un trattamento periodico di decalcificazione dell apparecchio Per far ci si dovr utilizzare un prodotto an ticalcare specifico per questo tipo di app...

Page 34: ...k aan ervaring en kennis gebruikt worden als zij voor het gebruik van dit apparaat onder toezicht staan of pas sende aanwijzingen hebben gekregen voor het veilige ge bruik van dit apparaat en zij de m...

Page 35: ...of benodigdheden niet correct aan gekoppeld zijn Gebruik het apparaat niet als de aangesloten accessoires of verbruiksgoederen storingen vertonen Vervang ze onmiddellijk Het apparaat niet aanzetten zo...

Page 36: ...male waterniveau MAX P Fig 1 Fig 2 Plaats het reservoir opnieuw in het koffiezeta pparaat zorg ervoor dat het goed vast zit Controleer dat de reinigingsdop goed vastge draaid is en goed dicht is voord...

Page 37: ...ker uit het stopcontact Rol de kabel op en berg deze op in het hier voor bedoelde snoervak Verwijder het water uit het reservoir Het apparaat reinigen SNOERVAK Dit apparaat beschikt over een opbergvak...

Page 38: ...toring naar een erken de Technische Dienst Probeer het apparaat niet zelf te demonteren of te repareren want dit kan gevaarlijk zijn VOOR EU VERSIES VAN HET PRODUCT EN OF INDIEN VAN TOEPASSING IN UW L...

Page 39: ...u Udr ujte ehli ku a jej kabel kdy je nap jena nebo se och lazuje mimo dosah d t mla d ch 8 let Tento p stroj nen hra ka i t n a dr bu nesm j prov d t d ti samy bez dozoru ehli ka se nesm pou vat jest...

Page 40: ...ou v n m Neukl dejte ani nep epravujte p stroj pokud je st le hork Pro spr vnou funkci udr ujte ehlic plochu ve vhodn ch podm nk ch nepou vejte p es kovov p edm ty kovov sou sti ehlic ho prkna knofl k...

Page 41: ...a spr vn teplota OVL D N PROUD N P RY P stroj m ovl dac knofl k S kter umo uje ovl dat pr tok p ry VERTIK LN NAPA OV N Je mo n ehlit zav en z clony od vy na v ku apod Chcete li tak u init postupujte p...

Page 42: ...je nedoporu uj I T N ZA ZEN Zkontrolujte zda se p stroj ochladil po kejte alespo 3 hodiny po odpojen p stroje Vypus te n dr na vodu a bojler O Pro vypr zdn n oh va e od roubujte v ko F proti sm ru hod...

Page 43: ...ci fizycznej sensorycznej lub umys owej lub nieposiadaj ce do wiadczenia i wiedzy je eli by y one nadzo rowane lub odpowiednio przes zkolone w zakresie korzystania z urz dzenia w spos b bezpie czny i...

Page 44: ...akcesoria lub os prz t do niego s uszkodzone Nale y je w w czas natychmiast wymieni Nie w cza urz dzenia je li nie zawiera wody Nie u ywa urz dzenia je li jaki element w czenia wy czenia nie dzia a Ab...

Page 45: ...a Wyj pojemnik na wod Nape ni pojemnik nie przekraczaj c maksymalnego poziomu MAX P Fig 1 Fig 2 W o y pojemnik na filtr do przegrody upew niaj c si e jest poprawnie zamontowany Przed w czeniem urz dze...

Page 46: ...t funkcj je dynie wtedy kiedy temperatura parownika i e lazka b d prawid owe Funkcj ECO mo na u ywa do wszystkich typ w tkanin Niemniej jednak do tkanin grubych lub pogniecionych zalecamy u ywanie fu...

Page 47: ...przeciw kamieniowi Pod czy urz dzenie w pozycji maksymalnej prasowania z u yciem pary i zaczeka oko o 20 sekund aby rodek odwapniaj cy zacz dzia a Wypu ca par w dogodnym miejscu na przyk ad np na zlew...

Page 48: ...lost pokia dostali pokyny na be zpe n pou vanie spotrebi a a uvedomuj si pr padn nebe zpe enstvo istenie a dr bu nesm vyko n va deti bez dozoru Ke je ehli ka zapnut alebo sa ochladzuje mus by ulo e n...

Page 49: ...om stave a nepou vajte na om kovov alebo ostr n stroje Sledujte indik tor hladiny MAX Fig 2 Zariadenie odpojte od elektrickej z suvky ke sa nepou va a v dy pred jeho isten m T to v ha je ur en iba pre...

Page 50: ...s vyzna en na ehlen ch odevoch Teplota pre syntetick vl kna polyester nylon Teplota pre hodv b a vlnu Teplota bavlnu maxim lna teplota pre parn ehlenie Max teplota pre bielize Ak sa odev sklad z r zny...

Page 51: ...nastavenou na paru Nastavte na vy sok teplotu a bavlnen tkaninu polo te medzi kovov plat u ehli ky a odev BEZPE NOSTN TEPELN OCHRANA Toto zariadenie je vybaven bezpe nostn m zariaden m ktor ho chr ni...

Page 52: ...EBO V PR PADE E JE TO VO VA EJ KRAJINE PO ADOVAN EKOLOGICK LIKVID CIA A RECYKLOVA TE NOS TOHTO V ROBKU Materi ly z ktor ch je vyroben obal tohto za riadenia s ur en na zber klasifikovanie a syst m rec...

Page 53: ...i szenzoros s szelle mi k pess gekkel rendelke z szem lyek illetve olyanok akik nem rendelkeznek kell tapasztalattal s ismeretekkel kiz r lag fel gyelet mellett vagy akkor haszn lhatj k ha megfelel t...

Page 54: ...a felszerelt kieg sz t k hib sak Azonnal cser lje ki ket Ne haszn lja a k sz l ket resen Ne kapcsolja be a k sz l ket v z n lk l Ne haszn lja a k sz l ket ha a be kikapcsol nem m k dik A k sz l k k zb...

Page 55: ...1 Fig 2 Helyezze vissza a tart lyt a h z ba gyelve arra hogy helyesen legyen behelyezve A k sz l k bekapcsol sa el tt bizonyosodjon meg arr l hogy a biztons gi sapka szorosan fel legyen csavarva HASZ...

Page 56: ...k sz l ket az elektromos aljzatb l Helyezze vissza a k belt a k belh zba Cser lje ki a vizet a v ztart lyb l Tiszt tsa meg a k sz l ket K BELTOK Ennek a k sz l knek a h ts r sz n tal lhat egy k beltok...

Page 57: ...zt egy felhatalmazott m szaki gyf ls zolg lathoz Ne pr b lja sz tszedni vagy me gjav tani a k sz l ket mert vesz lyes lehet EU S TERM KV LTOZATOKHOZ S VAGY AZ N ORSZ GA ESETLEGES K VETEL M NYEI ESET B...

Page 58: ...BG SOLAC 8...

Page 59: ...BG 16 c MAX Fig 2 e MIN...

Page 60: ...BG A B C D E F G ECO H ECO I J K L Stand M stand by N O P Q R S T U V W 2 MAX P Fig 1 Fig 2 J Max 60 40 J K L...

Page 61: ...BG S U S STAND BY stand by 8 M ECO MAX ECO ECO MIN E 100 Fig 4...

Page 62: ...BG pH 3 Fig 5 O F O 500 20 U 2014 35 UE 2014 30 UE 2011 65 U 2009 125 CE...

Page 63: ...use sau f r experien i cuno tin e n cazul n care ace tia sunt supraveghea i sau au fost instrui i cu privire la uti lizarea aparatului ntr un mod sigur i n eleg pericolele impli cate Cur area i ntre i...

Page 64: ...ntru a l apuca sau deplasa Nu r sturna i aparatul n timpul utiliz rii sau dac este conectat la re eaua de alimentare Pentru a men ine tratamentul antiaderent n stare bun nu folosi i ustensile metalice...

Page 65: ...i aparatul n func iune ac ion nd butonul pornire oprire Indicatorul luminos J se va aprinde Roti i butonul termostatului n pozi ia tempera turii dorite Nu utiliza i temperaturi mai mari dec t cele in...

Page 66: ...e nc lze te mai rapid dec t se r ce te prin urmare pentru a evita accidentele minimiza consumul de energie i optimiza timpul este recomandat s ncepe i s c lca i articole care necesit o temperatur mai...

Page 67: ...lele din care este format ambalajul acestui produs sunt incluse n sistemul de co lectare clasificare i reciclare Dac dori i s le elimina i utiliza i pubelele publice corespunz toare fiec rui tip de ma...

Page 68: ...AR 3 O F Fig 5 005 O 02 WEEE 2014 35 EU 2014 30 EU 2011 65 EU 2009 125 EC...

Page 69: ...AR U S STAND BY 8 stand by M ECO ECO MAX ECO ECO MIN E 001...

Page 70: ...AR ECO H I J K Stand L stand by M N O P Q R S T U V W MAX Fig 1 Fig 2 P J Max 04 06 J K L S...

Page 71: ...AR MAX Fig 2 MIN A B C D E F ECO G...

Page 72: ...AR SOLAC 8 8 61...

Page 73: ...s de vrez vous adresser l un de nos services d as sistance technique agr s Pour savoir lequel est le plus proche vous pou vez acc der au lien suivant http solac com Vous pouvez aussi nous contacter po...

Page 74: ...e http solac com Ak po adujete aj s visiace inform cie m ete sa obr ti na n s Tento n vod na obsluhu a jeho aktualiz cie si m ete prevzia z lokality http solac com HU GARANCIA S TECHNIKAI SEG TS GNY J...

Page 75: ...0 LB L BANO MIDDLE EAST Imasdounian Building 701064 Zalka Beirut 961 1 887 501 LT LITUANIA EUROPE Strazdo g 70A LT 48460 Kaunas 8 37 759025 MAR MARRUECOS AFRICA Avenue 2 Mars R sidence NASSRALLAH Appt...

Page 76: ...solac com Espa ol ES English EN Fran ais FR Deutsch DE Portugu s PT Italiano IT Nederlands NL esky CS Polski PL Slovensk SK Magyar HU BG Rom n RO AR Model CPP 6000 Rated Power 220 240V 50 60Hz 2000 24...

Reviews: