background image

11

OPERATION

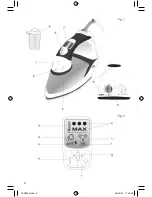
•  Plug the Compact Vapor Generator into the mains. A buzzer will sound, the display will light up automa-

tically and the thermometer symbol will appear on the blink alongside temperature position 1 (•) and the 

medium steam position Fig.2. In addition, an icon will appear with the scale-preventing cartridge, for 30 sec, 

indicating that your iron has a scale-prevention system Fig 2 (e). To replace it, follow the instructions in the 

section “ANTICALC - SYSTEM”. By default, the iron marks these positions when it is switched on.

Temperature selection

•  With your Compact Vapor Generator you will easily know when it reaches the selected temperature and 

is ready for ironing, as on the communication display the thermometer icon will cease to blink and at the 

same time a buzzer will sound. 

Fig 2.

•  The  CVG  has  4  temperature  positions  for  you  to  choose  between  by  pressing  the  temperature  selector 

button 

Fig 2 (h).

 If you press once, another dot will appear alongside the one already there (••), indicating 

that it is at temperature level 2. The thermometer will go on the blink again until the selected temperature 

is reached. When it has reached it, the warning buzzer will sound and the thermometer will cease to blink 

Fig 4.

 Temperature levels 3 and MAX are selected in the same way.

•  From the MAX temperature position, if you press the button again, the iron will revert to the initial position 

with 1 temperature dot, and so on. Press the temperature button for 2 seconds to disconnect the iron. To 

restart it, simply press the button again.

Steam selection

•  The Compact Vapor Generator has two steam positions; medium steam (20gr/min) and maximum steam 

(45gr/min). The medium value always appears by default when the iron is switched on. 

•  To  obtain  maximum  steam,  simply  press  the  steam  selector  button  once 

Fig  2  (i)

,  and  the  steam  icon 

will appear in the display at its highest flow. 

Fig 5

. To revert to medium flow, you just have to press the 

selector button again. 

Fig 2 (i).

•  When you have chosen the appropriate temperature and steam flow for the garment, press the steam 

On-

Off

 switch 

Fig 6 (g)

 once and you may start to iron

. It is not necessary to be pushing the steam button 

continually

, just press once and the steam will issue without interruption. To cut off steam output, press 

the steam 

On-Off

 switch 

Fig 2 (g)

 again and it will cease to issue automatically.

•  ECO-INTELLIGENT: this Solac Compact Ironing System includes a device for disconnecting the steam 

function after 3 seconds of not detecting any movement. This ensures lower power consumption as 

well as greater autonomy of the tank (lower water consumption).

•  The steam function switches back on automatically when the slightest movement of the Compact 

Ironing System is detected or when any of the steam outlet buttons is pressed.

AUTOMATIC SWITCH OFF: AUTO - PAUSE

•  The Compact Vapor Generator has an automatic switch-off system. It is switched off automatically 3 minutes 

after  the  last  time  it  was  used. This  means  that  once  the  device  is  actuated,  the  CIS  ceases  to  heat  and 

begins to cool down. At that moment a buzzer will sound and the icon 

Fig 2 (f)

 will appear on the blink 

for  5  seconds  on  the  illuminated  display,  and  it  will  continue  blinking  afterwards  on  the  display  when  it 

is not lit up 

Fig 7,

 indicating that the appliance has been switched off. To switch it back on, just move it 

slightly or else press any of the three control buttons 

Fig 2 (g, h, i

). The CIS will revert to the temperature 

and steam position it had before being switched off.

•  Remember that the period between being switched off and switched back on again will affect the time 

that the CVG may need to regain the temperature selected previously.

IRONING RECOMMENDATIONS

•  Since the working of this model is similar to an ironing centre and due to its strong flow of steam at Max, 

45 gr/min, we recommend you to iron with medium steam at temperature positions 1 and 2, and maximum 

steam  for  temperature  positions  3  and  Max. We  also  recommend  you  to  iron  first  with  steam  (the  level 

appropriate  to  the  garment  you  are  going  to  iron)  and  go  over  the  clothes  dry  to  remove  the  moisture 

and obtain results comparable with professional pressing.

CVG9800.indd   11

28/10/09   17:40:57

Summary of Contents for CVG 98 series

Page 1: ...DI STIRATURA COMPATTO ISTRUZIONI PER L USO COMPACTE STRIJKINRICHTING GEBRUIKSAANWIJZING EHL C CENTRUM COMPACT N VOD K POUZIT ELAZKO KOMPAKTOWE INSTRUCJA OBSLUGI KOMPAKTN EHLIACI STROJ N VOD NA POUZIT...

Page 2: ...9 13 ENGLISH 13 17 FRAN AIS 18 22 DEUTSCH 23 27 PORTUGU S 27 31 ITALIANO 31 36 NEDERLANDS 36 40 ESKY 40 44 POLSKA 44 48 ESLOVENSKY 49 54 MAGYAR 54 58 58 62 HRVATSKA 62 66 ROMANA CVG9800 indd 2 28 10...

Page 3: ...3 CVG9800 indd 3 28 10 09 17 40 56...

Page 4: ...4 CVG9800 indd 4 28 10 09 17 40 56...

Page 5: ...l sobre una prenda colgada en el armario o puesta en una persona El planchado vertical debe hacerse con la prenda sobre un colgador y aislada de otras prendas elementos o personas Mantenga el CPC en p...

Page 6: ...a Fig 1 8 y manteniendo el CPC en posici n vertical apoyado sobre los pies anti deslizantes de la tapa trasera Fig 3 6 Una vez lleno el dep sito cierre la tapa Compruebe si la prenda a planchar tiene...

Page 7: ...me nor consumo energ tico as como una mayor autonom a del dep sito menor consumo de agua La funci n vapor se conectar de nuevo autom ticamente al detectar el m s m nimo movimiento del Centro de Planch...

Page 8: ...uen a la c mara de vapor de la suela dando como resultado un alargamiento de la vida del CPC Este modelo permite en caso de desearlo reemplazar la resina por una nueva con el objeto de que el CPC se m...

Page 9: ...heets cards and possible stickers that may be on the outside or inside of the appliance that acted as handling protection or sales promotion material Read these instructions before first using your ap...

Page 10: ...n Figure 2 1 by turning it backwards see arrow Due to the high level of water hardness in most areas Solac recommends that you always use distilled or demineralised water for ironing You will thus gua...

Page 11: ...temperature and steam flow for the garment press the steam On Off switch Fig 6 g once and you may start to iron It is not necessary to be pushing the steam button continually just press once and the s...

Page 12: ...n out of water completely you would hear a strange noise from the micro pump In this case press the On Off switch unplug the appliance and fill the tank with water When you press the On Off switch aga...

Page 13: ...une nouvelle cat gorie de licence Woolmark pour le soin des v tements Evolution dispose d une techno logie compl tement nouvelle qui assure la d licatesse et l efficacit du repassage gr ce la g n rat...

Page 14: ...nt pas utiliser cet appareil ATTENTION Lorsque votre appareil sera hors d usage NE LE JETEZ PAS la poubelle confiez le un POINT DE RECYCLAGE ou la d chetterie la plus proche afin qu il soit trait corr...

Page 15: ...au de temp rature 2 Le thermom tre se remettra clignoter jusqu atteindre la temp rature s lectionn e Lorsque celle ci aura t atteinte vous entendrez un bip et le thermom tre s arr tera de clignoter Fi...

Page 16: ...nimum indiqu sur la cuve car vous pourriez endommager la micro pompe et courter la dur e de vie du CRV Pour repasser sans vapeur il suffit de NE PAS actionner l interrupteur On Off de la vapeur Fig 2...

Page 17: ...ant les indications du dessin en appuyant simultan ment la pi ce vers l int rieur jusqu se situer sur le cadenas ferm Fig 9 Assurez vous qu une fois mis le filtre NE RESSORTE PAS de la partie arri re...

Page 18: ...mpakt B gel Station alle Papiert ten Plastikbeutel Folien Pappen und eventuell vorhandene Etiketten die sich am oder im Ger t befinden und beim Transport zum Schutz bzw zur Absatzf rderung dienen Lese...

Page 19: ...e Weise leisten Sie einen Beitrag zum Umweltschutz HAUPTBESTANDTEILE UND ZUBEH RTEILE Fig 1 1 Deckel Wassereinf ll ffnung 2 Sprayd se 3 Spraytaste 4 Wassertank 5 Austauschbare Anti Kalk Kassette 6 Ant...

Page 20: ...kt zu MAX Herunterregeln von MAX zu Punkt Herunterregeln von MAX zu Punkt Ist danach der gew hlte Temperaturbereich erreicht und das Blinken der Temperaturampel a setzt aus ert nt ein akustisches Sign...

Page 21: ...n Dampfschalter i On Off Fig 2 bet tigen Der Wassertank 4 muss beim Trockenb geln nicht entleert werden B GELN MIT DAMPF Dieses Modell erm glicht es Ihnen in der Temperaturstellung 1 mit Dampf zu b ge...

Page 22: ...ldung der Kalk Kassetten Aufnahme die Kassette im Uhrzeigersinn drehen und gleichzeitig nach innen dr cken bis der Pfeil auf das Verriege lungssymbol weist Fig 9 Achten Sie darauf dass die eingesetzte...

Page 23: ...rm rio ou vestida numa pessoa O passa gem vertical deve fazer se com a pe a sobre um cabide e isolada doutras roupas elementos ou pessoas Mantenha o CPC em posi o vertical quando o guardar apoiado sob...

Page 24: ...a de roupa a engomar tem alguma etiqueta com indica o da temperatura a que deve ser engomada Recomendamos que separe as pe as de roupa em fun o da temperatura que requerem para engomar e comece pelasp...

Page 25: ...ossue um sistema de desliga o autom tica Transcorridos 3 minutos da ltima vez que se utilizou este se desactiva de maneira autom tica Isto significa que uma vez que act a o dispositivo o CVG deixa de...

Page 26: ...troca da resina n o implica que se possam evitar os conselhos sobre a dureza d gua mencionados no item ANTES DE COME AR A PASSAR Em caso de n o trocar a resina deste CEC este ver se afectado pelos efe...

Page 27: ...mpire il suo Centro di Stiratura Compatto CPC o riempirlo durante la stiratura segua le istruzioni indicate nel punto PRIMA DI COMINCIARE A STIRARE sconnettendolo dalla rete ed usando il bicchiere che...

Page 28: ...ne del vapore Riempire il serbatoio con l aiuto del bicchiere in dotazione Fig 1 12 senza superare il livello massimo e mantenendo il sistema di stiratura compatto in posizione verticale appoggiato su...

Page 29: ...vapore Fig 2 g e questo smetter di uscire automaticamente ECO INTELLIGENT il sistema di stiratura compatto Solac dotato di un dispositivo di scollegamento della funzione vapore che viene abilitata do...

Page 30: ...dando come risultato un allungamento della vita del CPC Questo modello permette se desiderato di sostituire la resina per una nuova con lo scopo che il CPC si mantenga sempre in ottimo stato In caso...

Page 31: ...iksaanwijzing gaat lezen willen wij u nog enkele aanwijzingen geven zodat u het apparaat dat volgens de meest recente stand van de techniek is ontwikkeld optimaal kunt gebruiken Hier de belangrijkste...

Page 32: ...ent het om ieder risico te vermijden door een door Solac erkende klanten service te worden vervangen omdat hiervoor speciaal gereedschap nodig is Het CSC moet worden gebruikt op een stabiel strijkoppe...

Page 33: ...t een akoestisch signaal en het display wordt automatisch verlicht Het thermometersymbool a knippert en temperatuur 1 verschijnt in de temperatuuraanwijzer b op het display Bovendien is gedurende 30 s...

Page 34: ...het uitschakelen Als het apparaat intussen afgekoeld is moet u er rekening mee houden dat het opwarmen van het apparaat iets meer tijd vergt AANBEVELINGEN VOOR HET STRIJKEN Aangezien de werkwijze een...

Page 35: ...er opvangt en voorkomt dat deze in de stoomkamer en in de stoomkanalen geraken Dit verlengt de levensduur van het apparaat Indien hard water wordt gebruikt en of u wilt de houdbaarheid van de antikalk...

Page 36: ...tov f lie t tky a mo n n lepky kter jsou um st ny vn nebo uvnit spot ebi e a slou jako bez pe nostn ochrana nebo jako reklamn materi l P ed prvn m pou it m spot ebi e si p e t te tento n vod Nep ipoju...

Page 37: ...poka d pou vat destilovanou nebo demineralizovanou vodu Budete m t taky z ruku e kompaktn ehlic t leso z stane v perfektn m stavu tak dlouho jak je to jen mo n Pokud z jak hokoli d vodu nem ete pou v...

Page 38: ...b ru vhodn teploty ehlen a napa ov n od vu stiskn te jednou p ep na p ry On Off Obr 6 g a m ete za t ehlit Nen nutn tisknout p ep na p ry neust le sta ho stisknout jednou a p ra bude vyd v na bez p er...

Page 39: ...vertik ln poloze jak je zn zorn no na Obr 3 I kdy je n dr ka na vodu pln ikonka dopln n vody z displeje nezmiz dokud nestisknete p ep na p ry On Off a neza nete znovu ehlit Jestli e byla voda z n dr k...

Page 40: ...mpaktowego zestawu do prasowania zapewniaj cego jednocze nie jako profesjonalnego prasowania i zalety tradycyjnego elazka elazko Evolution Compact Ironing Centre pomy lnie przesz o testy i spe nia sta...

Page 41: ...kosza na mieci Nale y odda je do najbli szego PUNKTU PRZETWARZANIA lub sk adowania odpad w W ten spos b chronimy rodowisko naturalne G WNE CZ CI SK ADOWE I WYPOSA ENIE Rys 1 1 Zakr tka otworu do nape...

Page 42: ...isku wyboru temperatury h rys 2 Po pierwszym naci ni ciu pojawi si druga kropka obok ju wy wietlanej wskazuj c na wybranie temperatury 2 Termometr ponownie zacznie migota a gdy elazko si rozgrzeje do...

Page 43: ...n Off Prasowanie bez pary NIE naciska przycisku ZA WY On Off i rys 2 Nie ma konieczno ci opr niania zbiorniczka na wod PRASOWANIE Z PAROWANIEM Ten model umo liwia prasowanie z parowaniem przy ustawien...

Page 44: ...m rodkiem zawieraj cym glink B Obudowa Zewn trzne powierzchnie elazka czy ci ciereczk zwil on wod z myd em Nie my obudowy elazka rodkami ciernymi lub rozpuszczalnikami poniewa mog okaza si agresywne w...

Page 45: ...i behom ehlenia v dy ju najsk r odpojte od siete Pri odpojovan ehli ky CVG nikdy ne ahajte za sie ov k bel Ak je sie ov k bel po koden zabr te nebezpe iu a zverte opravu do autorizovan ho servisu stre...

Page 46: ...ehli ku CVG do siete Ozve sa sign l automaticky sa rozsvieti display symbol teplomeru bude bli ka ved a nastavenej teploty v polohe 1 a nastavenie pary v strednej polohe Obr 2 Naviac sa objav ikona od...

Page 47: ...mu centru a tie z d vodu ve mi silnej intenzity naparovania v maxim lne 45 gr min doporu ujeme ehli strednou parou pri teplote v rovni 1 a 2 a maxim lne naparovanie pou va pre teplotu v rovni 3 a MAX...

Page 48: ...ktor sa nach dza na konci spotrebi a proti smeru hodinov ch ru i iek pokia to p jde a pku vyrovnajte s otvoren m z mkom pribli ne 180 a s asne vytiahnite Pri v mene filtra vyrovnajte pku s otvoren m z...

Page 49: ...sszab thatja a f ggetlen g zkamra lettartam t A CVG vagyis a g z llom s v zzel val felt lt se vagy jrat lt se eset n a k sz l ket csatlakoztassa le a h l zatr l majd k vesse A VASAL S MEGKEZD SE EL TT...

Page 50: ...em ny a v z ez rt a Solac a vasal shoz desztill lt vagy demineraliz lt v z haszn lat t javasolja Ezzel biztos thatja hogy vasal ja a lehet leghosszabb ideig marad t k letes llapotban Ha valami miatt n...

Page 51: ...45 gr min A maxim lis g zkibocs t s kibocs t s hoz egyszer nyomja meg a g zmennyis g szab lyoz gombot 2 bra i s a g z jele megjelenik a kijelz n legnagyobb g zkibocs t st jelezve 5 bra Ha ism t k zepe...

Page 52: ...ki m g a s a MAX ll sban a g z sz razabb ez rt annak ellen re hogy ugyanakkora mennyis get bocs t ki a g z nehezebben l that SPRICCEL A v ztart lyban l v v zzel spriccelhet vizet a ruhanem re az erre...

Page 53: ...llom st f gg leges helyzetben tekerje fel a csatlakoz zsin rt a talp ra s ezt r gz tse a leszor t f llel Annak ellen re hogy a csatlakoz zsin r el van l tva egy 360 os forg st biztos t k ny kkel SOHa...

Page 54: ...rosod sokra amelyek a helytelen haszn latb l vagy sz ll t sb l ered nek Ez olyan esetekre is rv nyes amikor a k sz l ket nem megfelel f ldel s dugaljhoz csatlakoztatt k Ugyancsak rv nytelen a garanci...

Page 55: ...55 1 1 2 3 4 5 6 7 2 a b c d e f g h i 8 2 1 Solac 1 12 2 7 CVG9800 indd 55 28 10 09 17 41 03...

Page 56: ...56 1 2 30 2 2 4 2 h 2 4 3 2 20 45 2 i 5 2 i 6 g 2 g ECO INTELLIGENT Solac 3 AUTO PAUSE 3 2 f 5 7 2 g h i 45 1 2 3 CVG9800 indd 56 28 10 09 17 41 03...

Page 57: ...57 2 i 1 20 45 1 3 30 2 d 1 8 3 6 180 9 CVG9800 indd 57 28 10 09 17 41 03...

Page 58: ...a te uz ravnomjernu temperaturu plo e gla ala Broj certifikata M0601 PA NJA Prije nego to po nete koristiti va kompaktni sustav za proizvodnju pare uklonite sve papirnate ili plasti ne vre ice kao i e...

Page 59: ...ora Djeca moraju biti pod nadzorom kako se bi igrala s aparatom Ovaj aparat ne smiju koristiti osobe uklju uju i djecu smanjenih fizi kih osjetilnih ili mentalnih sposob nosti neiskusne osobe i osobe...

Page 60: ...olo aja temperature izme u kojih ete mo i birati priti u i bira temperature Sl 2 h Ako pritisnete jednom pojavit e se jo jedna to kica uz ve jednu postoje u pokazuju i da je to drugi stupanj temperatu...

Page 61: ...razniti spremnik za vodu GLA ANJE S PAROM Ovaj model vam dopu ta gla ati s parom ve u po etnom polo aju Raspola e s dva razli ita protoka pare srednji med 20gr m i maksimalni max 40gr m Za ispravno ko...

Page 62: ...jelove i ili otkloniti neke od mjera i ili oznaka Kad elite spremiti Va ure aj postavite ga u okomiti polo aj omotajte kabel oko stra njeg dijela i pri vr stite ga vezicom Iako kabel za napajanje rasp...

Page 63: ...apa n timp ce c lca i scoate i ntotdeauna aparatul din priz Nu trage i niciodat de cablul de alimentare pentru a scoate aparatul din priz ci trage i de techer n cazul n care cablul de alimentare este...

Page 64: ...e secunde se va afi a o pictogram reprezent nd cartu ul anticalcar care indic faptul c fierul dumneavoastr de c lcat este prev zut cu un sistem anticalcar Fig 2 e Pentru nlocuirea acestuia urma i inst...

Page 65: ...i iile 3 i Max de temperatur De asemenea v recomand m s c lca i mai nt i cu aburi ajust nd debitul n func ie de articolul de mbr c minte pe care urmeaz s l c lca i iar apoi s c lca i rufele uscat pent...

Page 66: ...or de ceasornic respect nd indica iile din desen ap s nd n acela i timp pe pies p n ajunge i la pozi ia reprezent nd lac tul nchis Fig 9 Dup ce a i pus filtrul la loc asigura i v c acesta NU IESE N AF...

Page 67: ...CVG9800 indd 67 28 10 09 17 41 05...

Page 68: ...100 Recycled Paper MOD CVG 98 CVG9800 indd 68 28 10 09 17 41 05...

Reviews: