EN
or tangled cables increase the risk of electric
shock.
•
Do not use the appliance if the cable or plug
is damaged.
•
If any of the appliance casings breaks, im-
mediately disconnect the appliance from the
mains to prevent the possibility of an electric
shock.
•
Do not touch metal parts or the body when it is
operating, as it may cause serious burns.
•
Fully unroll the appliance’s power cable before
each use.
•
Disconnect the appliance from the mains when
not in use and before undertaking any cleaning
task.
•
Do not store or transport the appliance if it is
still hot.
•
Turn the thermostat control to the minimum
(MIN) setting. This does not mean that the iron
is switched off permanently.
•
Any misuse or failure to follow the instructions
for use renders the guarantee and the manu-
facturer’s liability null and void.
•
IMPORTANT: When you want to dispose
of the appliance, NEVER throw it in the rubbi-
sh. Instead, go to your closest CLEAN POINT
or waste collection centre for subsequent treat-
ment. In this way, you will be contributing to
looking after the environment.
•
Before disposing of your used appliance, you
should make it visibly unserviceable and have
it disposed of according to current national le-
gislation.
•
Ask your Distributor, Town Council or Local Au-
thority for detailed information.
MAIN COMPONENTS
1 Main body
2 Power cord
3 Metal soleplate
4 Spray outlet
5 Water filler opening
6 Water tank
7 Spray button
8 Supersteam button
9 Temperature selector
10 Steam selector
11 Temperature pilot light
12 Self clean
BEFORE STARTING TO IRON
Due to the high levels of mains water hard-
ness in most areas, Solac recommends that
you always use demineralised water for iro-
ning. In this way, you will guarantee that your
iron remains in optimal condition for a longer
period of time.
Do not use decalcifying agents or descaling
products in the water tank. Do not use scen-
ted water or ironing water either. These pro-
ducts damage the interior of the steam gene-
ration system.
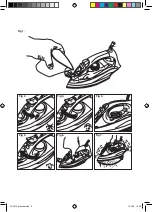
1 With the iron unplugged from the mains, rota-
te the steam selector (10) to the closed posi-
tion (fig. 2).
2 Open the water filler opening (5). Fill the wa-
ter tank without exceeding the maximum le-
vel, using the water beaker provided (12) and
keeping the iron in the vertical position (Fig.
1). When the tank is full, close the cap..
+
When filling the tank, make sure that the wa-
ter does not overflow from the water filler ope-
ning.
3 Check whether the garment to be ironed has a
label indicating the ironing tempera.
+
We recommend you classify the garments ac-
cording to their required ironing temperature
and begin with the garments ironed on the
lowest temperature(•)
SYNTHETIC FIBRES, minimum temperature (•)
SILK, WOOL, medium temperature (••)
COTTON, high temperature (•••)
LINEN, MAX temperature
NOTE: Ironing delicate garments at a tempe-
rature higher than necessary spoils the fabric
and causes burnt residue to stick to the sole-
plate.
If you have any doubts about the temperature
to use for a given garment, perform a test on
a part, which will not be visible, beginning with
the lowest temperature settings
USE
+
This appliance has been designed exclusively
for ironing clothes. Do not use it for any other
purpose.
+
Completely remove all the elements use for
transportation and packaging.
If the appliance is hot, handle it with care and
do not touch the metal soleplate..
Never leave the iron in a horizontal position
when the soleplate is hot. Rest it on its rear
PV2013_plancha.indd 10
15/7/16 15:59
Summary of Contents for Optima 2.0
Page 2: ...PV2013_plancha indd 2 15 7 16 15 59 1 4 3 12 6 2 9 11 7 8 10 5...
Page 3: ...Fig 1 Fig 6 Fig 7 Fig 4 Fig 3 Fig 2 Fig 5 PV2013_plancha indd 3 15 7 16 15 59...
Page 59: ...BG 10 c PV2013_plancha indd 59 15 7 16 15 59...
Page 62: ...4 8 5 1 2 3 10 9 Max 4 15 30 8 5 8 1 10 2 2 9 11 7 7 1 BG PV2013_plancha indd 62 15 7 16 15 59...
Page 69: ...AR PV2013_plancha indd 69 15 7 16 15 59...
Page 70: ...AR PV2013_plancha indd 70 15 7 16 15 59...
Page 71: ...AR PV2013_plancha indd 71 15 7 16 15 59...
Page 72: ...AR PV2013_plancha indd 72 15 7 16 15 59...
Page 73: ...PV2013_plancha indd 73 15 7 16 15 59...
Page 74: ...PV2013_plancha indd 74 15 7 16 15 59...

