EN
end.
Take care with the steam; do not aim it at peo-
ple, animals or delicate objects.
Always iron on stable, solid and smooth sur-
faces.
+
For very delicate garments, place a cloth be-
tween the iron and the delicate garment to
avoid potential markings from the soleplate..
1 Extend the cord completely and plug it into the
mains. The temperature pilot light will turn on
(11). Place the iron in the vertical position.
2 Select the desired operating temperature ac-
cording to the garment you wish to iron (see
“TEMPERATURE SELECTION (fig. 4)”).
3 Select steam ironing (medium or maximum)
or dry ironing as appropriate (see “STEAM
SELECTION”).
4 Hold the iron by the handle, and slide the so-
leplate over the garment to be ironed.
5 After using the iron, set the steam selector
(10) to the closed position and the tempera-
ture selector (9) to position 0.
6 Unplug the power cord from the mains.
7 Empty the water tank (see “EMPTYING THE
WATER TANK”). Wait until the iron is comple-
tely cold and store it in the vertical position in
a safe place.
BEFORE FIRST USE
+
Before using it for the first time, use the
appliance to iron an old cloth or clothing, to
clean the system.
1 Set the temperature selector (9) to the Max
position and wait a few minutes for the iron to
reach the appropriate temperature (the tem-
perature pilot light will go out).
2 Rotate the steam selector (10) until it is in the
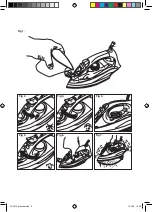
completely open position (fig. 3): steam will
start to come out of the orifices in the solepla-
te.
3 Hold the iron by the handle and slide the sole-
plate over the old towel.
4 When the water tank is empty, no more steam
will be produced. The iron is ready for use.
+
Do not worry if the iron gives off a little smoke
when used for the first time. This will go away
quickly.
TEMPERATURE sELECTION (fig. 4)
1 Turn the temperature selector (9) until it is in
the desired position.
+
When changing the position of the temperatu-
re selector (9), to either increase or reduce the
temperature, several minutes must pass befo-
re the iron reaches the selected temperature.
+
When the selected temperature is reached,
the pilot light will go out (11).
STEAM SELECTION
To obtain steam, set the temperature selector
(9) between the levels •• and Max, depending
on the garment to be ironed.
The iron has 3 steam positions (dry ironing , me-
dium steam flow or maximum steam flow )
1 When the pilot light (11) goes out, indicating
that the desired temperature has been rea-
ched, rotate the steam selector (10) until the
desired steam flow is obtained (fig. 5).
EMPTYINg THE WATER TANK
+
When you finish ironing, always empty the
water from the tank.
1 Set the steam selector (10) to the closed posi-
tion and the temperature selector (9) to the 0
position.
2 Unplug the plug from the mains.
3 Open the water filler opening (5) and place the
iron face down over the sink, gentlyshaking it
to completely empty the tank.
4 Wait until the iron is completely cold and store
it in the vertical position in a safe place.
IRONING RECOMMENDATIONS
STEAM IRONING
For professional ironing results, we recom-
mend you steam iron garments first and then
dry iron them.
SUPERSTEAM
+
If you want more steam while ironing, press
the button (8) two or three times, aim the su-
persteam at the desired area of the garment
and pass the iron soleplate over it to dry it.
Thus is useful for eliminating wrinkles.
+
The supersteam may not be released on
the first occasions. This is normal. Press the
push-button a couple of times. Once the su-
persteam circuit has been primed, the jet of
steam will be released
•
We recommend pressing the control at 5-se-
cond intervals.
VERTICAL STEAM
+
This allows you to remove creases from deli-
cate garments without having to put them on
the ironing board: jackets, overcoats, curtains,
PV2013_plancha.indd 11
15/7/16 15:59
Summary of Contents for Optima 2.0
Page 2: ...PV2013_plancha indd 2 15 7 16 15 59 1 4 3 12 6 2 9 11 7 8 10 5...
Page 3: ...Fig 1 Fig 6 Fig 7 Fig 4 Fig 3 Fig 2 Fig 5 PV2013_plancha indd 3 15 7 16 15 59...
Page 59: ...BG 10 c PV2013_plancha indd 59 15 7 16 15 59...
Page 62: ...4 8 5 1 2 3 10 9 Max 4 15 30 8 5 8 1 10 2 2 9 11 7 7 1 BG PV2013_plancha indd 62 15 7 16 15 59...
Page 69: ...AR PV2013_plancha indd 69 15 7 16 15 59...
Page 70: ...AR PV2013_plancha indd 70 15 7 16 15 59...
Page 71: ...AR PV2013_plancha indd 71 15 7 16 15 59...
Page 72: ...AR PV2013_plancha indd 72 15 7 16 15 59...
Page 73: ...PV2013_plancha indd 73 15 7 16 15 59...
Page 74: ...PV2013_plancha indd 74 15 7 16 15 59...

