background image

etc.

1  Fill the water tank as explained in the “BEFO-

RE STARTING TO IRON” section.

2  Place  the  garment  on  a  hanger,  well  away 

from other garments, people, animals, etc.

Do not discharge steam onto a garment han-

ging in the wardrobe or on a person.

3 Set the steam control (10) to the closed po-

sition and the temperature selector (9) to the 

Max position.

4. Bring the iron close to the garment, in the 

vertical position,( between 15 and 30 cm) and 

press the supersteam button (8) once only. Do 

not position the iron too close to the garment, 

because you could damage it.

5. Wait a few seconds before pressing the button 

(8) again, so as not to damage the garment. 

Most wrinkles can be eliminated with three 

sprays of stea.

DRy IRONING

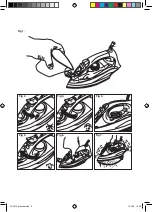
1  If there is water in the tank, turn the steam 

selector (10) to the closed position (fig. 2).

2  Plug in the iron and set the temperature selec-

tor (9) to the desired position.


 The pilot light (11) will go off when the tempe-

rature is reached.

IRONINg WITH sPRAY

Spray can be obtained by pressing the corre-

sponding button (7) when dry ironing or iron-

ing with steam. The iron is at any temperature 

level

• 

Press the spray button (7) as many times as 

you want to use this function. 3D soleplate:

• 

Ceramic soleplate with active tip, equipped 

with a metal body ideal for professional iro-

ning of shirt collars,pockets, trouser creases, 

etc. Caution. The skirt is an active area of the 

soleplate, so it will be hot while ironing.

• 

3D Ironing is a way to help with ironing, use it 

to iron delicate areas like shirt cuffs, pockets 

or skirt and trouser hems. Do not make direct 

contact with the skin, and wait for the iron to 

cool down completely before touching it.

OTHER FUNCTIONS

ANTI-LIMESCALE SySTEM

This iron has an innovative built-in anti-limescale 

system, consisting of a resin filter that retains the 

limescale substances from the water, so these 

cannot reach the steam chamber of the soleplate, 

thus extending the life of the iron.

The existence of this anti-limescale system does 

not mean that the recommendations about wa-

ter hardness mentioned in the “BEFORE STAR-

TING TO IRON” section can be ignored .
ANTI-DRIP SySTEM

The iron incorporates an anti-drip system that 

prevents the iron from dripping, even when it is 

switched ofa.

STORAGE AND CLEANING

Clean the appliance after using it for the first 

time, immediately after each use and after a 

long time without use.

SOLEPLATE

1  Disconnect the iron and allow the soleplate to 

cool down.


Use clay-based, environmentally friendly 

products to clean the solep.

EXTERNAL PART

1  To clean the external part of your iron, use a 

cloth dampened with soapy water.


 Do not use solvents or abrasive products to 

clean your iron, as these could damage some 

of the plastic parts and/or remove some of the 

marks.

2 Store your iron in a vertical position, coiling 

the cord around the base and pressing the ca-

ble into the fixing clip.

Although the power cord is fitted with a 360º 

swivel piece, NEVER FORCE this cord when 

coiling it around the appliance on the first turn.

SELF-CLEANING

It is advisable to carry out the self-cleaning 

operation about once a month, depending on 

the frequency of use and the hardness of the 

water used 

1  Ensure that the tank is half filled with water.

2  Place the iron in the vertical position.

3  Plug in the iron and turn the temperature se-

lector (9) to the Max position.

4  Wait for the pilot light to go off (11) indicating 

that the desired temperature has been rea-

ched.

5  Turn the temperature selector (9) to the 0 po-

sition and unplug the iron from the mains.

6  Place the iron in the horizontal position over 

a sink or an appropriatecontainer and press 

the selfclean button (12), keeping the iron in 

thisposition and swinging it gently from side to 

side. Steam and water willcome out from the 

holes in the iron, flushing out dirt and impuri-


EN


PV2013_plancha.indd   12

15/7/16   15:59

Summary of Contents for Optima 2.0

Page 1: ...UCHSANLEITUNG FERRO DE ENGOMAR A VAPOR INSTRU ES DE USO FERRO DA STIRO A VAPORE ISTRUZIONI PER L USO STOOMSTRIJKIJZER GEBRUIKSAANWIJZING NAPA OVAC EHLI KA N VOD K POUZIT ELAZKO PAROWE INSTRUKCJA OBS U...

Page 2: ...PV2013_plancha indd 2 15 7 16 15 59 1 4 3 12 6 2 9 11 7 8 10 5...

Page 3: ...Fig 1 Fig 6 Fig 7 Fig 4 Fig 3 Fig 2 Fig 5 PV2013_plancha indd 3 15 7 16 15 59...

Page 4: ...o no intente desmontarlo o repa rarlo por s mismo La temperatura de las superfi cies accesibles puede ser ele vada cuando el aparato est en funcionamiento Desenchufar el aparato de la red antes de rel...

Page 5: ...se de su aparato usado deber inutilizarlo de modo visible encarg n dose de su evacuaci n de conformidad a las leyes nacionales vigentes Solicite informaci n detallada a este respecto a su Distribuidor...

Page 6: ...un lugar seguro ANTES DEL PRIMER USO Antes de utilizarlo por primera vez haga fun cionar el aparato planchando un pa o o pren da vieja para limpiar el sistema 1 Coloque el selector de temperatura 9 en...

Page 7: ...iminarse con tres golpes de vapor PLANCHADO EN SECO 1 i el dep sito tiene agua coloque el mando de vapor 10 en posici n cerrado fig 2 t 2 Conecte la plancha a la red y coloque el se lector de temperat...

Page 8: ...rrastrando suciedad e impurezas fig 6 7 Realice la operaci n con precauci n ya que el agua y el vapor salen muy calientes y pueden quemarle 7 Coloque la plancha vertical y espere a que se enfr e por c...

Page 9: ...is in use Unplug the appliance from the mains before refilling the water tank Ensure that the voltage indicated on the name plate matches the mains voltage before plug ging in the appliance Connect th...

Page 10: ...that you always use demineralised water for iro ning In this way you will guarantee that your iron remains in optimal condition for a longer period of time Do not use decalcifying agents or descaling...

Page 11: ...urn the temperature selector 9 until it is in the desired position When changing the position of the temperatu re selector 9 to either increase or reduce the temperature several minutes must pass befo...

Page 12: ...from the water so these cannot reach the steam chamber of the soleplate thus extending the life of the iron The existence of this anti limescale system does not mean that the recommendations about wa...

Page 13: ...s symbol means that it is important to read the operating instructions This symbols means that user must to con sult instructions thoroughly before use This symbol indicates that the appliance should...

Page 14: ...ance Technique agr Ne pas tenter de proc der aux r parations ou de d monter l appareil cela implique des risques Quand l appareil est mis en marche la temp rature des surfaces accessibles peut tre lev...

Page 15: ...faire de votre appareil usag il vous faudra le rendre inutilisable d une fa on bien visible D barrassezvous en en respectant les r gle mentations nationales en vigueur Informez vous sur ce point aupr...

Page 16: ...0 6 D branchez le cordon d alimentation 7 Videz le r servoir d eau voir VIDER LE R SERVOIR D EAU Attendez que le fer soit compl tement froid et rangez le en position verticale dans un endroit s r AVAN...

Page 17: ...10 sur la po sition arr t et le s lecteur de temp rature 9 sur Max 4 Approchez le fer du v tement en position verticale entre 15 et 30 cm et appuyez sur la commande de super vapeur 8 une seule fois N...

Page 18: ...ad quat et appuyez sur le bouton d autonettoyage 11 en lemaintenant dans cette position tout en r alisant de l gers mouvementsde va et vient avec le fer La vapeur et l eau s chapperont par lesorifices...

Page 19: ...austauschen oder sich in der N he befind liche Teile entfernen die sich w hrend der Benutzung bewe gen ebenso vor dem Zusam mensetzen und Auseinander nehmen der Ger teteile sowie vor der Reinigung Be...

Page 20: ...Gebrauch des Ger ts das Stromka bel vollst ndig abwickeln Ziehen Sie den Stecker heraus und lassen Sie das Ger t abk hlen bevor Sie mit der Reini gung beginnen Das Ger t nicht wegr umen wenn es noch...

Page 21: ...beim Umgang mit dem Dampf Rich ten Sie den Dampfstrahl niemals auf Perso nen Tiere oder empfindliche Gegenst nde B geln Sie stets auf einer stabilen festen und glatten Fl che Tipp Legen Sie beim B ge...

Page 22: ...h ideal zum Ausb geln von Falten Es kann vorkommen dass beim ersten Mal kein Superdampf austritt Dies ist normal Dr cken Sie einfach mehrmals auf die Taste Sobald der Superdampfkreislauf gef llt ist t...

Page 23: ...ertank bis zur H lfte gef llt ist 2 Stellen Sie das B geleisen in senkrechte Po sition 3 Schlie en Sie das Ger t an das Netz an und stellen Sie den Temperaturwahlschalter 9 auf Max 4 Warten Sie bis di...

Page 24: ...sist ncia T cnica autorizado A fim de evitar pe rigo n o tente desmont lo ou repar lo sozinho A temperatura nas superf cies acess veis pode ser elevada quando o aparelho est em funcionamento Desligar...

Page 25: ...sua evacua o de conformidade com s Leis nacionais vigentes Solicite informa o pormenorizada a este res peito ao seu Distribuidor C mara Municipal ou Administra o local COMPONENTES PRINCIPAIS 1 Corpo p...

Page 26: ...zar o aparelho pela primeira vez fa a o funcionar engomando um pano ou pe a de roupa velha para limpar o sistema 1 Coloque o selector de temperatura 9 na po si o Max e espere uns minutos at que o fe r...

Page 27: ...vapor 10 na posi o de fechado fig 2 2 Ligue o ferro rede e coloque o selector de temperatura 9 na posi o desejada O piloto 11 apagar se quando atingir essa temperatura ENGOMAR COM SPRAY Pode obter uma...

Page 28: ...o uma vez que a gua e o vapor saem muito quentes e podem queimar 7 Coloque o ferro na vertical e espere at arre fecer completamente 8 Limpe a base com um pano h mido Recordamos que os danos produzidos...

Page 29: ...nza Tec nica autorizzato Non tentare di smontare o riparare l appa recchio in quanto ci potrebbe comportare rischi di sicurezza Quando l apparecchio in fun zione la temperatura delle su perfici access...

Page 30: ...a zione del vapore 1 Con il ferro ancora scollegato dalla rete ele ttrica portare il selettore di vapore 10 sulla posizione di chiusura fig 2 2 Aprire la bocchetta di riempimento 5 Riem pire il serbat...

Page 31: ...emperatura 9 sulla po sizione desiderata Quando si modifica la posizione del selettore di temperatura 9 sia per aumentarla che per diminuirla necessario attendere qualche minuto perch il ferro raggiun...

Page 32: ...rivino alla camera di vapore della base dando come risultato una maggiore durata del ferro La presenza di tale sistema anticalcare non im plica che si possano trascurare i consigli sulla durezza dell...

Page 33: ...rda che i danni provocati dal calcare non sono coperti da garanzia Questo simbolo indica che importante leg gere le istruzioni di funzionamento Questo simbolo indica che l utente deve leggere attentam...

Page 34: ...es chadigd is of wanneer het bes chermdeksel beschadigd of gescheurd is Als het netsnoer beschadigd is moet het worden vervan gen Breng het apparaat naar een erkende Technische bijs tandsdienst Probee...

Page 35: ...fabrikant teniet LET OP Wanneer u dit apparaat niet meer gebruikt en wilt weggooien deponeer het dan IN GEEN GEVAL bij het huisvuil maar breng het voor verdere verwerking naar het dichtstbijzijnde re...

Page 36: ...over het te strijken kle dingsstuk 5 Als u klaar bent met strijken zet dan de stoomregelaar 10 in de stand Gesloten en de temperatuurregelaar 9 op stand 0 6 Haal het netsnoer uit het stopcontact 7 Le...

Page 37: ...r iemand gedragen wordt 3 Zet de stoomregelaar 10 in de stand Geslo ten en stel de temperatuurregelaar 9 in op Max 4 Breng het strijkijzer in verticale stand tot bij het kledingstuk 15 tot 30 cm en dr...

Page 38: ...topcontact 6 Houd het strijkijzer horizontaal boven een wasbak of een geschikte teilen druk op de knop Zelfre i n ighionugd 1d2eze ingedrukt en beweeghet strijkijzer lichtjes heen en weer Uit de gaten...

Page 39: ...se ujist te e nap t uveden na t tku za zen odpov d s ov mu nap t Spot ebi p ipojte k z suvce kter je vybave na zemn c m kol kem a ur ena pro proudov zat en minim ln 10 A Z str ka p stroje mus spr vn s...

Page 40: ...te e va e ehli ka z stane po del dobu v optim ln m stavu Do n dr ky neaplikujte prost edky pro od v pn n nebo odstran n vodn ho kamene Nepou vejte parf movanou vodu ani vodu prod vanou k ehlen Tyto v...

Page 41: ...PA OV N Aby se tvo ila p ra nastavte regul tor teploty 9 mezi stupn a Max v z vislosti na druhu od vu kter chcete ehlit ehli ka umo uje 3 druhy ehlen ehlen za sucha st edn napa ov n nebo maxim ln na p...

Page 42: ...e ehlic plochu vychladnout K i t n ehlic plochy pou vejte produkty kter ne kod p rod VN J STI 1 K i t n vn j ch st ehli ky m ete pou t had k navlh en v m dlov vod K i t n ehli ky nepou vejte abrazivn...

Page 43: ...5 EU o n zk m nap t sm rnic 2014 30 EU o elektro magnetick kompatibilit sm rnic 2011 65 EU o omezen pou v n n kter ch nebezpe n ch l tek v elektrick ch a elektronick ch za zen ch a sm r nic 2009 125 E...

Page 44: ...pr du Przed pod czeniem maszyny do sieci spraw dzi czy napi cie wskazane na tabliczce zna mionowej odpowiada napi ciu sieci Pod cza urz dzenie do sieci elektrycznej o sile co najmniej 10 amper w Wtyc...

Page 45: ...olka wietlna temperatury 12 Funkcji samoczyszczenia PRZED ROZPOCZ CIEM PRA SOWANIA Ze wzgl du na bardzo cz sto wyst puj cy wysoki poziom twardo ci wody firma Solac zaleca ka dorazowe u ywanie do praso...

Page 46: ...2 Ustawi regulator pary 10 w pozycji ca kowi cie otwartej rys 3 para zacznie wydostawa si z otwor w w stopie 3 Trzymaj c elazko za uchwyt przeprasowa nieu ywany r cznik 4 Kiedy zbiornik wody jest pus...

Page 47: ...0 w pozycji zamkni tej rys 2 2 Pod czy elazko do sieci i ustawi regulator temperatury 9 w danej pozycji n Lampka kontrolna 11 zapali si gdy osi gni ta zostanie dana temperatura PRASOWANIE ZE SPRYSKIWA...

Page 48: ...mej pozycji delikatnie przechyla je na obie strony Para i woda b d wydobywa si z otwor w elazka usuwaj c brud i nieczysto ci Fig 6 7 Podczas wykonywania tej operacji nale y zachowa ostro no woda i par...

Page 49: ...lebo opravi preto e to m e by nebezpe n Pr stupn plochy m u by po as prev dzky hor ce Zariadenie pred dop an m vody do n dr ky odpojte od elektrickej z suvky Pred pripojen m od avova a ku zdroju na p...

Page 50: ...lniaci otvor 6 N dr ka na vodu 7 Tlacidlo kropenia 8 Tlacidlo super pary 9 Regul tor teploty 10 Volic pary 11 Indik tor teploty 12 Samostatn ho cistenia PRED ZACIATKOM EHLENIA Kv li vysok mu stupnu tv...

Page 51: ...d je z sobn k na vodu pr zdny nebude vy ch dzat iadna para ehlicka je pripraven na pou itie Neob vajte sa ak pri prvom pou it zo ehlic ky vych dza trochu dymu Toto r chlo prejde VOLBA TEPLOTY fig 4 1...

Page 52: ...xistencia tohto syst mu proti usadzovaniu vod n ho kamena neznamen e odpor cania o tvr dosti vody uveden v casti PRED ZACIATKOM EHLENIA m ete ignorovat SYST M PROTI KVAPKANIU ehlicka obsahuje syst m p...

Page 53: ...symbol znamen e pou vate si mus pred pou it m d kladne pre ta n vod na pou itie Tento symbol znamen e zariadenie nes mie by zakryt Tento symbol znamen e povrch m e by po as prev dzky hor ci Tento pr s...

Page 54: ...es tett technikai szakseg ts get ny jt szer vizbe Ne pr b lja sz tszedni vagy megjav tani szakseg ts g n lk l mert vesz lyes lehet A hozz f rhet fel letek felfo rr sodhatnak a k sz l k hasz n lata sor...

Page 55: ...HASZNOS T SSAL FOGLALKOZ SZOLG LTAT T Ily m d n is hozz j rulhat k rnyezete meg v s hoz A haszn lt k sz l k kidob sa el tt meg kell gy z dnie r la hogy az biztosan nem m k dik s hogy az rv nyben l v j...

Page 56: ...els haszn lat el tt egy r gi ruhadarab ki vasal s val tiszt tsa meg a rendszert 1 ll tsa a h m rs klet v laszt t 9 Max ll s ba majd v rjon p r percig am g a vasal el ri a be ll tott h m rs kletet a h...

Page 57: ...t 9 a k v nt poz ci ba A jelz f ny 11 kialszik amint a k sz l k el rte a k v nt h m rs kletet VASAL S SPRAY VEL A permetez s funkci haszn lat ra a vonat koz gomb 7 sz raz vasal s vagy g z l s mellett...

Page 58: ...z g si s r l st okozhat 7 ll tsa a vasal t f gg leges helyzetbe s v r ja meg am g teljesen leh l 8 A talpat nedves t rl kend vel t r lje le Ne feledje hogy a v zk ltal okozott k rokra a j t ll s nem v...

Page 59: ...BG 10 c PV2013_plancha indd 59 15 7 16 15 59...

Page 60: ...BG a 1 2 3 4 5 6 7 8 9 10 11 12 C Solac 1 10 2 2 5 12 1 3 MAX PV2013_plancha indd 60 15 7 16 15 59...

Page 61: ...BG 1 11 2 __ 4 3 4 5 10 9 0 6 7 1 9 x 2 10 3 3 4 _______ Abb 4 1 9 9 11 9 Max 3 1 11 10 5 1 10 9 0 2 3 5 PV2013_plancha indd 61 15 7 16 15 59...

Page 62: ...4 8 5 1 2 3 10 9 Max 4 15 30 8 5 8 1 10 2 2 9 11 7 7 1 BG PV2013_plancha indd 62 15 7 16 15 59...

Page 63: ...1 2 360 1 2 3 9 Max 4 11 5 9 0 6 7 10 6 8 7 9 10 __ a 2006 95 EU 2004 108 EU 2011 65 EC 2009 125 EC BG PV2013_plancha indd 63 15 7 16 15 59...

Page 64: ...robleme duce i aparatul la un serviciu de asisten tehnic autorizat Nu ncerca i s l demonta i sau s l repara i f r ajutor deoarece poate fi periculos Temperatura suprafe elor ac cesibile poate fi ridic...

Page 65: ...2 Deschide i orificiul pentru alimentarea cu ap 5 Umple i rezervorul pentru ap f r a dep i nivelul maxim folosind recipientul pentru umplere cu ap 12 i in nd fierul de c lcat n pozi ie vertical Fig 1...

Page 66: ...rii fie n sensul sc derii temperaturii p n ca fierul s ajung la temperatura selectat tre buie s treac un interval de timp de c teva minute Atunci c nd temperatura selectat este atins indicatorul lumi...

Page 67: ...re ine substan ele cu piatr din apa astfel nc t acestea s nu poat ajunge la camera t lpii extinz nd astfel durata de via a fierului de c lcat Existen a acestui sistem mpotriva depunerilor de piatr nu...

Page 68: ...d Re ine i c defec iunile datorate depunerilor de piatr nu sunt acoperite de garan ie Acest simbol arat faptul c citirea instru RO c iunilor de utilizare este important Acest simbol arat faptul c util...

Page 69: ...AR PV2013_plancha indd 69 15 7 16 15 59...

Page 70: ...AR PV2013_plancha indd 70 15 7 16 15 59...

Page 71: ...AR PV2013_plancha indd 71 15 7 16 15 59...

Page 72: ...AR PV2013_plancha indd 72 15 7 16 15 59...

Page 73: ...PV2013_plancha indd 73 15 7 16 15 59...

Page 74: ...PV2013_plancha indd 74 15 7 16 15 59...

Page 75: ...PV2013_plancha indd 75 15 7 16 15 59...
Page 76: ...l Es English EN Fran ais FR Deutsch DE Portugu s PT Italiano IT Nederlands NL esky CS Polski PL Slovensk SK Magyar HU BG Rom n RO AR Model PV2013 Rated Power 220 240V 50Hz 2200 2600W PV2013_plancha in...

Reviews: