12
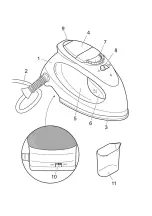
MAIN COMPONENTS
•
After ironing always empty the water tank. If you want to empty it while ironing,
disconnect the appliance from the power supply beforehand.
•
Keep the iron upright when storing it, always on its heel rest, on a stable surface.
•
The iron should not be used if it has been dropped or if water tank is leaking or anything
is broken. If you notice any of these problems take the iron to the manufacturer´s
appointed service centre.
•
Do not leave the appliance unattended when its is connected to the suly mains.
•
The temperature of the soleplate can be high when the appliance is in operation. During
operation, do not touch the soleplate and only lift the iron by its handle, and do not allow
the cord to touch the soleplate.
q
CAUTION! When you want to dispose of the appliance, NEVER throw it in the
rubbish bin. Take it to the CLEAN POINT or waste collection centre closest to your
home for processing. You will thus be helping to take care of the environment.
Before disposing of your used appliance, you should make it visibly unserviceable
and have it disposed of according to current national legislation. Ask your
distributor, Town Council or Local Authority for detailed information.
MAIN COMPONENTS
BEFORE STARTING TO IRON
,
Check the mains voltage and slide the voltage selector Fig.1 to the proper
position using a tool.
,
Make sure you remove the soleplate protector before ironing.
,
Due to high water hardness levels in the mains water supply in most areas, Solac
recommends that
distilled water should always be used for ironing
. This will ensure
that that your iron will remain in optimal conditions for a longer period of time.
,
If for any reason demineralised water is not available, be sure to use water with poor
mineral qualities (soft) or filter your tap water using a purifying jug.
,
Do not use de-scaling agents or anti-limescale products in the water tank.
Scented waters or linen water should not be used. These products damage the
interior of the steam generation system.
1 With the iron unplugged from the power supply, move the steam selector (8) to the
closed position
(fig. 2).
2 Open the water filling inlet (4). Fill the water tank without exceeding the maximum level
with the help of the enclosed beaker (11), keeping the iron in a horizontal position (Fig.
3). After filling the container close the lid.
)
Keep the water filing inlet closed during operation.
)
When loading the tank, make sure the water does not overflow into the water filling
inlet.
3 Check if the garment to be ironed has a tag showing the ironing temperature.
1
Main body
2
Power supply connection cord
3
Metal soleplate
4
Water filling inlet
5
Water tank
6
Steam button
7
Temperature selector
8
Steam Selector
9
Heating light
10
Voltage Selector
11
Filling beaker

