Solar Venture 300W PV Array Operator and Maintenance Manual
October 2020
16
|
A
A
B
C
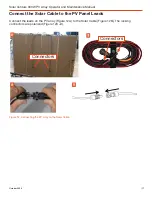
Install the PV Array on the Support Frame
The PV array has eight (8) grommet-reinforced holes, four (4) on the top and four (4) on the bottom
(Figure 10A, orange circles). The support frame has eight (8) complementary panel mounting hooks
(Figure 10B, orange circles). Connect the bottom of the PV array to the lower row of mounting hooks
first and the top row of hooks second (Figure 10B).
B
Connect array to
lower hooks first
Connect array
to upper hooks
second
The hooks on the upper row are part of a sliding tensioning clamp. Unlock and lift the clamp lever
to allow the hook to slide down (Figure 11A). Place the hook into the hole, then tighten (Figure
11B) and lock the clamp (Figure 11C). Repeat for each of the four mounting holes until the array is
secured to the support frame (Figure 11D).
Array backside
Power output
leads
D
Figure 10. Connecting array hooks to support frame
Figure 11. Locking the array into place on the support frame


